Table of Contents
Introduction
Starting the Game
Confirm System Requirements
Installing Star Control II
Start-up
Play Controls
Menu Controls
Keyboard Menu Controls
Joystick Menu Controls
Combat Commands
Default Keyboard Combat Controls
Joystick Combat Controls
Navigation
The Effects of Inertia and Gravity
Interplanetary Travel
Encounters in Interplanetary Space
Entering Planetary Orbit
Planet Types and Descriptions
"Pushing" Up into HyperSpace
HyperSpace Travel
Fuel Use in HyperSpace
Encounters in HyperSpace
Returning to TrueSpace
Ship Commands
Starmap
Alien Spheres of Influence
Using the Autopilot Feature
Scanning a Planet
Specific Scans
Mineral Scan
Biological Scan
Energy Scan
Dispatching a Lander
Planet Surface Exploration
Lander Status Display
Returning to the Flagship
Gathering Minerals
Planetary Hazards
Collecting Life-form Data
Flagship’s Manifest
Checking Cargo
Using Devices
Ship’s Roster
Game Options
Saving a Game in Progress
Loading a Saved Game
Changing Game Settings
Changing Names
Quitting the Game
The Earth Starbase
The Starbase Commander
Transferring Minerals to the Starbase
Outfitting Your Flagship
Flagship Characteristics
Fuel
Flagship Enhancement Modules
Adding and Removing Modules
The Shipyard
Adding and Removing Crew
Combat Vessels
Leaving the Starbase
Encountering Alien Races
Combat Sequence
Conversing with Aliens
Attacking Aliens
Combat
Selecting a Ship
The Battlefield
Navigating Your Ship in Combat
Collision with Asteroids and Planets
Ship Status Displays
Crew
Batteries
The Basics of Blasting
Victory and Defeat
Running Away
Analyzing Enemy Wreckage
Appendix I: Known Alien Races
Races in the Alliance of Free Stars
Races in the Ur-Quan Hierarchy
Appendix II: Play Tips for Star Control II
Maximizing Available Memory
Enhancing Game Performance
Solving Possible Conflicts with TSRs
Known Conflicts
Specifying Sound Card on the Command Line
Loading Problems
Garbled Graphics or Blank Screen
Graphic Adapter Fix
Booting Clean
Technical Support
Online Support
Appendix III: Instructions for SuperMelee
Starting SuperMelee
The SuperMelee Main Screen
Creating a SuperMelee Team
Game Settings
Who Controls Each Team
Input Device
Computer Opponent’s Skill Level
Leaving Settings Menu
Saving and Loading SuperMelee Teams
Fighting in Melee
Picking Ships
Fighting a Battle
Winning SuperMelee
Replaying Melee with the Same Teams
Returning to the Team Edit Screen
Appendix IV: Keyboard Configuration Utility
Appendix V: Combat Vessel Descriptions
Appendix VI: Flagship Modules
Game Credits
Legal Mumbo Jumbo
INTRODUCTION
Welcome aboard. Star Control II will take you on a far journey,
a space odyssey encompassing the realms of science-fiction
and role-playing. This epic adventure spans hundreds of light
years, and evokes a history reaching back over 250,000 years.
As you travel out among the stars, your decisions and actions
will directly affect the destiny of 18 intelligent, star-
faring species, including the inhabitants of Earth. Star
Control II is only in part a sequel to Star Control, which
focused exclusively on the strategy and tactics of the bitter
Ur-Quan Slave War (known by the philosophical as the Great
Crucible of Sentience). You need not have played the first
game to enjoy this one. However, if you have never fought
a Star Control spacebattle, you may wish to practice with
the SuperMelee game before facing enemy forces. The evil
aliens you will encounter are adept at the art of war,
and unforgiving of weakness. The history that follows
details the critical involvement of Earth in the conflict
between the Alliance of Free Stars and the villainous Ur-Quan
Hierarchy. Study what happened, learn from the mistakes of those
that went before. Only in this way will you be prepared for the
mystery, the intrigue and the blazing action of Star Control II.
In the Beginning
The time is in the year 2155. Yet the story begins over two
centuries before, in the 1930’s, a time when surface vehicles
on Earth burned fossil fuels. It’s all hard to imagine now,
of course, getting from place to place in a dangerous noisy
machine with an engine that set fire to spurts of prehistoric
goo. Makes one shudder. Humans had another quaint oddity in
those days; it was a little box called a radio that transmitted
a mindless mix of music and speech. The radio was a harmless
diversion, really, until the radio towers got taller and the
broadcasts got stronger. Until the transmissions began to pulse
out into the vacuum of space, riding electromagnetic waves
throughout the universe. It wasn’t long before the broadcasts
from Earth reached distant stars, and several alien races
took notice of this new evidence of life on the far-off blue
planet. One of the species listening was the Ur-Quan, a life-
form devoid of conscience or character, a race genetically
compelled to conquest. As early as 1940, the Ur-Quan began
to formulate sinister schemes to attack Earth. Other aliens,
meanwhile, benign species that wished only peace, lay plans
to warn Earthlings of the Ur-Quan threat.
The Scrutiny of Earth Intensifies
From their strange worlds many light years away, both good and
evil aliens watched with growing interest as Soviet Cosmonaut
Yuri Gagarin became the first human to orbit the planet in 1961.
Less than a decade later, a tremor swept through the advanced
life-forms beyond the solar system as American Astronauts
Armstrong and Aldrin became the first men to tread Earth’s
satellite moon.
Alien scrutiny of Earth intensified. Meanwhile, the fratricidal
conflicts that had scourged mankind since the species evolved
continued unabated. The Small War of 2015 came close to
obliterating civilization on Earth when nuclear combat broke
out between several Middle Eastern countries. Fortunately
the exchange was relatively small, limited to less than
a dozen warheads, and a global conflagration was narrowly
avoided. Even so, nearly a million people died. The terrible
loss of life and the near-thing of a planetwide Armageddon
sobered heads of government around the world. The leaders of
the industrialized nations and the Third World met at the
United Nations headquarters in New York and agreed to cooperate
in an immediate strengthening of U.N. authority. Within six
months, the U.N. Security Council had assembled a large Peace-
Keeping Army and assumed worldwide control over all weapons of
mass destruction. "Mass-kill" devices were gathered up from
every country that possessed them. The weapons were then
dismantled and their components stored in huge subterranean
bunkers that came to be known as "Peace Vaults." Simultaneously,
the U.N. outlawed the sale of smaller arms. It took nearly a
decade to end all armed conflict on earth. Yet the goal was
finally achieved. Ten years after the U.N. summit, in 2025,
the Earth experienced its first year without war. To ensure
the total destruction of the arms trade, the United Nations
prohibited future weapons research, including the development
of nuclear fusion and fission technologies that might be adapted
for bomb-making purposes. Laser applications were also closely
monitored to prevent the design of "Star Wars" like weapons.
Despite these restrictions, science continued to advance across
a wide spectrum of disciplines, especially in bio-technology.
Brilliant Swiss Scientist Hsien Ho combined the now-complete
human genome map with sophisticated genetic-engineering
techniques and perfected the artificial parthenogenesis
- cloning - of humans at the Zurich BioTeknik in 2019.
Though the clones were, to all external appearances, human,
Hsien Ho modified their genes so that they were not capable
of producing offspring.
Meanwhile, a new religious order, known as Homo Deus, or "The
Godly Men," was founded in the aftermath of the Small War and
the emotional turmoil caused by the destruction of the Holy
Lands. Its charismatic founder, former car salesman Jason
MacBride, built his worldwide following on the thesis that
the Millennium was near. MacBride even predicted a specific
date, March 11, 2046, when Heaven and Earth would join, and
each devout person would be elevated to a divine status. The
movement captured the imagination of millions of poor and
disillusioned individuals worldwide. Within a few years,
"Brother Jason" was one of the most powerful and influential
people on the planet.
For most people on Earth, the following two decades were a
golden time of peace and prosperity. This was not the case
for Hsien Ho’s now adult clones. Seeing Ho’s creations as
a threat to his "Godly Men," Jason MacBride fought to have
the clones declared sub-human. Calling them "Androsynths," or
the "fake men," he used the vast resources of his Homo Deus
organization to strip the clones of their human rights.
Sadly, as the years passed, the Androsynths became little
better than well-treated slaves.
Not unexpectedly, March 11, 2046 came and went without the
arrival of Jason MacBride’s promised Millennium. Citing a "lack
of genuinely devout people," MacBride withdrew from public life
and faded into obscurity, his power and fortunes rapidly declining.
By the middle of the 21st Century, Earthlings had begun to colonize
their solar system. Planet orbiting factories led to lunar bases
and soon there were mining and research outposts scattered across
the Asteroid Belt. Yet the expansion of mankind into deep space
was limited by the relatively slow speed at which spacecraft could
travel. Research began in earnest to develop a ship that could
warp toward distant stars faster than the speed of light.
The Androsynth Rebellion
In retrospect, the Clone Revolt of 2085 was inevitable. Stronger,
smarter and more adaptable than normal humans, the Androsynths
despised and deeply resented their status as slaves. By the late
‘70’s there were tens of thousands of Androsynths distributed
across the planet, many of them doing sophisticated scientific
and technological research. Then, in the spring of 2085, the
Androsynths staged a worldwide rebellion, throwing off their
chains with the help of a sympathetic human underground.
The uprising had been exquisitely planned. Within 24 hours, the
clones had captured nearly every space-flight facility on the
planet. Androsynths working at the centers had secretly fueled
and readied over a thousand spacecraft to carry their people off
this hated planet. Two days after the rebellion began, the freed
clones took over all orbital and lunar bases, leaving not a single
Androsynth on the face of the earth. "Star Control," the recently
established wing of the United Nations’ military forces, made
several attempts to evict the clones. Each time the Star Control
ships approached, the craft were burnt to ashes by colossal MASER
weapons that Androsynth scientists had fashioned out of formerly
benign energy broadcast units.
After two months of futile strikes on the Androsynth strongholds
with conventional weapons, the U.N. leadership decided to use
the means of mass destruction stored in the Peace Vaults. Yet
before the nuclear bombs and laser rays could be reassembled,
Star Control scoutships watching the orbiting bases reported an
amazing sight. Eight of the largest space stations were
accelerating out of Earth orbit, heading towards the periphery
of the solar system. The Androsynths had somehow modified the
huge space-stations for flight, including the recently finished
StarLight Hilton.
Though Star Control chase ships were never able to catch the
space-stations, a ten thruster ore freighter on its way home
from an Asteroid Belt mining base with a hold full of titanium
was able to make a high-V interception of the ragtag fleet. As
the freighter pilot approached the fleeing space-stations, they
suddenly began to glow with a bright energy field that spun around
the ships with blazing speed. According to the pilot’s recorded
testimony, a "great red hole" over 500 meters across appeared
in front of the space-stations. As he watched in disbelief,
the stations flew into the hole one by one and vanished in a
starburst of white lights. When the last of the Androsynth
strongholds had disappeared, the hole collapsed rapidly inward,
imploding finally to nothingness.
Over 30 years would pass before humans encountered the Androsynths
again.
Aliens Contact Earth
In 2112, the largest and most remote space installation, Ceres
Base, was built on the 700 kilometer-wide asteroid of the same
name. Three years later, Ceres Base would be the site of mankind’s
first official contact with an alien life-form - the crystalline
Chenjesu. The alien vessel suddenly appeared out of nowhere, a
scarlet flash of light announcing its presence as it took up a
position 3 kilometers above the asteroid. Almost immediately,
the alien ship began broadcasting this message:
People from Earth: We are the Chenjesu. We mean
you no harm. We come in peace with an urgent message.
Heed these words: there is a horde of conquering
warriors advancing toward your solar system from
deep space. They are called the Ur-Quan. They know
you are here. They will make slaves of you as they
have made slaves of a thousand races across the
galaxy. They will enslave both our species, Chenjesu
and Human, unless we stop them now. We are not alone
in our struggle. There are others who will fight with
us against the Ur-Quan. Together - in an alliance with
the remaining free stars - we may yet turn back the
enemy, defeating the Ur-Quan and its Hierarchy of
Battle Thralls.
We beseech you to join us, for we desperately need
your help. But we do not have much time. What is your
answer?
For over a week, the answer from Earth was stunned silence.
The Alliance of Free Stars
The Chenjesu representatives were patient. Beings of vast intellect
and perception, they understood the psychological shock their sudden
appearance had on the inhabitants of Earth, a people who, amazingly,
had never before had contact with a species other than their own.
The aliens remained in the solar system for several months,
conferring with the political, military and scientific leaders of
Earth. Meanwhile, the Chenjesu’s starship transported U.N. observers
through HyperSpace to visit several worlds that had been attacked by
the Ur-Quan and their Hierarchy of Battle Thralls. The sad evidence
of wholesale slaughter and devastation, and the accounts of dazed
survivors, proved that the Chenjesu account was true. On August 1,
2116, Earth joined the Chenjesu and their other allies - the
Mmrnmhrm, the Yehat, the Shofixti, and unofficially, the Syreen -
to form The Alliance of Free Stars. Following formal ratification
of the pact by the United Nations, Star Control was placed
under the direct authority of the Alliance Command Council. The
Chenjesu expected Earth to play a major role in the Alliance, both
as combatants and suppliers of war material. Even though Earthlings
were technologically primitive, their civilization had thousands of
huge modern factories and millions of skilled workers able to
manufacture both munitions and spacecraft. The tens of thousands of
thermonuclear weapon components stashed away in the Peace Vaults
were an additional bonus which surprised even the Chenjesu.
On the day following Earth’s formal induction into the Alliance,
an alien race known as the Ariloulaleelay appeared, landing first
on the Earth’s moon. They transmitted a request to meet with
Alliance representatives, and a delegation of human and Chenjesu
diplomats journeyed to the lunar surface to establish contact.
The Arilou explained that they too were threatened by the Ur-Quan
and had come to join the Alliance of Free Stars. Alliance
headquarters was consulted, and soon afterwards the Arilous were
welcomed into the coalition. Although the Arilou were extremely
secretive - being unwilling to discuss even the locations of
their homeworlds - they provided additional strength to the
Alliance. This strength was to be tested almost immediately.
The Course of the War
There were many great battles between the Alliance of Free Stars
and the Ur-Quan and their Hierarchy of Battle Thralls. Both the
Alliance and the Hierarchy built hundreds of asteroid forts all
across the spiral arm of the Galaxy. Only a small fraction of
these fortified positions, and the colonies and mining bases
that surrounded them, survived the fighting.
As the war spread, new alien races were drawn into the conflict
until finally there were 14 separate species at war. On the
Alliance side there were the Earthlings, the Chenjesu, the
Yehat, the Mmrnmhrm, the Ariloulaleelay, the Syreen, and the
Shofixti. Fighting with the Ur-Quan were the Mycon, the Spathi,
the Androsynths, the VUX, the Ilwrath, and the Umgah. By 2134 it
was becoming clear to both sides that the Ur-Quan and their
Hierarchy of Battle Thralls were slowly but surely winning the
war.
Captain Burton’s Discovery
On March 16, 2134, Star Control Captain I. Burton, a highly
respected 28-year old female Earthling, was leading a task force
of heavy cruisers on a deep recon into what was believed to be a
friendly sector near the Zeeman-Vela star cluster. Burton was
brilliant and beautiful, with wide-set deep blue eyes, a white,
even-toothed smile and silky straw-colored hair. She also had a
figure that turned heads, even aboard a warship hurtling through
deep space. She had just taken a navigational star fix when the
ships from Earth were suddenly ambushed by an elite force of
Androsynth Guardian combat vessels. The Androsynth ships had been
modified for extended blazer mode, giving them increased speed
and range. The task force was cut to shreds and only Burton’s
vessel, the Tobermoon, escaped immediate destruction. Knowing the
Tobermoon could not outrun the Guardian ships, Captain Burton
engaged in a desperate ploy to save the ship and crew. Fear
crinkling the corners of her deep blue eyes, she warped her
craft toward the heart of Zeeman’s Star, a nearby supergiant
sun. She had a desperate plan, a last ditch ploy she prayed
would confuse the pursuers’ sensors. The bridge crew began to
panic as heat in the cabin climbed to oven-like temperatures.
Two enlisted men finally broke under the pressure and came for
Burton, terror in their eyes and sweat pouring down their faces.
But the captain had guts as well as beauty. She drew her
sidearm and held the mutineers off, gaining the precious
minutes she needed. Finally, the cabin temperature now nearing
150 degrees Fahrenheit, she judged they were close enough to the
titanic star for her plan to work. As the Tobermoon’s outer hull
began to liquify, Burton jettisoned the ship’s entire stock of
nuclear missiles and detonated them. From the Androsynths’
perspective, the vessel they were chasing had exploded when it
flew too close to the superhot sun.
As the Androsynth task force warped out of the system, a severely
damaged Tobermoon slowly emerged from its hiding place behind
Zeeman’s Star. Burton ordered a damage report. As she’d
suspected, the craft sustained severe damage. Worse, the ship’s
engineers informed her they couldn’t make repairs without a
planetfall on a world with a breathable atmosphere. Like most
supergiant stars, Zeeman did not have any Earth-like planets
in orbit around it. The Tobermoon limped through space for almost
a week before Hyper-Radar reconnaissance located a hospitable
planet orbiting the dwarf star Vela. The planet was called
Vela II, and it proved to have both an oxygen rich atmosphere
and deposits of metal ore the humans could refine and use to
repair their ship.
After a successful landing, Burton ordered the engineers to begin
repairs. She sent the rest of the crew off to explore their
surroundings. It was only pure chance that a young ensign chose
to enter an unremarkable cave in a nearby hillside. What he found
within the cave was the most remarkable discovery of the century
- a huge underground installation, the size of a small city,
built in the distant past by an extinct race known only as the
Precursors. The cave was massive, over 2500 meters long and
averaging 50 meters from floor to ceiling. Off the main tunnel
were countless side passages and hidden niches, almost all
crammed with futuristic equipment and hundreds of long-dormant
robots. Halfway down the main gallery, a deep crevasse sliced
across the tunnel floor, evidence of a tremendous prehistoric
earthquake that had offset the adjoining walls by more than ten
meters. Over the centuries, water trickling into the cave from
the planet’s surface had carried countless minute traces of
calcium carbonate that settled out as lime. As the limestone
sediment built up, the deposits covered much of the Precursors’
wondrous machinery with a smooth 14 coating called flowstone
that was now five to ten meters thick in places. Artifacts
of this powerful and technologically advanced alien species
had been found in every quarter of known space. Yet this was
the first time an entire Precursor base had been discovered.
Captain Burton recognized that the wealth of advanced
technology could bring the Alliance victory over the Ur-Quan
- but only if scientists could be brought to Vela II to study
the fantastic find.
Realizing that the surrounding region of space could fall under
the control of the enemy at any time, Burton accelerated repairs
to the Tobermoon and rocketed back to Earth at emergency warp
speed to report her findings to her superiors at Star Control.
Within a week, the Tobermoon was on the return leg to Vela II,
crammed full of hastily assembled scientific equipment and
experts on both the Precursor’s civilization and their advanced
xenotechnology.
Expedition to Vela II
The most respected but least liked Precursor expert in the
expedition to Vela II was Professor Jules Farnsworth. The
professor was well known for his formidable intellect and his
extensive knowledge of the Precursor civilization. Though
recognized as a great mind, Farnsworth was also widely disliked
for his flamboyant egotism and rude impatience with peers who did
not hang on his every word. The man was simply impossible to work
with for anyone with a modicum of self-respect.
It wasn’t long before both his fellow scientists on the mission
and Captain Burton rued the decision to bring Farnsworth along,
for the professor did little but complain during the voyage from
Earth to Vela II. Yet, as irksome as he was, Professor Farnsworth
proved his worth almost immediately upon his arrival at the
Precursor installation. Within hours he located the base’s
deactivated central control computer. While the professor worked
feverishly on the ancient aliens’ computer, Captain Burton
received a fateful message from the Star Control High Command.
As feared, the Ur-Quan had smashed through the defensive lines
drawn between the Mira and Indi constellations. Star Control
reconnaissance ships reported that a large Hierarchy task force
was hurtling toward the Vela star system. Captain Burton was
ordered to evacuate all personnel from Vela II and return to
Earth immediately. Burton’s heart beat like a hammer in her
chest as she read the rest of the message. Star Control was
paranoid that the Precursor’s advanced technology would fall
into the hands of the hated Ur-Quan. To prevent the Hierarchy
from obtaining these ancient secrets, Burton was ordered to
install nuclear devices throughout the Precursor installation.
Once the Tobermoon was in orbit, she was to set off the weapons
and destroy the entire complex.
The non-military members of the Vela II research team were stunned
by the order. Destroy the most significant discovery of the
century? It was unthinkable! Professor Farnsworth was especially
distraught for he was in the middle of several critical research
projects that promised to unlock ancient Precursor technical
secrets. In an uncharacteristic display of courage, Farnsworth
offered to remain behind, promising to detonate the nuclear
bombs if the Ur-Quan found the Precursor caves. The majority
of the other scientists and engineers also asked to stay on
Vela II and continue their research. Finally, Captain Burton
was persuaded that saving the treasure trove of advanced
Precursor technology was more important than obeying a direct
order from the High Command. Still, she didn’t trust Farnsworth
to det-onate the nuclear bombs should the Ur-Quan land. She
decided the only logical thing to do was to remain behind herself.
On August 11, 2134 Captain Burton gave over command of the
Tobermoon to First Officer Chi, with orders to leave the star
system immediately. He was to return to Earth at best speed and
brief the High Command on the expedition’s desperate attempt to
save the Precursor installation. Chi promised to return with a
relief party and supplies as soon as the Ur-Quan attack was
repulsed. After the Tobermoon had lifted-off, the team quickly
moved all their equipment deep into the cave system and obscured
all signs of their presence from the planet’s surface. Now, if an
Ur-Quan reconnaissance ship scanned the terrain, Vela II would
appear uninhabited. The weeks turned into months as Captain Burton
and her team of 200 waited for the return of the Tobermoon.
Marooned
After six months in the caves, food reserves grew critically short
and Captain Burton imposed strict rationing. Professor Farnsworth
found a data bank in the computer memory describing Vela II’s flora
and fauna. Burton felt her spirits soar as Farnsworth pointed out
several plants and animals that could be harvested for food.
The most likely sources of meat were the red-brown Libixx, animals
that looked like winged rabbits, and the six-legged Ortogs, 2,000
pound beasts with pendulous udders that resembled a cross between
a cow and a lizard. Both had cell structures, internal organs and
flesh remarkably similar to mammals on Earth. The Precursor data
also indicated that several plant species - especially the giant
blue-flowered Iccamullon - had the same proteins, sugars and
starches as crops humans had been raising for centuries. Captain
Burton assigned teams to hunt wild animals and harvest food
plants, allowing them out of the caves only under cover of dark
for the first year they were there. Then, gradually as the years
passed, the marooned Earthlings grew confident they were safe from
discovery by the Ur-Quan on this out-of-the-way little planet.
They began to see themselves as colonists and most moved out of
the caves to settle on the surface. Still, with Captain Burton
prodding them, the humans remained cau-tious, building camouflaged
houses and planting crops in purposefully chaotic patterns.
Eventually they gave their planet a name: Unzervalt. It meant,
simply, "our world."
Ten years slipped past, marked by the deaths of a dozen colonists
from accidents or old age, and the birth of 42 children. Several
of the scientists had now become full-time farmers. Others
fabricated old-fashioned bullet-firing rifles and disappeared
into the Unzervalt wilderness, appearing months later clad in
Ortog skins and bursting with tales of strange landscapes and
even stranger life-forms.
Farnsworth’s Breakthrough
After more than a decade of hard work, Professor Jules Farnsworth
announced with considerable fanfare that he had finally succeeded
in unlocking the secret of the Precursor Control Computer. Without
Captain Burton’s permission - indeed without even knowing what would
happen - Farnsworth commanded the computer to initiate its prime
function. The resulting near-disaster almost got the professor
put in the stockade.
Suddenly, the immobile machinery within the cave roared to life.
Huge electrical arcs shot between massive electrodes, incinerating
a wooden storage shack. Robotic vehicles began tearing across the
cavern floor along pre-programmed paths - paths which led them right
through several man-made buildings. A 30 meter tall crane-like
machine detached itself from one wall and swiftly rolled through
the cave, nearly crushing a group of panicked scientists. It was a
miracle that no one was killed in the ensuing chaos as humans fled
the caves in terror.
The next day, robotic vehicles emerged from the cave, and cut down
a nearby forest. They levelled the ground, covered the surface with
some kind of metallic plastic, and then returned to their cave.
Bronzed from the Vela sun, her straw-colored hair pushed up under
her commander’s cap, Captain Burton led a squad of volunteers back
into the caves on a cautious reconnaissance mission. Inside the
main cavern, the squad came upon the robots assembling the spine
of a huge ship - a starship! Although the robots clearly knew the
humans were there, turning to focus benign scanners on the
volunteers several times, they obviously did not consider the
Earthlings a threat. Captain Burton decided it was safe for humans
to return to work in the caves, so long as people kept out of the
robots’ way.
Days later an abashed Farnsworth was finally coaxed back to the
Precursor Control Computer to continue his research. Almost
immediately, the professor discovered two significant facts.
First, the construction process would soon transition out of the
caves and assembly of the starship would continue on the planet’s
surface. Second, as far as Farnsworth could tell, the construction
was going to take a long time.
The "long time" that Farnsworth predicted turned out to be nearly
a decade. The colonists grew accustomed to the framework of a great
starship looming above their tiny village. Day after day, a hundred
robots moved across the surface of the vessel, welding and fitting,
assembling and fabricating.
Then one day, without warning, the construction robots stopped work
and returned underground. They assumed their original positions in
the cave and shutdown completely. The cave was exactly the way the
research team had first found it – silent, motionless. A flustered
Professor Farnsworth frantically asked the Control Computer for an
explanation, and got an immediate answer. There were not enough raw
materials left to finish the vessel, nor were there suitable
substitutes any-where on the planet. A week of tests by Burton
and her team proved the ship was complete enough to blast off from
the surface of Vela II. But it would have to cruise slowly through
HyperSpace, lightly armed, and with only enough room for a skeleton
crew.
There was another problem. The controls for the vessel were not
designed for humans. It became obvious from the interior layout of
the starship that the Precursors were giants, and seemingly not
bipedal. Levers were almost impossible to move, three people were
required to actuate a single switch, and the chairs, beds and other
furnishings were better suited for a wooly mammoth than a human.
Some kind of automated control system was needed. After mulling over
the problem for several days, Captain Burton decided that the only
answer was to remove the Central Control Computer from the cave and
configure it to run the ship. Surely Professor Farnsworth knew enough
about the Precursor com-puter system to give it whatever commands
were necessary to take the ship back to Earth. Despite vehement
protests from Farnsworth, the Captain ordered the Precursor’s computer
installed in the vessel. After 20 years marooned on Vela II, the
colonists were at last ready to return to Earth.
Or were they? Pressed to begin programming the computer, Farnsworth
broke down and admitted he didn’t have the foggiest idea how to do it.
It turned out he had never understood the incredibly complicated system.
Instead, for years he had secretly employed the natural computer talents
of a precocious young genius. This gifted child, now a young man, had
been born on Unzervalt – the son of an officer from the Tobermoon and a
Research Team engineer. Each night, after Farnsworth left the Control
Computer console, the young boy had crept into the caves and tinkered
with the computer. Within a few months, the child had established a
rapport with the computer far beyond anything Farnsworth had
accomplished. When the Professor discovered the boy’s nocturnal acti-
vities, he used gifts and phony promises to win the child’s
confidence, then talked the young genius into activating the entire
complex. This time, the Captain did throw the Professor into the
stockade.
Then Burton called the young man into her office and proposed a plan.
She would command the starship, and he would serve as pilot, acting
as the interface with the starship’s Precursor computer. With
trepidation, you accepted.
The Return to Earth
After 3 months of intensive crew training, Captain Burton felt it
was finally time to leave Unzervalt. You weren’t so sure, weren’t
entirely comfortable with your new role as a starship officer.
Burton listened as you expressed your doubts, then put an arm
around your shoulders and reassured you. You’d make a fine pilot.
She’d trust a ship to you any time. Besides, all the plans were set.
The two of you would lead the return to Earth, and once there send
back a rescue ship for the colonists left behind. If necessary,
Burton vowed, you would fight your way through the forces of the
Ur-Quan Hierarchy.
You, above all, will remember that trip, for during the journey you
went through a rite of passage. You left Unzervalt a boy and soon
found yourself forced to be a man – to lead bravely and boldly and
wisely. Think back. Do you recall the exhilaration of blasting off
from the tiny planet where you were born – and the sheer terror
later? Three days out, as you approached the perimeter of that
cursed Oort Cloud, you found the Tobermoon – derelict and tumbling
through space. The deep burns along her hull were mute evidence she’d
seen combat. And lost. The discovery was, of course, a great shock to
Captain Burton. Unconsciously she chewed her bottom lip, and for the
first time her handsome face showed the awful strain of the past twenty
years. She’d been engaged to Captain Chi. Through two decades she’d
clung to the hope she’d see him again, kept alive the dream they’d
shared of marriage and children and a life together. Now the dream was
shattered. She knew he was gone, even though there was no body to mourn
over. Strangely, there were no bodies at all on board. And most of the
important ship systems were intact. Do you remember how Burton wondered,
tears brimming in her blue eyes, if Officer Chi and the other crew
members had been taken prisoner? How her words conjured up a picture in
your mind of the Earthlings being tortured – their ordeal provoking mirth
in the soulless Ur-Quan. With a few days work, the engineers brought the
Tobermoon back to life. What came next changed your life forever. With
Captain Burton the only one aboard qualified to pilot the Earth Cruiser,
you were put in command of the Precursor starship. Admit it. Standing
on the bridge – those epaulets the grieving but bravely smiling Captain
Burton pinned on gleaming from your shoulders – you felt proud, sure of
yourself. Hey, truth be told, at that moment you thought you were
invincible.
Your confidence didn’t last long, did it? With the Tobermoon leading
the way, you and Burton pushed your ships out into HyperSpace – the
parallel dimension where distances are fantastically compressed and
interstellar travel feasible. Blazing white flashes surrounded your
vessels and everything took on a crimson hue. Something up there wasn’t
right. Remember? Your body felt like it was in a vise and your head was
spinning. You fought for control, forcing yourself to focus on the soft
voice of Captain Burton radioing a command from the Tobermoon: “Set
course for Earth.”
A day later – you think it was a day, but now, looking back, you can’t
be sure – a sinister shadow began following you through HyperSpace.
It moved fast, real fast. Within a couple of hours it had approached
close enough to interact with your ship’s hyperdrive field, pulling
you both back into TrueSpace. At close range, the enemy ship looked
like a pair of spinning red globes surrounded by a crackling energy
field. Some kind of glowing rod or energy beam connected the red
globes. The alien craft built up speed rapidly as it zeroed in on the
starship you commanded. Burton saw the attack coming and signalled
you to warp out of the area immediately. A moment later you watched
on your command console monitor as the Tobermoon flashed away on a
trajectory to intercept the alien ship. As you pushed up into
HyperSpace, you saw a crackling bolt of energy lance out from the
alien vessel and strike the Tobermoon. Burton’s craft wobbled
violently, then veered off on an erratic course in the general
direction of Unzervalt. The Alien craft was apparently satisfied with
disabling the Tobermoon, for the strange ship made a 180 degree turn
and rocketed at warp speed toward deep space.
Once your starship reached HyperSpace, you radioed the Tobermoon, only
to learn that Captain Burton had been killed by the alien’s unexpected
attack. You felt sick to your stomach. Then you wanted to punch the
bulkhead. You’d been half in love with Burton, you knew that now. Life
stunk!
Captain Burton’s death left you in full command of the mission to find
Earth. You navigated the Precursor starship back on your original
course, your mind swirling with all that had happened. A terrible
doubt overtook you, gnawing at the edges of what had always been your
strong self-confidence. Could you pull this off? You, a son of
Unzervalt, born in a cave, raised on Ortog milk and Libixx meat. You,
a man who’d never set foot in a university, never had formal space
flight training beyond the crash course from Burton? You’d taught
yourself everything, learning from reading computer programs and
watching how engineers and scientists did things. The question ate at
you now; had you been both a good teacher and a good student? Good
enough at both to prepare you for the awesome task that lay ahead?
Time would tell.
And time did tell. Five days after the alien attack you arrived at a
stellar vortex leading out of HyperSpace. Your scanner showed the
vortex spiralling down to a brilliant yellow star. You knew at once
that this was the great star that had given life to your ancestors,
the star your Earthling progenitors called the Sun! You warped down
out of HyperSpace and took a navigational fix. You were just beyond
the orbit of the ninth planet of the yellow star. Earth was the
third planet out from the Sun. With all thrusters on, you can reach
the blue planet in two days. A horrible thought flits across your
mind. Had the Ur-Quan broken through the Alliance defense lines and
attacked your ancestral home? Was there devastation? Had the cities
been obliterated by nuclear weapons and the survivors left irradiated
mutants, genetic freaks roaming the ashen landscape like primal apes?
You’ll know in 48 hours.
STARTING THE GAME
It shouldn’t take much more than 5 minutes to install the game and
begin playing Star Control II. Although we salute the expression of
free will, you will get started faster if you follow the steps below.
Confirm System Requirements
An AT-class IBM-PC compatible computer with a hard drive and 2x
speed CD-ROM drive is required. A 20 MHz 386 machine or better is
recommended. If you have a slower machine see Appendix II.
Star Control II supports VGA and MCGA graphics only.
You will need at least 580,000 bytes of low DOS memory
available when you start the game.
You will need at least 9.2 megabytes available on your hard
disk if you want to play Star Control II from your hard drive
rather than play off the CD-ROM.
Installing Star Control II onto your hard drive
Star Control II can be installed on your hard disk. Here’s how:
1 Turn on your computer.
2 Insert the Star Control Collection CD-ROM into
your CD-ROM drive (usually D or E).
3 In DOS, a DOS Window, or MS-DOS mode, make a
directory for the game on your hard drive
(usually C). Change to the root directory by
typing CD\ <Enter>.
4 At the DOS prompt, type MD STARCON2 <Enter>
to create the “STARCON2” directory.
5 Change to your new directory by typing CD\STARCON2 <Enter>.
6 At the new prompt, type COPY D:\STARCON\STARCON2\*.*
<Enter> where D is the name of your CD-ROM drive.
This will copy the game from your Star Control
Collection CD-ROM to your hard drive, and install
Star Control II on your C drive, in a directory
called C:\STARCON2.
After you launch the game, you will be presented with choices:
Start New Game: The game starts at the very
beginning, prompting you to enter your
captain’s name.
Load Saved Game: You are presented with a
list of saved games to choose from. If you
change your mind and want to start from the
beginning, press the Spacebar.
Start-up
Follow these steps to start the game:
1 Make sure your computer is on.
2 Place the Star Control Collection
CD-ROM in your CD-ROM drive.
3 If you have Windows, exit from
Windows to DOS. If you have Windows ‘95,
restart in MS-DOS mode. If DOS is your
operating environment of choice, you
should already be where you need to be.
4 Change to your CD-ROM drive by typing
the drive name (usually D) and a colon.
Press <Enter>.
5 At the CD-ROM drive prompt, type
STARCON <Enter>.
6 Choose Star Control II in the introductory
menu. When you are shown the picture of a
star, hit the <Space Bar>.
If you have copied the game to your hard drive, exchange the
following steps for their equivalents above:
2 Since the game is on your hard drive, you
don’t need the Star Control Collection CD-ROM
in the drive.
3 Follow Step 3 above.
4 From the root directory of your hard drive
(usually C:) change direc-tories to the
STARCON2 directory by typing CD\STARCON2
<Enter>.
5 At the C:\STARCON2> prompt, type STARCON2
<Enter> to launch the game.
6 When you are shown a picture of a star,
hit the <Space Bar>.
PLAY CONTROLS
Star Control II can be played entirely from the keyboard, or
you can use a joystick for most game activities. Joysticks are
automatically detected and calibrated at runtime, so keep your
joystick centered and motionless until the game begins.
Menu Controls
Many aspects of gameplay are accessed by a system of menus.
Each menu will list various options which allow you to give a
command, select a ship, pick a phrase, etc. To select menu
items with the keyboard, use the cursor arrow keys to highlight
the item you want, then press Enter. In some cases, when you
pick a menu item, you will be given a new sub-menu of options.
To leave a sub-menu and return to the previous menu, press the
Spacebar.
Keyboard Menu Controls
When selecting menu items, the joystick acts just like the
cursor arrow keys. Pressing Button #1 is the same as pressing
Enter, and pressing Button #2 is the same as pressing the
Spacebar. Button #1 selects the highlighted option, and
Button #2 returns you to the previous menu.
Joystick Menu Controls
up
^
Button#2 |
Button#1 |
left <--- ---> right
|
|
v
down
Combat Commands
In combat, you can control your ships with either the joystick
or the key-board. You can redefine the control keys with the
separate program, KEYS.EXE. The KEYS configuration will not be
saved unless you are playing the game from your hard drive. In
the SuperMelee bonus game, there can be two human players, and
each uses a separate joystick or area of the keyboard.
Default Keyboard Combat Controls
Keyboard #1 Keyboard #2
Use Special Power N 1
Rotate Counter-Clockwise M 2
Rotate Clockwise , 3
Thrust . 4
Fire Main Weapon ? 5
Joystick Combat Control
(Up)
Thrust
^
(Up/Cntr Clockwise) Button #2 | (Up/Clockwise)
Thrust & Rotate Special power | Thrust & Rotate Clockwise
Counter Clockwise Y |
\ | /
Button #1 \ | /
Fire \ | /
X \ | /
\ | /
\ | /
(Counter Clockwise) \ | / (Clockwise)
Rotate Cntr Clockwise<------------------------------>Rotate Clockwise
NAVIGATION
The core of Star Control II is space flight, both in combat and
exploration. Whether you are traveling from planet to planet or
from star to star, or engaging in combat, the controls are the
same. To go somewhere, you rotate your ship in the direction you
want to go, and then press the Thrust key.
The Effects of Inertia and Gravity
When ships are navigating in Star Control II, they are under the
influence of two physical forces; inertia and gravity.
Inertia is the tendency of an object in motion to remain in
motion. All moving objects have inertia, and the faster they go,
the more inertia they possess. When you let your foot off the gas
in an automobile it slows and comes to a stop because there are
many forces of friction acting against your motion, like air-
resistance, the roughness of the road, and the car's mechanical
parts rubbing against each other.
In normal space, these resisting forces of friction are virtually
nonexistent. Any object in motion (like a spaceship) will keep
moving at the same speed until something stops it. The only way
for a spaceship to stop itself is to turn in the direction opposite
its line of travel and thrust until it comes to a stop.
Gravity is the natural attractive force that exists between all
objects. This force is usually too small to be noticeable, unless
an object is terrifically massive – like a sun or planet. In Star
Control II, the only situation in which your ship will be affected
by gravity is in space combat. As you approach a planet, its
gravity will begin to affect the course of your vessel, bending
your path toward the center of the planet.
Inertial ships can make use of planets’ gravity fields to achieve
higher than normal velocities by performing the Leyland Gravity
Whip maneuver. To use this trick, simply move past a planet, and
while you are close to the planet, thrust continuously without
rotating your vessel. Then, as you fly away from the world, stop
thrusting and coast at high velocity.
Note: Use caution when performing this maneuver to avoid striking
planets, which can damage your vessel.
Interplanetary Travel
Interplanetary navigation is travel between planets within a single
star system. The interplanetary navigation screen is represented as
a sun surrounded by a number of planets, each situated on an
ellipse describing its orbital path around the sun. As you navigate
your ship toward the center of the star system, the view expands to
show you a more detailed view of the inner planets. When you
approach a planet, the view will expand once more, showing you a
close-up view of the world, plus displaying any moons which may be
orbiting the main planet.
Encounters in Interplanetary Space
Though most of the known area of space is still uninhabited, you
are likely to encounter groups of alien starships anywhere in your
voyages. In the Interstellar view, these ships are represented as
small icons, which can be travelling between planets, or
patrolling space. At typical interplanetary distances, you will
be unable to ascertain the exact configuration of an enemy task
force. The actual composition can be determined only when you make
contact with the ships.
To engage an alien task force, simply bring your ship into contact
with the icon. But beware, the outcome of such an encounter may be
sudden combat.
Entering Planetary Orbit
Once you’re in a star system, you may want to visit the planets
there. Your flagship itself is not designed to land on a planet,
but you can enter a planet’s orbit for a closer look and then
send a Lander down for a more thorough investigation. To enter a
planet’s orbit, maneuver your vessel until it touches the center
of a planet. You will then automatically enter the planet’s orbit.
Planet Types and Descriptions
Planets are aggregated matter which forms around suns. The size,
composition and chemistry of each planet is unique, but the
majority of planets fall into a few general categories which
are described below.
Gas Giants
These planets are huge balls of gas composed of light elements
such as hydrogen or helium. Since gas giants have no surface to
speak of (just an increasingly dense fog of gas), ships cannot
land on this type of planet. Although there has been some
discussion of harvesting the upper atmosphere of gas giants
with enormous “scoop-ships,” your flagship is incapable of
gleaning any useful minerals from such planets. To date, no
complex life-form has ever been found in/on a gas giant;
however, research into this field has been minimal.
Water World
Like Earth, most other water worlds are large rocky planets
with nickel-iron cores, fluid mantles, and a thin shell of
H20 covering some or all of the surface of the planet.
Depending on the distance from primary (the star about which
the planet orbits) the surface can be solid ice, liquid, or
gaseous vapor. Due to the unusual chemistry of water, life
is quite common on water worlds having an average surface
temperature in water’s phase-change range, 0-100° centigrade.
Selenic World
Selenic worlds are small and not dense, being composed of
light, common minerals and metals. Such planets rarely
possess an atmosphere. Earth’s moon, Luna, is a perfect
example of this kind of world.
Dust World
The surfaces of these planets are composed of silicates
and metal oxides, with little or no usable mineral deposits.
The thin atmosphere found on dust worlds will occasionally
support a minimal eco-system.
Hydrocarbon World
Hydrocarbon worlds are similar to water worlds, but instead
of H20 these planets are covered with a layer of richly
varied, inorganic hydrocarbons such as ethanol. Small deposits
of useful minerals have been found on such planets, but they
are most notable for their ability to support life.
Primordial World
Large and rocky, these planets follow the typical metal-core,
silicate sheath configuration found in so many worlds of
this size. The primordial world gets its name from the
conditions found on its surface when the primary supplies
enough energy to volatilize the planet’s dense layer of CO2,
producing a super-thick, incredibly hot atmosphere.
Metallic World
Often found in the first or second orbital position,
metallic worlds have been subjected to such incredible
heat that the lighter materials burn-off the planet,
leaving a small, dense ball of heavy metals and minerals.
Although such metallic worlds are exceptionally valuable
finds for their abundant resources, beware their
occasionally intense gravity fields.
Reduction World
The reduction world is very similar to the water world,
except that the predominant surface gas is not oxygen,
but instead methane and ammonia.
Radioactive World
These rare planets have a much higher than normal surface
concentration of valuable radioactive elements, indicating
either atypical gas composition, or unusual mantle
convection processes.
Other Planet Types
There is no doubt that there are many other, less common
types of planets to be found in the galaxy, each with their
own unique characteristics. It is up to you to locate these
unknown worlds, and determine their nature.
“Pushing” Up into HyperSpace
To leave a star system and enter HyperSpace you will first
have to leave the gravitational field of the primary star.
To do so, fly away from the star until you reach the outer
limits of the system. At this point your flagship will
automatically engage its “pushers,” lifting you out of
TrueSpace, and projecting your ship into the adjacent
dimension of HyperSpace.
HyperSpace Travel
All the myriad ways between the stars may be reached through
HyperSpace, a conveniently accessible alternate dimension
which shares time-space with our own universe. The set of
physical laws in HyperSpace is substantially similar to our
own (allowing starships and their occupants to survive there),
but certain key differences involving the speed of light
permit fantastically accelerated transit between stars.
While in HyperSpace, you can monitor your surroundings via
the small tactical display in the lower right corner of the
screen. On this display, stars are shown as bright dots and
alien vessels are shown as dark dots. The Ariloulaleelay, who
seem most familiar with the nature of HyperSpace, have
intimated that there are other “things” in HyperSpace, some
of which are “good,” while others are “extremely bad.”
Presumably, these “things” the Arilou refer to would also
appear on the tactical display, though what they would look
like is unknown.
Things look strange in HyperSpace. The subtle differences
in physics cause a substantial red-shift in the visible
spectrum, casting everything in a blood red light. The
sudden explosions of bright light and coruscating energy
bursts which are common in HyperSpace have proved harmless,
and it is theorized that these are manifestations of objects
which are moving quickly through HyperSpace into adjacent
dimensions.
Fuel Use in HyperSpace
In HyperSpace, gravity and inertia do not function as they
do in our dimension. Once you cease thrusting, your ship
will gradually come to a halt, as though some invisible
force were constantly dragging on your vessel. This is,
in fact, the case. To continue travel, you have to thrust
constantly, and this uses huge amounts of fuel. As a general
rule: DO NOT RUN OUT OF FUEL IN AN ALIEN UNIVERSE. Few have
lived to tell of the experience.
Encounters in HyperSpace
All known star-faring races use HyperSpace as their transit
corridor between stars. Occasionally, such ships may meet
in this alien dimension, and the intersection of their masses
causes them both to drop down from HyperSpace into the
interstellar void. The confrontation between ships then takes
place in the traditional manner, and is resolved in words
and/or weapons exchanges.
Returning to TrueSpace
The passage back to TrueSpace is made via the trans-
dimensional vortices produced by stellar gravity fields.
To enter a star system, move your ship onto the center of a
stellar vortex. You will automatically transition out of
HyperSpace and into the star system.
SHIP COMMANDS
Your flagship is capable of many activities beyond
navigation. You access these abilities through the Flagship
Command Menu. You can enter this menu from Navigation by
pressing the Spacebar or Button #2, then moving the
highlight to the desired command and pressing Enter. The
Commands are as follows:
Starmap
This command displays a map of the stars in the known
region of space.
To find out the name of a star, move the flashing highlight
on top of it. The name of the star and the fuel necessary
to reach it will then be shown in the secondary and tertiary
data displays at the top of the screen. The grey oval
surrounding your position represents your range with your
present fuel supply. Remember, you use fuel landing on planets
and escaping from battle, so this range circle can change even
if you are not in HyperSpace.
Note: Planetary excursions require fuel, and may significantly
affect your range.
You can expand the Starmap to get a clearer look at a viewed
region by pressing the Insert key. Use the Delete key to
return to the original view. To scroll your view of the
Starmap when you are zoomed-in, move the cursor off the
edge of the screen, and the view will automatically re-
center.
Alien Spheres of Influence
When you acquire information about an alien race, either
through friendly conversation or via minute inspection of
enemy ship wreckage, the Starmap will display what you have
learned by showing the aliens’ sphere of influence. This
appears as a colored circle on the Starmap, labelled with
the name of the appropriate alien race. The size of the
sphere is an indicator of the overall strength of an alien’s
entire star fleet. Although these Spheres of Influence are
usually centered around their native homeworld, they can move.
Therefore, you might want to make regular examinations of your
star map.
Using the Autopilot Feature
You can fly to any star in space manually, using the
navigation controls described above. As a convenience, you
can also have an automatic pilot fly your vessel directly
to a desired star or location in HyperSpace.
To set a course for automatic pilot, start from the Starmap.
Position the cursor on your desired destination and press
Return. A line of blue dashes will show you the course
plotted by the autopilot computer. To engage, press the
Spacebar or Button #2. You will automatically enter navigate
mode and begin flying to your target. As long as “AUTOPILOT”
is flashing, you’re headed for your destination.
You can activate the autopilot while in orbit, in
interplanetary space or in HyperSpace. If you have set a
star as your destination, the autopilot will disengage when
you enter the target star system.
To interrupt the autopilot at any time and assume manual
control of your flagship, press any of your normal navigation
controls, and the autopilot will disengage. To resume
automatic flight, return to the Starmap and repeat the
procedure described above.
Scanning a Planet
Many planets exhibit important and interesting aspects,
such as valuable mineral deposits,unique life-forms,
and, potentially, items and artifacts left by other
intelligent species. To avoid tediously exploring the
surface of every planet, you can make a quick evaluation
of each planet from orbit by using your flagship’s
scanning equipment.
To get a basic scan of a planet, choose Scan from the
Flag-ship Command Menu. This will display general
information about the planet in the rotat-ing planet
display, including:
Planet Type:
A general description of the planet.
Orbital Radius:
Distance from its primary star in A.U.s (the distance
from Sol to Earth is 1 A.U.).
Temperature:
The average surface temperature in degrees centigrade.
The hotter the planet, the more prevalent are “hotspots”
on the planet’s surface, making travel there more
dangerous.
Tectonics:
This value gives a general indication of the
frequency of large seismic shocks within the planet’s
surface. There are 8 classes of activity, with 1 being
least dangerous and 8 being a stupendous tectonic
upheaval.
Weather:
This factor measures the force and density of
disturbances within a planet’s atmosphere. Like
tectonics, there are 8 classes of weather. The most
dangerous effect of weather on a lander is lightning,
which strikes more often on planets with higher
weather factors.
Atmospheric Pressure:
Pressure is a measure of the density of the gasses
which make up a planet’s atmosphere. Atmospheric
pressure is measured in Earth-standard units.
Mass:
The mass of a planet is measured in Earth-
standard units, where 1.0 is equal to the mass of
Earth.
Radius:
The radius of each planet is also measured
in Earth units. The mass combined with the radius
determine a planet’s gravity.
Gravity:
A planet’s gravity affects how much fuel it costs
to land on the world. Gravity is measured in
Earth units.
Length of Day:
This measurement reflects how long it takes for
the planet to revolve fully about its axis.
Axial Tilt:
Axial tilt describes the angular difference
between a planet’s rotational axis, and the
axis of its orbit around the primary star.
Typically, the greater the axial tilt, the
greater the planet’s seasonal differentiation.
Specific Scans
Based on what you have learned from the basic scan,
you may wish to make a more focused scan of the
planet’s surface. These scans include:
Mineral Scan
This function paints low-power, deep-radar waves
across the planet, and interprets the resulting
echoes into dots on the mineral display, showing
the location, size, and type of each significant
mineral deposit on the surface. The diameter of
the dot indicates the size of the deposit, and the
color informs you what type of minerals are in the
deposit.
MINERAL CHART
Mineral Color Value
Common Cyan 1
Corrosive Red 2
Base Metals Gray 3
Noble Gases Blue 4
Rare Earths Green 5
Precious Metals Yellow 6
Radioactives Orange 8
Exotics Purple 25
Of course, each planet has many more resources well
beneath the surface. However, your lander is not equipped
to access these minerals, and must limit itself to
what resources are readily available.
Biological Scan
When conditions are right – the temperature, the
atmosphere, the amount of water – certain planets
develop life. The vast majority of life-forms are simple,
viral or bacterial organisms, and present little to
interest anyone but a specialist, or someone whose body
has become infested with such creatures. Larger, more
sophisticated life-forms tend to be more interesting.
All living creatures change the environment around them,
absorbing light and/or food, and excreting less pleasant
substances. Your flagship is equipped with Biological
Scan facilities which use such environmental changes to
pinpoint large creatures.
Energy Scan
The energy scan will locate power being generated on a
planet’s surface, providing the generator is not shielded,
or otherwise concealed. The primary use of this function
is to find alien ships or installations on a planet’s surface.
Dispatching a Lander Scanning only provides information
about what’s on a planet’s surface. To retrieve something
of value, you will have to go down to the surface. While your
flagship is unsuited for such a journey, it carries planetary
landing vehicles, which can make repeated trips to and from
planetside. Your flagship can hold up to 10 landers.
To send a lander to the surface, choose DISPATCH from the
Scan Menu. A flashing cursor lets you set your landing
position. Move the cursor with the Cursor keys and press
Enter. The fuel necessary to make the trip is displayed in
the flagship data window.
Note: If you have lost all your landers, you will be unable
to visit a planet’s surface. You will have to return to the
Earth Starbase for more landers.
Planet Surface Exploration
When you’ve landed on an alien world, be careful because the
conditions there could be quite treacherous. Planet landers,
though quick and maneuverable, are not exactly invincible
space tanks.
Lander Status Display
To the left of the planet map is the Lander Status display
showing the lander’s crew (a maximum of 12), its present
cargo, its data stores, and its protective devices. Once you
have launched a lander from your flagship, you will see it
fly off toward the planet. Your command area will then be
replaced by a magnified image of the vehicle landing on the
planet’s surface. After you have arrived on the planet
surface, you can begin maneuvering the lander vehicle using
your normal starship navigation controls, though you will have
to thrust continuously to move forward. As you move about the
surface, the magnified view will scroll to keep your vehicle
centered in the view.
Returning to the Flagship
You can return from the surface to the flagship at any time
by pressing the Spacebar or Button #2.
Gathering Minerals
Mineral deposits are shown on the planet’s surface as colored
dots (see the Mineral Chart, for details.) To pick up a
mineral deposit, simply run over it with your lander. You will
hear your harvesting equipment gather the material and bring
it aboard. The Cargo Status Bar will change to reflect the
presence of the minerals brought aboard, and show how much
room you have left in the lander. If you try to gather a
deposit when the lander is full, you will hear an unpleasant
protest from your harvesting machinery, and you will be unable
to load the deposit. To gather additional minerals, you will
have to return to the flagship and off-load the material into
your Cargo Bays.
Planetary Hazards
Alien worlds can be extremely hostile when compared with Earth,
and can cause the unfortunate demise of your lander’s crew. If
a disaster should strike, and your entire crew be eliminated,
your lander will be destroyed, and with it all the minerals
and/or devices you had collected. When visiting dangerous
planets, it is wise to keep a finger on your recall control,
just in case you need to leave in a hurry.
The hazards you will encounter include:
Earthquakes: These massive tectonic upheavals appear on your
magnified display as expanding concentric rings. The longer
the lander is pun-ished by an earthquake, the more of your
lander’s crew will perish.
Lightning: Unpredictable and unavoidable, lightning can
dance around your lander for minutes, then zero in on your
vessel and wipe-out half your crew in seconds.
Hotspots: On planets with high surface temperatures, you
will encounter “hotspots,” shifting regions of intense heat
which are incredibly destructive. Avoid these hazards at all
costs!
Native Life-forms: On rare occasions you will encounter
interesting life-forms on alien planets. Unfortunately,
“interesting” usually means dangerous. You will be unable
to ascertain just how dangerous a creature is until it
attacks, and it may then be too late. Many lifeforms will
flee from your lander instead of attacking. Some creatures
are sessile and just sit there.
Collecting Life-form Data
To collect life-form data, you need to thoroughly analyze
the creature. To do so, you must first prepare the life-form
for study. This is accomplished by aiming your lander at the
entity and pressing Return to fire a stun blast. When the
creature is sufficiently incapacitated, it will transform
into a glowing specimen canister which can then be retrieved
at your leisure by running over it with your lander. Don’t
worry, this doesn’t hurt the creature at all.
Each species of alien life is different. Some are fast and
others are slow. Some look like jumping plants, while others
look like zeppelins with teeth. Some creatures are stunned
by a single zap from your lander, while others won’t succumb
until they’ve been shot ten times. As a general rule, avoid
physical contact with alien creatures unless they are stunned
and properly contained. Remember, they may bite.
Unfortunately, in general the more dangerous the alien life-
form, the more valuable its data will be. Exactly where and
with whom you exchange life-form data for valuable
commodities is up to you to find out.
Flagship’s Manifest
This option lets you view and manipulate various detailed
aspects of your flagship and combat fleet.
Checking Cargo
The amount of minerals or other cargo your flagship can carry
depends on how many Cargo Bays you have built into your ship.
When you choose CARGO, the game will display the different
types of minerals and how many units you presently possess,
as well as the remaining FREE CARGO space left on your ship.
The display also shows how much information you have gathered
on life-forms. Should you wish to DISCARD some minerals
(perhaps to make room for other, more valuable minerals),
select the DISCARD command and then press Enter or Button #1.
Next, move the flashing cursor over the type mineral you wish
to discard and press Enter again. Each time you do so, one
unit of the selected mineral will be discarded. You cannot
retrieve minerals once you have discarded them.
Using Devices
During the course of the game, you will find, buy, or otherwise
obtain devices which you will carry aboard your flagship. To
manipulate such items, choose DEVICES from the Command Menu. A
list of the devices aboard your ship will be displayed in the
flagship status area. After you have highlighted the device you
want to activate, press Enter or Button #1. To leave the device
list and return to the Command Menu, press Spacebar or Button #2.
Ship’s Roster
This command is useful for moving crew between your flagship and
your combat vessels. After choosing ROSTER, you can ASSIGN crew
from your flagship to a combat vessel, or RECALL crew back to
your flagship. After you have selected the desired command,
highlight the ship you want to transfer crew to or from, and
then press Return to effect the transfer, one crew member at a
time. The number of crew aboard the selected ship is displayed
in the Flagship Data Window. When you are finished assigning or
recalling crew, press the Spacebar or Button #2 to return to
the Command Menu.
Game Options
By choosing GAME from the Flagship Command Menu, you gain access
to several commands which let you SAVE your game in progress, LOAD
a game in progress, change play SETTINGS, or QUIT the game
altogether.
Saving a Game in Progress
You can never be sure just when you’re going to be blown to tiny
bits by an evil alien, so it is a good idea to save your game as
you play – especially right before a battle, or just after you’ve
struck it rich mining. That way, should you meet an untimely end,
all your hard work will not have been in vain.
When you choose SAVE GAME, the program will display a list of
numbered Game State Slots on the left side of the screen. Move
the flashing cursor up or down to pick the Game State Slot in
which you want to save the current game. Although there are 50
slots available, only ten are shown at once. To scroll the entire
selection of slots, move the highlight up or down beyond the edge
of the list.
When you have picked a slot, press Enter. The entire slot will
highlight, and you can now type in a brief description of where
and/or when you are situated in the course of the game. If the
slot already has a description, you can use the Backspace and
DEL keys to erase the old description, if desired. When you are
satisfied with the description, press Enter. The game will save
the necessary information, and return to the Flagship Command
Menu.
Loading a Saved Game
After choosing LOAD from the Game Menu, highlight the Game State
Slot with the desired description and press Return. The game will
automatically load and return to normal play.
Changing Game Settings
This command allows you to configure the way the game plays to
better suit your personal preferences.
Music Level
This command toggles music on and off.
Sound Level
This command toggles sound effects on and off.
Reading Speed
After choosing READING, you can either pick +SPEED, which speeds up
the rate at which text is displayed in the game, or you can choose
-SPEED, which slows down text display.
Combat
This submenu of options allows you to change how the game conducts
space combat. By modifying these settings you can have the computer
fight your battles for you, and/or speed-up how fast the game
conducts the combat.
Cyborg:
If both your arms are broken, or you are suffering from a serious
disease, you may wish to toggle the CYBORG setting on and have the
computer fight your battles for you. Of course, some players have
been known to use this feature WITH NO ADEQUATE EXCUSE! Harumph!
Resolving Combat:
By using the +Resolve and -Resolve options, you can speed-up your
Cyborg-controlled battles. The active setting is shown in the Flagship
Data Window. The available settings are:
Normal: The rate of play is held to a consistent speed which is
similar on most computers. This is the default setting.
No Delay: The program unleashes the full power of the computer,
allowing battles to be greatly accelerated on fast computers.
Flicker: The same as No Delay, but now the program shows only a
sample of the calculated ship and weapon positions, creating a
flickering, fast-forward display.
Fastest: To achieve maximum speed, the program displays no ship-
to-ship graphics, just sound. The status areas are updated
continuously, showing the progress of the furious conflict.
Remember, the Resolution setting is effective only when the Cyborg
is turned ON.
Changing Names
You will probably want to use this command at the beginning of the
game to establish the name of your character and to christen your
flagship. After choosing NAMES, you can pick CAPTAIN or FLAGSHIP.
After you have made your selection, the current name in the Flagship
Status Window is erased, and you can enter a new name in its place.
To erase the old name, use the Backspace and DEL keys. When you are
done, press Return.
Quitting the Game
To leave Star Control II and return to DOS (perhaps to play a game
of SuperMelee!), choose QUIT and then choose YES, QUIT to confirm
your departure.
THE EARTH STARBASE
Early on in the course of the game, you will gain access to a huge
Starbase orbiting Earth. This spacestation will serve as your base
of operations for the remainder of the game, providing you with
enhancements for your flagship, additional combat vehicles, and crew.
To visit the Earth Starbase, go to the Sol star system and approach
Earth until the view expands to show you the Earth-Luna system. The
Starbase is the object in orbit between the planet and the moon.
Navigate your flagship until it touches the center of the Starbase
and you will automatically take up position adjacent to the space
station. Once you arrive at Starbase, you have the following choices:
STARBASE COMMANDER, OUTFIT STARSHIP, SHIPYARD, DEPART STARBASE.
The Starbase Commander
This command initiates a conversation with the commander of the Earth
Starbase. He is the source of much information regarding the Ur-Quan
and various developments which will turn up over the course of the
game.
Transferring Minerals to the Starbase
In order to build new equipment for your flagship, build additional
combat vehicles, or commission more crew, you have to supply the
Starbase with raw materials. These materials most often take the form
of minerals which you have gathered from the surfaces of alien worlds.
To transfer resources to the Starbase, initiate a conversation with
the Commander and select the option, “Commander, I have material to
off-load.” The Commander will then remove the minerals from your vessel
and inform you of their value.
Outfitting Your Flagship
At the beginning of the game, your flagship is incomplete. You will
spend much of the first part of the game gradually building it into
one of the most powerful vessels in the galaxy. To do so you must
gather mineral or other resources from across space and bring them
back to the Starbase.
When you choose OUTFIT FLAGSHIP from the Main Starbase Menu, you will
see a schematic display of your vessel, its components, its present fuel
supply and the landers you have on board.
Flagship Characteristics
The flagship schematic display also lists the following characteristics:
Turning Rate: The rotation rate of your flagship in combat, HyperSpace
and interplanetary travel, based on the number of turn jets on your
vessel.
Maximum Velocity: Your ship’s speed in combat, Hyper-Space and inter-
planetary travel based on the number of thrusters your ship possesses.
Combat Energy: The speed with which the energy for your weapons is
replenished during combat. The more Dynamos you have on board your
flagship, the faster energy will be regenerated.
Fuel
Your flagship requires fuel to travel through HyperSpace and to send
landers down to the surfaces of alien worlds. Your ship always has a
fuel reserve capacity of 10 units of fuel and is initially equipped
with one Fuel Tank Module with limited capacity. To increase your
present supply of fuel one unit, up to your maximum fuel capacity,
select +FUEL. To transfer fuel from your ship back to the Starbase
(recouping some of its value) choose -FUEL. To increase your fuel
capacity you will have to buy addi-tional Fuel Tank Modules.
Flagship Enhancement Modules
The Precursors who designed your flagship 250,000 years ago (while
humans were still little more than smart monkeys), would have really
appreciated the Swiss Army Knife. This is apparent in the way your ship
is built. The superframe of the flagship is strong but minimal,
providing little better than a solid framework ready to accept
additional pieces of equipment. These self-contained equipment
packages are called “Modules.” You can build additional modules and
attach them to your vessel.
Modules come in four different kinds: Thruster, Attitude, Lander,
and Multi-Function.
Thruster and Attitude modules affect how your ship handles in space.
The more Thrusters you have affixed to your flagship the faster it
goes. Increasing the number of Attitude modules allows your ship to
turn faster. You can have a maximum of 11 Thrusters and 8 Attitude
modules. Landers are necessary for making journeys to planet
surfaces. You may need more than one lander because hostile
conditions on planetside may result in the untimely destruction
of a lander now and again. You are limited to a maximum of 10
landers.
Multi-Function modules fit along the spine of your flagship and can
transform it from a colony space-ark to a mineral processing platform
to a battleship of unrivaled power. The characteristics of your
flagship depend on the selection of Multi-Function modules you make.
You are limited to a maximum of 16 Multi-Function modules. The optimum
layout of modules for your starship will depend on your specific
mission, and your style of play.
Adding and Removing Modules
To add a module to your flagship, choose +MODULE. The game will then
display a list of available modules in the Flagship Status Window. Next
to each module is its cost. Move the highlight to the module you wish
to add and press Enter. A flashing cursor will now appear on the
schematic display, allowing you to position the module on your vessel.
Move the cursor with the Cursor keys and press Enter. The cursor will
now move back to the module list so that you can add more modules, if
desired. When you are done adding modules to your flagship, press
Spacebar or Button #2 to return to the Command Menu.
There is no perfect configuration of modules, so at times during the
game you will want to replace a module on your flagship. To remove a
module and recover most of its value, choose -MODULE from the Command
Menu. A flashing cursor will then appear on the schematic display of
your vessel. Use the Cursor keys to move the highlight to the module
you wish to remove and press Enter.
Note: You cannot remove modules which contain resources such as fuel in
Fuel Tanks or minerals in Cargo Bays. If you want to remove such
modules, first empty them.
For a detailed list of module descriptions, see Appendix VI – Flagship
Modules.
The Shipyard
In addition to enhancing your flagship, the Earth Starbase can also
build additional combat vessels to escort you on your travels through
space. To build combat ships, or commission new crew members for your
flagship or combat vessels, choose SHIPYARD from the Starbase Main
Menu.
At the top of the Shipyard Screen you will see a schematic of your ship
which shows how much fuel, cargo, and crew you have aboard. Beneath this
schematic are the 12 ship hangars in which you can build your fleet of
combat vessels.
Adding and Removing Crew
To add new crew members, select +CREW from the Shipyard Command Menu. A
flashing cursor will appear on the schematic of your flagship. Move the
cursor using the Cursor keys to the ship to which you want to add crew,
and press Enter.
Additional crew are shown as green dots on your flagship. Your maximum
crew level depends on how many Crew Pod modules you have attached to
your flagship. Each Pod holds up to 50 crew. For combat vessels, the
present/maximum crew levels are shown in text beneath the image of each
ship.
When you have added sufficient crew members, you can then move the
cursor to another ship, or press the Spacebar to return to the Command
Menu.
To remove crew from your flagship or a combat vessel, choose -CREW from
the Shipyard Command Menu, then move the flashing cursor over the
desired ship and press Enter. Each time you do so, one crew will be
transferred back to the Starbase, and you will recoup most of the crew’s
value. When you are done removing crew, press the Spacebar to return to
the Command Menu.
Combat Vessels
You may add up to 12 escort vessels which will travel with and fight for
your flagship. These ships may represent a less expensive alternative
for defending yourself, rather than spending a great deal of your
resources on transmogrifying your flagship into a battleship.
Adding Combat Vessels
To add a ship to your escort fleet, choose +SHIP from the Command Menu.
A list of the available ship types and their costs will then appear in
the Flagship Status Window. Move the highlight to the ship you wish to
purchase and press Enter. A hangar will then open, showing the newly
commissioned ship. Remember, ships arrive in their hangar with only one
crew member (the captain) onboard.
It is highly recommended that you immediately add maximum crew to each
new vessel as it is built. When you are done building ships, press the
Spacebar to return to the Command Menu.
Note: The selection of ships you can build will be very limited at the
beginning of the game. To expand this list, you need to make alliances
with other alien races. You may only receive these “gift ships” from
other races if you have room in your fleet. Therefore, you may want to
keep two or three open slots.
Also, these gift ships may be sold for Resource Units, but you cannot
rebuild the vessels. Once they are sold, they are gone.
Removing a Combat Vessel
To decommission (remove) a combat ship from your fleet, and recoup most
ofits value, choose -SHIP from the Shipyard Command Menu. Move the
flashing cursor over the ship you want to remove and press Enter. Any
crew on board the ship will be automatically removed, and their value
added to your available resources. When you are done removing ships
from your fleet, press the Spacebar to Return to the Command Menu.
Leaving the Starbase
When you are ready to leave, choose DEPART STARBASE from the Main
Starbase Menu. You will appear in interplanetary space, near Earth.
ENCOUNTERING ALIEN RACES
You can encounter alien ships in HyperSpace, in interplanetary space,
and in orbit around certain planets. Some encounters you can avoid,
others are inescapable. In some situations, you may have to chase
down the aliens to make contact with them.
Such an encounter may lead to a friendly conversation, or you may
immediately find yourself in battle. In most situations, you will
make the choice to talk or fight.
Combat Segue
Unless you have established friendly relations with an alien race, when-
ever you encounter their ships you’ll hear the “RED ALERT” klaxon and
the screen will change to display the combat segue screen. On this
screen, you will see the composition of the alien task force, as well
as the closest planetary body. At this point, the Command Menu gives you
the choice of talking with the aliens or attacking them. You may also
use all the GAME options so that you can save the game at this point,
should you desire to do so.
Note: The Combat Segue Screen normally displays the exact number of
ships you have encountered. However, if alien ships fill the entire
screen, you are facing an enemy task force of UNLIMITED size which
you CANNOT defeat in combat. If the task force is between you and
something you want, you will have to figure out what is necessary to
appease the aliens, or devise a clever plan to trick them into
leaving.
Conversing with Aliens
When you choose CONVERSE from the Command Menu, you automatically
open a hailing frequency to the enemy vessel. The advanced Precursor
computer system aboard your vessel will translate messages to and from
your ship with near perfect clarity.
When the alien commander responds, his/her/its image will appear on
your screen. Depending on the alien race’s general disposition, and/or
your relationship with them up to that point, the alien’s greeting
could range from a friendly, “Hello, we come in peace. How are you?”
to the more traditional, “Prepare to die, puny Earthling.” The latter
phrase would probably end the conversation, and cause an immediate
transition to combat.
Conversations transpire in a familiar manner. You say something, the
other being says something, and the process repeats until one of you
is sufficiently angry, bored, or otherwise ready to end the
conversation. The interesting part of communicating with an alien (or
anyone else for that matter) is in what you say.
When it is your turn to say something, you will be presented with a
set of possible phrases. Depending on what phrase you choose, you may
alter-nately befriend or enrage the alien you are talking to. After
you have decided on the phrase you wish to speak, highlight it with
the Cursor keys and press Enter. The alien will respond, and either
you will be given another set of phrases or the conversation will
come to an end – possibly initiating combat. To repeat the alien’s
last phrase to you, press the Spacebar or Button #2.
Attacking Aliens
If you choose ATTACK! from the Command Menu, or your conversation
ends on a sour note, you will automatically go into COMBAT MODE.
COMBAT
One of the most important and fun parts of Star Control II is ship-to-
ship tactical combat. If you played Star Control, you already know how
this part works. If you are new to this aspect of the game, you will
want to read this section carefully, and then use the SuperMelee
program to prac-tice your combat skills. If you are totally inept in
fast action situations, and just want to watch the battle unfold,
set the CYBORG option (see page 39 for details) and let the computer
fight for you.
Note: Setting the Cyborg option is comparable to taking a shower
while wearing a raincoat.
Selecting a Ship
When combat is initiated, the screen clears. If your flagship is
flying without any escort vessels, it immediately warps into the
combat zone. If you are accompanied by one or more combat ships, you
must pick the first ship to fight. Move the flashing cursor over the
flagship or one of the escort vessels and press Enter.
The Battlefield
Combat always takes place in a region of space near a planet or
other large object. The area is bounded and wraps around on itself so
that when you leave one side of the combat zone, you appear on the
other side. The screen always centers on the midpoint between your
ship and the enemy vessel, so when one ship “wraps around” the screen,
the view will suddenly shift. At first this may be disorienting, but
you will soon grow accustomed to the transitions.
Navigating Your Ship in Combat
Maneuvering your ship in combat is similar to travelling in inter-
planetary space. You rotate your ship in a desired direction and
thrust forward. All of your ship commands (i.e. thrust, turn, fire,
and special power use) may be triggered simultaneously.
Collision with Asteroids and Planets
Asteroids are large rocks which endlessly tumble through a solar
system, trapped by the gravity of the star and its planets. Due to
the sophistica-tion of modern inertial dampeners, colliding with
asteroids causes no dam-age, just a sudden change in course.
Impacting a planet is a different matter altogether. Your ship will
be damaged severely, and potentially even be destroyed. Once again,
AVOID HIT-TING PLANETS.Ship Status Displays The right side of the
screen is broken into two Ship Status Displays, one for your enemy’s
ship, and one for your own vessel. In addition to showing who built
the ship and the name of the captain that commands it, the status
area displays key information which will be crucial to your
success in combat.
Crew
The bar to the left side of the large ship icon shows the maximum
and current crew levels. Each time a ship is damaged, green dots
(crew) will dis-appear from the bar. When all the crew are gone,
the ship is destroyed.
Batteries
To the right of the large ship icon is the battery charge bar
which shows the current and maximum energy levels in the ship’s
batteries. Firing weapons or using a special power consumes energy
(the amount depends on each ship’s specific characteristics).
Unlike crew, batteries recharge gradually over the course of the
battle. The speed of energy regeneration varies from ship to ship,
and is a significant factor in a ship’s unique com-bat strategies.
Ships with constant, fast energy renewal (like the Yehat
Terminator) will want to close on their opponents and continuously
blast away, while other vessels with slower energy regeneration
(such as the Mycon Podship) will want to approach their enemy and
attack, then retreat to accumulate a fresh supply of energy.
The Basics of Blasting
Getting your ship in the right position is crucial to firing.
Therefore, you must keep several things in mind when confronting
an opponent:
The type and range of the weapon you’re firing.
The defensive capabilities of your opponent, both in defensive
powers and evasive potential.
The position of other objects, such as planets and asteroids,
which may affect either craft, or the course of the fired
weapon.
The computer opponent achieves its remarkable accuracy by firing
not at your ship, but at where your ship is going to be.
The best way to learn how to shoot and maneuver is to repeatedly
practice in SuperMelee, either against the computer opponent, or,
preferably, with a friend.
Victory and Defeat
When you eliminate the last crew member from an enemy vessel, it
is destroyed.If there are other ships in the enemy’s task force,
a new ship will warp in immediately. Since each ship’s combat
entry position is ran-dom, be prepared for immediate hostilities.
If one of your combat vessels is destroyed, you must pick another
ship with which to re-enter the fray, unless your flagship was
destroyed. WHEN YOUR FLAGSHIP IS DESTROYED, THE GAME IS OVER. In
this unfortunate circumstance, you will be given the option to
resume a saved game, start over from the beginning, or quit to DOS.
Running Away
If you are worried that one of your ships is about to be
destroyed, you can choose to flee the battlefield. To run away
while fighting with any ship, press the ESC key. Your ship comes
to an immediate halt and begins an emergency warp-out maneuver.
During this maneuver, you will be unable to control your vessel,
but it will be vulnerable to enemy attack. The glow around your
ship will pulse faster and faster until your vessel has generated
enough force to speed out of the combat zone.
When you command an escort vessel to flee, you are prompted to
select a new ship to fight with. The ship that fled will not be
available for the remainder of the battle, but will return to the
fleet when the fight is over. When you run away while using the
flagship, you leave the battle altogether, taking your escort
vessels with you.
Note: The emergency warp technology for escaping from combat
has NOT been included on your ships at the very beginning of
the game. However, this feature will become available early on
in play.
Analyzing Enemy Wreckage
If you defeat all the enemy vessels in an attacking task force,
you will scavenge and analyze the enemy wreckage. A scavenging
report will tell you how much you have reclaimed.
APPENDIX I : KNOWN ALIEN RACES
Races in the Alliance of Free Stars
The first Alliance race to become aware of the Ur-Quan threat
was the sophisticated, crystalline race, the Chenjesu. In 2098
their ultra-sensitive HyperWave receivers began recording strange
broadcasts, unshielded and strong, from the direction of the
Cygnus star cluster. Soon after, the Chenjesu listened as the
Ur-Quan brutally conquered the first race they encountered, the
Umgah. By 2111 the Spathi had also been subjugated and the Ilwrath,
one of the Chenjesu’s closest neighbors, was near defeat. The
Chenjesu realized that they needed help fighting the Ur-Quan and
their ever-growing armada of battle thralls.
The Chenjesu’s long-standing mutual defense agreement with the
Mmrnmhrm became the basis for the Alliance of Free Stars. Soon the
Yehat and their foster-species, the uplifted Shofixti, entered the
Alliance. Following Humanity’s induction in 2115, the
Ariloulaleelay and the Syreen (unofficially) followed suit,
bringing the Alliance to its final configuration, seven alien
races united against a common foe.
Chenjesu:
This race is the only known form of silicon-based life-form to
have achieved intelligence naturally. The Chenjesu are the oldest,
most technologically advanced species in the Alliance, and while
all mem-bers in the Alliance are officially equal, the Chenjesu
are a bit more equal. Since this species evolved as a
photo/chemovore (it derives its nourishment from light and
ambient minerals) with no natural predators, the Chenjesu are
entirely non-aggressive, preferring calm philosophical discourse
above all other activities.
Mmrnmhrm:
The Mmrnmhrm’s origin is mysterious. Less than a thousand years
ago, the first Mmrnmhrm awakened, alone, on the surface of a dark,
airless moon. Looking up, the conical, segmented robot saw the
huge factory-starship which had just finished manufacturing it by
stripping the surface of the moon for raw materials and then
refining these crude ores into final parts within its cavernous
interior. Within a few years, the star system teemed with
millions of intelligent, self-aware robots who called themselves
the Mmrnmhrm.
These non-hostile mechanical beings were assembled for some kind
of mission by a distant alien race. When born/built, each Mmrnmhrm
awakens filled with knowledge and purpose, though to date the
Mmrnmhrm have not revealed the exact nature of their long-term
mission. Within a century after the first Mmrnmhrm was built, they
had established peaceful relations with the nearby Chenjesu and
colonized the adjacent stars in the Virginis constellation.
Yehat:
The Yehat are a race of avian creatures who live their lives in
the pursuit of honor for their clan, their Queen, and themselves
through combat. Physically, these creatures resemble a 3 meter
high hybrid between an old Earth pterosaur and a bumble-bee. To
succeed on their world, against larger, faster competitors, they
evolved a complex, programmable neural control system – a thinking
brain – which allowed them to adapt to new situations with
lightning speed.
Like Earthlings, the Yehat entered space without the assistance of
a more advanced race. It is not surprising that they grant
Earthlings such high honor and status for the same achievement.
The Yehat have great pride that they did not go through this uplift
process, and that their culture is totally intact. In fact, the
same ruling family has been leading the Yehat people for over 2000
years, dating back far beyond their Industrial Age. Given their
intensely martial society and advanced weapons technology, the Yehat
became the backbone of the Alliance Starfleet.
Shofixti:
A Shofixti resembles a large marsupial carni-vore – sort of a killer
shrew – who exhibits furious aggressive behavior contained within a
strong ethical framework. When the Yehat first found them in 2075,
the Shofixti were living in fortified mud castles in a feu-dal
society similar to medieval Japan. The Yehat had such admiration for
these feisty little warriors that they immediately “adopted” them
and took responsibility for the Shofixti’s uplift, swearing that no
“peace-loving” race would be allowed to dilute the Shofixti’s noble
warlike tendencies. During the war the primary responsibility of
the Shofixti starships was to act as advanced scouts, establishing
mines, colonies, and fortifications throughout the stars.
Ariloulaleelay:
Arilou (as individuals of this species are called) are pale, about
1.5 meters tall, and have large, childlike heads with dark,
soulful eyes. Although Arilou never talk (communicating through
direct telepathic link), they almost always wear a wide, innocent
smile.
The Arilou may have visited Earth often in the past, especially
in the period between 1950 and the year 2000, during which they
are suspected of having been responsible for flying saucer
sightings, cropfield circles, alien abductions and similar
prankish behavior.
The Ariloulaleelay maintain great secrecy about them-selves and their
motivations. The location of their home-world, or even their native
region of space, is unknown, as is much else about these beings. In
fact, the very existence of the Ariloulaleelay was not certain until
the year 2116 when they appeared without warning on Earth’s moon and
asked to be inducted into the Alliance.
Syreen:
The Syreen people evolved on a paradise world in the Arianni constel-
lation where they built a great artistic civilization in harmony with
their environment. No citizen of Syrea suffered want or ignorance.
Then, in 2035, a cataclysm of tectonic upheavals tore lava-filled
chasms across the planet’s surface and irrevocably poisoned their
atmosphere. The disas-ter killed off almost all the Syreen population
– only those in the Syreen Space Patrol were untouched. The male
population, who were rare in the Patrol, were virtually eliminated.
The Syreen Space Patrol collected what few survivors could be found
on the surface and transformed their many orbital space platforms
into huge starships.
In the following decades before the War, the Syreen became
wandering space-gypsies, navigating their fleet of Habitats
through the starways, searching for a new planet of such surpassing
beauty that it would forever wash away the pain of losing Syrea,
their Eden.
The Syreen became unofficial members of the Alliance in 2120, after
suffering repeated Ur-Quan attacks on their fleets of slow-moving
Habitats. Adapting their remaining Patrol vessels for combat, the
Syreen became a potent force in the fight against the Ur-Quan. The
single greatest weakness of the Syreen star fleet, its severe
shortage of trained crew-members, was alleviated by Syreen
scientists who developed a psionic amplifier which could compel
even the most hostile alien to serve a Syreen ship captain with
perfect faithfulness. Crews on board Syreen ships became a surreal
pastiche of alien races, with Ilwrath, VUX, Spathi and others
working dutifully side by side with human volunteers under the
command of beautiful Syreen officers.
Races in the Ur-Quan Hierarchy
The history of the Ur-Quan is largely unknown, save that they are
an old race who have travelled the galaxy for thousands of years
with a single motive: To find intelligent life and enslave it. Most
Xeno-psychologists agree that the Ur-Quan behavior indicates they
suffered some kind of severe trauma, and are neurotically acting out
their need to control every-thing by enslaving any intelligent
species they meet. Most starship commanders who have faced the
Ur-Quan in combat think the Ur-Quan attack and enslave simply
because they are evil, hostile creatures who should be destroyed.
The organization of the Ur-Quan Hierarchy is simple and immutable:
All alien races are inferior to the Ur-Quan. Battle Thralls, those
other races who fight for the Ur-Quan, are granted the next
highest status, and are permitted to maintain a small amount of
autonomy. All other independent species are simply known as prey.
Ur-Quan:
Physically, Ur-Quan resemble the predatory caterpillar native to Earth’s
Hawaiian Islands, only grown to over ten meters in length. The Ur-Quan
equivalent of a face is rich in sensory organs, and its expressions are
varied and horrific. Aboard ship, these creatures cling to webbed
ceilings with their back legs, dangling down over their controls and
their slave-crew like hungry spiders.
Ur-Quan are extremely territorial and aggressive, having evolved as non-
social, hunter-killers. Their territorial instincts are so strong that
only one Ur-Quan is present on each Dreadnought. When Ur-Quan meet, they
keep several meters between themselves, lest their instincts drive them
to engage in an unarmed battle to the death. A simple, linear dominance
structure dictates power within the Ur-Quan species. Each member of the
species has a number, indicating its relative power and authority. Ur-
Quan Master #1 is the ultimate lord of the entire Hierarchy.
The Ur-Quan are unwilling to communicate directly with other species
because to do so would be demeaning. Therefore, when giving orders or
interrogating enemies, the Ur-Quan use “Talking Pets,” large-brained,
frog-like creatures which are non-sentient, but possess the telepathic/
empathic ability to translate all languages.
Mycon:
The Mycons are neither plant nor animal, having evolved from something
more closely resembling an ambulatory fungus. Mycons are asexual and
reproduce by budding their own flesh into a separate off-spring. They
exchange genetic material by exhaling and inhaling DNA-rich spores.
Mycons are most comfortable in a hellish envi-ronment of hot rock and
poisonous vapors which would kill most other species in seconds.
Culturally, the Mycon are baffling. They appear to be born adult,
instantly able to assume responsibilities. In addition, all Mycons
occasionally undergo temporary but dramatic personality transformation,
as though they were “possessed” by a different Mycon personality.
Spathi:
The Spathi are all abject cowards and have built quite a successful
civilization around this basic characteristic. The Spathi physique is
slight and soft, with the vital organs being covered by a hard shell
surface. Spathi have large, humanoid eyes atop stiff thick stalks that
protrude from their central body mass at odd angles. When alarmed
Spathi ooze copious amounts of unpleasant fluid from their pores.
It is somewhat confusing why the Spathi chose to fight with the Ur-
Quan, since they certainly didn’t fight very hard against them
(having surrendered after less than 6 hours of combat).
Umgah:
The Umgah are blobbish creatures consisting of four main attributes;
eyes, mouths, tentacles and a strong sense of humor. The Umgah make
use of bio-logical forms in their technology and must often rely on
biomechanical hybridization.
The Umgah prefer warm, moist subterranean dwellings, sheathing the
interior of their ships with a thick, wet skin, and suffer from
agoraphobia – the fearof open spaces.
Before they were enslaved by the Ur-Quan, the Umgah culture was
relatively peaceful, content to expand slowly through the surrounding
Orionis constellation. The most serious conflicts caused by the Umgah
are the result of their incessant practical jokes, such as clogging a
fleet of Spathi Eluders’ life-support systems with fast-growing foul-
smelling goo.
VUX:
The VUX are bipedal, and would be considered humanoid were it not for
their heads, which look like a tragic combination of a squid and a
banana slug. The VUX are very sensitive about their looks. Indeed, in
the VUX culture, physical appearance is of tantamount importance, and
the VUX spend a great deal of their time on clothing, jewelry and
useless finery.
The VUX’s repulsiveness to most other races is matched by their
technological achievement in linguistic translation devices. This
combination led to the unfortunate incident in 2126, when the
Earthling Cruiser Miwok made first contact with the VUX near the Beta
Luyten star system. The Miwok’s Captain Rand, upon first seeing the
VUX commander on his view screen, remarked to his officers,
“That’s the ugliest freak-face I’ve ever seen!” Rand was unaware that
his every word was being relayed to the VUX captian with perfect
clarity. This grievous insult, and the subsequent ill-will between
Earth and the VUX delayed the VUX’s entry into the Alliance long
enough for the Ur-Quan to enslave them.
Androsynth:
These human clones established a fledgling colony in the Vulpecular
constellation after fleeing from Earth in the year 2085. During the
following three decades, the Androsynths focused their energies on
reproduction and armament. The Androsynths were totally unaware of
the Ur-Quan invasion until the aliens were on top of them, capturing
their home star system in a few short weeks of intense interplanetary
combat. Androsynths now fight for the Ur-Quan and many Earthlings fear
that should the Alliance lose the War with the Ur-Quan, the
Androsynth’s hostility toward Humanity could result in great suffering
for Earth.
Ilwrath:
Before the arrival of the Ur-Quan, these violent, religious insectoids
were of little consequence to their neighbors, the Chenjesu and the
Mmrnmhrm, because they possessed little in the way of advanced tech-
nology or raw resources. However, when the Ur-Quan conquered their
species, the spider-ish Ilwrath became dangerous indeed. Now, with
modern weapons and drive systems, the Ilwrath revel in their
opportunities to deceive and destroy other forms of life, as is
required by their twin gods of evil, Dogar and Kazon.
APPENDIX II: PLAY TIPS FOR STAR CONTROL II
Star Control II is mostly self-configuring, and most players will
never have to do more than type the program name. However, in a few
circumstances, you may have to adjust either your computer system
or the program.
Maximizing Available Memory
If you receive the error message, “Not enough memory to play Star
Control II.”, you will need to free up memory on your computer.
Some simple ways to do this include:
Installing the game on and playing from your hard drive.
Removing TSR programs or unnecessary device drivers from your
AUTOEXEC.BAT and CONFIG.SYS files. Star Control II does not use
a mouse, so removing your mouse driver (if your system loads one)
would be a good first step. In general, the only such programs
you will need are hard disk performance programs, such as disk
caches or automatic file compression utilities.
Enhancing Game Performance
Star Control II is a complex, multi-tasking program which plays
all sound and music by mixing up to 8 digital channels in real
time. Consequently, if you are running on a slower machine, you
may experience less then optimal performance, particularly if you
are running internal speaker sound, which has the most
significant impact on performance. To improve the game’s
performance you can:
Buy a faster computer.
If you are running with internal speaker sound, either
purchase one of the supported sound boards, which do
not hamper performance as much and sound lots better,
or shut down sound and music altogether (see
Specifying Sound Card on the Command Line, for details).
Solving Possible Conflicts with TSRs Some TSRs and device drivers
do not cooperate with the Star Control II program. The most common
such problems occur on 386 machines with older, extended memory
managers. The symptoms include system lock-up when the program
first fires up, or INCREDIBLY slow performance. To fix these
problems you can:
Configure the extended memory manager NOT to emulate
expanded memory.
Remove or replace the extended memory manager.
Shut down sound and music altogether (see Specifying
Sound Card on the Command Line, below, for details).
Known Conflicts
Conflict: Extended Memory Manager (only in rare instances)
Symptom: Extremely slow performance and in rare cases, system
halts.
Solution: Modify config.sys or autoexec.bat files to remove
memory manager.
Conflict: Gravis Ultrasound board in combination with Soundblaster
or Roland sound boards.
Symptom: System halts immediately when game is run.
Solution: Remove all sound boards except Gravis Ultrasound, or
remove Gravis Ultrasound.
Specifying Sound Card on the Command Line
Star Control II automatically detects supported sound cards
(inside your computer) when you load the program. However, there
are some peripheral sound devices which are not detected. For
these devices, you willhave to add a code to the command line:
STARCON2 /s:DEVICENAME where DEVICENAME is one of the following:
Code Sound Device
DISNEY1 Disney Sound Source on parallel port #1.
DISNEY2 Disney Sound Source on parallel port #2.
LPT1 Covox Speech Thing or other sound peripheral on
parallel port #1.
LPT2 Covox Speech Thing or other sound peripheral on
parallel port #2.
If you want to specify explicitly your sound board, follow the above
convention with one of the following codes:
Code Sound Device
INTERNAL Internal speaker
ADLIB An Adlib sound board
SBLASTER A Soundblaster
PAS A Pro Audio Spectrum
SM2 A Sound Master II
ASC An ASC Media Master
MICRO Microsoft Windows
GRAVIS Gravis Ultrasound
If you want NO sound, use the code SILENT.
Loading Problems
If you load Star Control II and experience the following:
The game doesn’t start properly,
You see a “Not Enough RAM” error message,
Freezes or erratic game play,
see the Booting Clean section.
Garbled Graphics or Blank Screen
Star Control II supports VGA or MCGA graphics only. If your computer
does not have these graphic cards and a color monitor, this game will
not work on your system. If you do have these and still experience a
blank screen or garbled graphics, see the Booting Clean section below.
Graphic Adapter Fix Certain computers, (i.e. Tandy 4850 EP) have
unusual video hardware. Therefore, colors in the game might not look
quite right. If you experience this problem, try running the game as
STARCON2 /g:BIOS. This will force the program to update the color
palette using the BIOS functions. Since most BIOS calls are far slower
than custom routines, a minor performance penalty may be noticed when
using this option.
Note: Any command line additions can only be made if you are launching
the game without using the front-end menu.
Booting Clean
The easiest way to resolve loading problems, DOS conflicts, memory
problems, erratic game play, etc., is to copy the games to your hard
drive, and boot your computer with a “boot disk” each time you wish to
play. A boot disk is a “clean” DOS system disk that will maximize use
of memory.
If you are in Windows 3.1, you need to exit Windows to get back to DOS.
From the File pull-down menu, choose “Exit Windows”. A dialog box will
appear mid-screen. Click on “OK”. You are now in DOS.
If you are in Windows ‘95, go to DOS by clicking on “Start,” then “Shut
Down and Restart the Computer in MS-DOS Mode”.
First, copy Star Control II to your hard drive.
1 At the DOS prompt, type C: <Enter>
2 At the DOS prompt, type CD\ <Enter>
3 Type MD STARCON2 <Enter> 4 Copy the Star Control II files to
your hard drive. At the DOS prompt, type
COPY D:\STARCON\STARCON2\*.* C:\STARCON2 <Enter>
Note: If you enter this command and receive the message, “Invalid Drive
Specification,” your CD-ROM drive is not properly set up for use in
MS-DOS mode. Contact your computer retailer or manufacturer for assistance.
Star Control II is now copied to your hard drive.
Creating a Boot Disk
1 Make sure you have a high-density diskette on hand that will
fit into drive A:
2 At the DOS prompt, type FORMAT A:/S <Enter> You will be
prompted to insert your diskette into drive A:. When the
computer asks you to enter a label name, press <Enter>.
When the computer asks if you want to format another
diskette, answer NO.
3 At the DOS prompt, type A: <Enter>
4 At the A: prompt, type COPY C:\CONFIG.SYS <Enter>
5 At the A: prompt, type COPY C:\AUTOEXEC.BAT <Enter>
6 At the A: prompt, type EDIT CONFIG.SYS <Enter>
Note: PC-DOS users may have to type E CONFIG.SYS <Enter>
The editing screen display is blue with several lines of white text.
Each line of text is one DOS command.
7 Only some of these lines are necessary for your game to
run properly. The lines we need can usually be left just
as they are. Keep the following lines intact:
The line with HIMEM.SYS (or any other upper memory manager)
The line with EMM386.EXE (or any other expanded memory manager)
Any lines pertaining to your Sound Card
Any lines necessary to the normal operation of your computer
For all other lines, move the cursor to the left edge of each line and
type REM <Spacebar>.
8 Once you have finished editing the CONFIG.SYS file, press <ALT+F> then
<S> to save the file. PC-DOS users will need to press the <F3> key
instead.
9 Press <ALT+f> and <X> to exit the editor.
10 At the A: prompt, type EDIT AUTOEXEC.BAT <Enter>
Note: PC-DOS users may have to type E AUTOEXEC.BAT <Enter>
11 Keep the following lines intact:
@ECHO OFF
PROMPT $P$G
the PATH line
Any lines pertaining to your Sound Card
Any lines necessary to the normal operation of your computer
For all other lines, move the cursor to the left edge of each line
and type REM <Spacebar>.
12 Follow steps 8 and 9 above to save the file and exit the editor.
The boot disk is now ready for use with the Star Control Collection.
To Play Star Control II, insert your boot disk into your A: drive and
either turn on or reboot your computer. At the A: prompt, type
C: <Enter>. Type CD\STARCON2 <Enter>, then STARCON2 <Enter> to launch
the game. When you finish playing, remove the boot disk from the A:
drive and either turn off or reboot your machine.
APPENDIX III: INSTRUCTIONS FOR SUPERMELEE
SuperMelee is pure Star Control combat. In this bonus game you can fight
against the computer opponent, or even better, battle another human player.
SuperMelee battles are fought between two rival teams, composed of up to 14
ships, using any combination of the 25 alien vessels from Star Control and
Star Control II.
If you have never fought a Star Control space battle, SuperMelee is the
necessary training ground where you will learn to survive in the hostile
starways of Star Control II. You can begin by fighting weak opponents,
learning the ins and outs of tactical combat. Then, as your skills
improve, you can take on more cunning foes and begin to explore the unique
stratagems for each ship-to-ship combination.
The experienced Star Control player will relish the 11 new ship types, the
multiplicity of ship battle combinations, and the ability to devise his or
her own SuperMelee teams.
Starting SuperMelee
To play SuperMelee:
1 Turn on your computer.
2 Get to the point in DOS where you would normally launch
the game. If you play from the CD, choose SuperMelee from
the Star Control menu, and ignore steps 3 & 4.
3 Change to the directory that contains the game. For
example, if you installed the game in a subdirectory
named STARCON2, type CD STARCON2 and press Enter.
4 Now type the file name, MELEE, and press Enter again.
Note that MELEE.EXE has the same command line options
for sound as STARCON2.EXE (see Specifying Sound Card
on the Command Line, for details.)
Note: The Melee program tries to run at the same speed on all computers.
If you would like to unleash your computer’s power and play at maximum
speed, add /frenzy on the com-mand line after Melee.
The SuperMelee Main Screen
The SuperMelee Main Screen includes three regions: The Team Display,
which shows the ships in each team as well as their name; the Game
Settings, which records the manner you have configured the game; and
the Main Menu, which lists the general commands at your disposal. As
a convenience, SuperMelee always remembers most recently used teams
and settings, and automatically loads these for you whenever you
start the game.
Creating a SuperMelee Team
To create a SuperMelee Team:
1 First highlight EDIT on the Main Menu and press Enter.
2 Using the Arrow keys, move the cursor to the slot where
you want to add a ship and press Enter. The highlight
will now move to the list of available ships.
Note: If you place the cursor on a slot which already contains a
ship, that ship will be replaced with your new choice.
3 Using the Arrow keys, move the highlight in the ship list.
Only two ships are shown at one time. To scroll the entire
list, move the highlight up or down. The list shows not only
the names of the ships, but their val-ues as well. Ship
values are useful when two or more players want to compose
different teams with the same overall strength. When you have
highlighted the ship you want to add to your team, press Enter
and the ship will appear in the Team Display region. The cursor
now returns to the Team Display region.
4 Continue placing as many ships as you like on both teams by
repeating steps 2 and 3. Notice that as you add and remove
ships from each team, the total team value changes to reflect
your modifications.
5 If you want to remove a ship from a team, highlight the ship
in the Team Display Region and then press the DEL key.
6 To change the name of a team, move the cursor to the name,
which will then highlight. Use the Backspace and Delete
keys to remove the old name, then type in the new team name.
When you are finished naming a team, press Enter, or just
move the cursor up or down off the team name using the Arrow
keys.
7 When you are done creating your team, press the Spacebar to
return to the Main SuperMelee Menu.
Game Settings
The current game settings for both Player #1 and Player #2 are shown in
the Game Settings Display, just above the Main SuperMelee Menu. When
you choose SETTINGS from the Main SuperMelee Menu, the cursor will move
to the Game Settings Window. To change a setting, move the highlight
to the desired setting and press Enter.
When you are done changing the game’s settings, press the Spacebar or
Button #2 to return to the Main SuperMelee Menu.
Who Controls Each Team
In SuperMelee you can play against a human opponent (the most fun), or
against a computer controlled foe. To change who controls a team, high-
light the setting and press Enter or Button #1. You can set both teams
to have computer control. In this case they will fight a totally
automatic series of battles against each other during which you can
study their techniques.
Input Device
You can play SuperMelee with joysticks, keyboard, or a combination of
both. To reconfigure the keyboard configuration, run the separate
keyboard configuration program KEYS.EXE. For consistency, the con-
figuration you set for SuperMelee will also be used in Star Control
II.
Note: Any keyboard configuration other than the default will only be
saved if you are playing from your hard drive. If you use the KEYS
command and are playing from the CD-ROM, your new configuration will
not be saved.
Computer Opponent’s Skill Level
In SuperMelee you can set the computer opponent’s skill level to
accommo-date beginner, intermediate or advanced players. To cycle
through the skill levels, move the highlight to the skill
description for the team you want to change and press Return.
The skill levels are:
Standard (default setting): The standard computer opponent never uses
its special power, nor does it shoot very accurately. This setting is
suitable only for beginning players or young children.
Good: At this setting the opponent shoots more accurately and begins
to use its special power, though not necessarily at the best time or
place.
Awesome: Playing SuperMelee against a computer opponent set to Awesome
should remain a challenge for quite some time. At this skill level,
the computer only shoots when it is sure it will hit you if
you continue along your present course. The computer now uses
its special power at maximum effectiveness.
Leaving Settings Menu
When you have established your desired settings, press the Spacebar to
return to the main SuperMelee Command Menu.
Saving and Loading SuperMelee Teams
To save a team, highlight SAVE from the Main Menu and press Enter. Type
in the name of your team (8 letters maximum) and press Enter. To load a
team, select LOAD from the Main Menu and press Enter.. Highlight the
team you want to play using the Arrow keys and press Enter again.
Fighting in Melee
Now that you’ve selected your settings and created your teams, you’re
ready for a game of SuperMelee. From the SuperMelee Main Menu, select
MELEE. You will now see a subscreen for each team in turn.
Picking Ships
Each player now picks his first ship to fight with. If you are playing
against a computer opponent, it will do so automatically. To pick a
ship, move the flashing cursor over the desired ship and press Enter.
If you want the next ship to be chosen randomly, highlight the “?” and
then press Enter.
Fighting a Battle
Combat in SuperMelee is identical to combat in Star Control II, except
that you cannot flee from battle. When a ship is destroyed, the ship
selection menu will appear, allowing you or your opponent to select the
next ship to fight.
Winning SuperMelee
When all of one player’s ships are destroyed, the Melee is over. Each
player’s menu will then appear, allowing the winner to gloat over his
many victories. This final display also shows the winner’s remaining
ship points which indicate the margin of victory. Use the following
guidelines to determine the quality of the victory:
Winner’s Remaining
Ship Points Quality of Victory
5% By the skin of your teeth.
10% A good, close game
25% A serious thumpin’
50% Totally Cree-mated!
75% and up Who are you playing with – a moon
rock?
Remember, if you get “Cree-mated”, there’s always the best-2-out-of-3!
Replaying Melee with the Same Teams
To begin another SuperMelee with the same teams, just press any key
after the ship selection screen has been displayed.
Returning to the Team Edit Screen
After a SuperMelee game is over, or at any time during play, you can
quit the battle and return to the SuperMelee Main Screen by pressing
F10, and then confirming your exit by pressing F1.
APPENDIX IV: KEYBOARD CONFIGURATION UTILITY
The Keyboard Configuration Utility – Keys.exe – lets you reconfigure the
keys you’ll use as the control keys in Star Control II.
1 Boot your computer as normal
2 Type CD \Starcon2 and press Enter
3 Type keys and press Enter. The following options will
appear onscreen:
F1 Select a new keyboard layout
F2 Experiment with different keyboard combinations
F3 Information on keyboard configuration
F10 Quit to DOS When you press F1 to change the keyboard
layout, you are given the option of changing the
Player 1 or Player 2 controls. Press the corresponding
function key to select your option.
After you’ve selected your keys, you’ll be given the option to redo them.
Press N to keep them, or press Y to change them.
To save the new keyboard configurations, press F7 at the Control Keys
Menu.
APPENDIX V: COMBAT VESSEL DESCRIPTIONS
Following are brief descriptions of the combat capabilities of all
of the ships in Star Control and Star Control II. These descriptions
are intended to give an overview of the ships’ attributes and special
powers, as well as a few tactical combat tips.
Ariloulaleelay Skiff – An Arilou Skiff, when flown skillfully, can
be one of the most effective spacecraft. It’s speed and inertialess
drive make it the most maneuverable of all ships, and its special
ability to teleport can help it escape from fatal situations. The
Arilou Skiff has an auto-targeting, swivel-mounted, short-range
laser that pumps out damage quickly. Unfortunately, the Arilou ship
can sustain only a minimal amount of damage itself. A successful
captain will use the teleport function, as well as an opponent’s
inertia, to move in quickly along the rear or flank of the enemy
ship, unload from a full store of energy, and then fly or teleport
quickly away to recharge.
Chenjesu Broodhome – The main weapon of the Chenjesu, the photon
crystal shard, is ver-satile for both offense and de-fense. As long
as the fire button is pressed, the shard con-tinues on its way. If
you hit an enemy with the whole crystal, it does a great deal of
damage. If the crystal misses, release the fire button while it is
still near the enemy ship and the shard will explode into smaller
pieces. Since the crystals do not harm the Chenjesu, they can be
exploded at point blank range to create a kind of ack-ack.
One powerful ability of the Chenjesu is to launch self-directed
DOGIs (De-energizing Offensive Guided Interceptor). These little
drones can steal the energy from ships, or just pester the enemy
until they are ready to give up. The best strategy for a Chenjesu
is to keep a good distance between itself and the enemy ship.
Earthling Cruiser – The Earthling Cruiser is a vessel designed
primarily for hit-and-run long-range attacks. Stay away from the
enemy ship, and fire your seeking nukes constantly! Use a Gravity
Whip off of the planet, if necessary to keep your distance, but be
careful not to collide with the planet. The only reason ever to get
close to an enemy ves-sel is to make an honorable, point-defense
laser “coup de grace”, to elimi-nate the opponent’s last crew
member.
Mmrnmhrm Xform – The X-form is actually two ships in one. Its
special power allows it to transform from one form into the other.
The Y-Wing form of this ship is fast but not very maneuverable,
and it fires long range homing missiles that do only a small amount
of damage. The X-Wing form is slow, but has good turning capability,
and fires a powerful double-lance, convergent laser. One very
effective way to take advantage of this ship is to stay mostly
in the faster Y-wing form, transforming into the X-Wing form only
to make quick turns or ward off would-be attackers when they get
too close.
Shofixti Scout – Shofixti Scout ships are small and very quick.
They have a limited num-ber of crew, and a relatively weak forward
firing gun with a moderate range. The special capability of this
ship is that it can detonate itself like a big bomb, and cause
great damage to an opponent’s ship. Of course, this requires that
the Shofixti ship get itself close enough before detonating.
Shofixti captains who are patient may find that their little gun
can be quite effective when fighting slow, or short-ranged enemy
vessels.
Syreen Penetrator – This space vessel has the unique potential to
leave a battle much stronger than it enters it. The goal of a
Syreen ship isalways to get close to the opposing ship and use the
Syreen call. This causes the enemy crew from the opponent’s craft
to jump ship and drift through space towards the Syreen ship. The
Syreen can then pick them up and use them as her own crew. One
very effective trick is to use the Syreen call and fire simul-
taneously. This way, when your opponent has only one or two crew
members left, the Syreen can destroy them before they have a chance
to pick any of the crew back up again.
Yehat Terminator – The powerful and direct Yehat Terminator is
the earliest of all Star Control ships. The ship is equipped with
extremely powerful medium-range dual cannons, as well as a shield
that, when activated, protects it from any weapon. Avoid the
temptation of exhausting all of your energy with your guns, saving
some for your shields. Also remember that energy genera-tion on
the Yehat ship is not sufficient to maintain constant shield-ing.
Lastly, since Yehats are not particularly fast, they can often
benefit from a ‘Gravity Whip’ from the planet. This allows them
to strafe an opponent as they go sailing past.
Androsynth Guardian – The Androsynth vessel is normally very
slow, and it’s weapon fires auto-homing molecular acid bubbles.
These tend to be most effec-tive when fired en masse to create a
dense cloud of bubbles that can serve as a haven for the Androsynth
ship, or to create a cloud of bubbles in the opponent’s path. The
Guardian can transform itself into a blazingcomet-like ball of
energy. When it does this it travels at high speed, until all of
its energy is used up. When the Androsynth is in this comet-like
“Blazer” form, it can ram an opponent’s ship and do a large amount
of damage. Another use of the Blazer form is for escape.
Ilwrath Avenger – The Ilwrath ships are only moderately powerful
because they are not very fast, and their weapon is only effective
at short range. In order to compensate for their weapon’s
shortcomings, the Ilwrath ship has a special cloaking capability.
Learn where the Ilwrath Avenger is when it is invisible. Since
the screen always centers on the midpoint between the two ships,
the Ilwrath is always diagonally opposite its opponent. When
your enemy gets near the center of the screen, you must be there
too. So open fire, literally! Be aware that when you uncloak by
firing your hellblast, your ship is automatically oriented to point
at your opponent’s ship. If your enemy has maneuvered around behind
you, you can turn around instantly by cloaking and immediately
firing your hellblast.
Mycon Podship – This extremely slow ship can fire a strange
homing weapon made of semi-sentient energy plasma that dissipates
after it is launched and does a huge amount of damage if it hits
the opponent. The Mycon ship can also use its energy to regenerate
crew that have been lost.
Against most ships, the Mycon Podship is a dead duck if it sits
still. Once it gets moving, (a good Gravity Whip will do), its
commander can fire a plasma torpedo now and then, and regenerate
any damage that comes his/her way. However, to give yourself time
to respond to an onrushing celestial body, avoid diagonal whip
trajectories.
One of the most serious threats to the Mycon is its own weapon,
the expanding plasma cloud. Fast ships, like the Arilou, Shofixti,
or Slylandro, will try to direct the plasma weapon back upon the
Mycon. If the Mycon is moving at or beyond its normal maximum
velocity, it can overrun its own weapon immediately after launch,
suffering grievous casualties. Solution: shoot backwards.
Spathi Eluder (previously known as “the Discriminator”) – The
Spathi ship is very fast and maneuverable with a moderately ranged
and relatively weak forward firing gun. This ship is most
dangerous when running from the enemy and launching BUTT (Backward
Utilized Tracking Torpedo) missiles directly into its pursuer’s
path. The Spathi commander’s main job is to entice his opponent
into chasing him. Taunts and jeers work well. Another effective
strategy for a Spathi commander is to circle his opponent’s ship,
just out of range, bobbing in to launch BUTT missiles, and then
out again.
The otherwise ineffectual forward guns can become quite deadly
with practice. If you need to kill only a few more crew for a
victory, as when fighting an undamaged Arilou, don’t shoot your
wad in a single facing. Instead, rotate as you fire to increase
your chance of a lucky hit.
Umgah Drone – The Umgah Drone can defeat any other ship, given
just a few seconds at close range. A favorite Umgah tactic is to
zip backwards right up next to its enemy. If the anti-matter cone
is up through the maneuver, there is a chance of it grazing the
enemy as you zip past for a few bonus points of damage –
especially important against the Arilou. Another way to use the
retro-movement is to thrust at the same time you zip backwards.
This results in a jerky, half-speed maneuver which opponents
often find difficult to deal with.
The Umgah’s anti-matter cone also makes an effective shield
against most incoming missiles. Notable exceptions are the
Chenjesu’s whole pho-ton crystal and the Ur-Quan’s fusion
blast, which pass through the conical field unharmed. The Umgah
receives all its power in one big whack after a considerable
delay. Each time the Umgah uses its anti-matter cone, this
delay is reset to maximum. So if you keep the cone up, you
will never regain fuel.
VUX Intruder – Rather than building a faster ship, the VUX
have taken the approach of slowing the other ships down.
They do this by means of homing limpets which cling to the
hull of an enemy ship, making it less and less maneuverable.
In addition to this, the VUX ship comes equipped with a very
powerful medium-range laser, and a large store of energy to
power it.
The VUX is one of the slowest and least maneuverable ships
in the game. Helping to offset this, the Intruder has the
advantage of always appearing near an enemy vessel when
combat begins. The VUX commander must be ready to fire
instantly, and make course adjustments to keep his laser
on target. If the enemy escapes and possesses any long or
intermediate range weapons, the VUX must immediately seek
out a planet and engage in a Gravity Whip. If the enemy
launches a seeking weapon, don’t forget to shoot at it as
it approaches. When the VUX nears its target, it should
slow by rotating to face the enemy and thrusting. Never
engage your enemy unless you have lots of fuel!
To make effective use of your limpets, deploy them in a
curtain, then turn and thrust ahead of where your enemy
must flee to avoid them. When the enemy is really gunked-up,
and you are fully recharged, use your laser to blast the
enemy ship’s hull. Remember, though the Yehat’s shield is
proof against your laser, your limpets pass through its
defenses unaffected.
Ur-Quan Dreadnought – Most experienced players would
probably say that either the Ur-Quan Dreadnought or the
Kohr-Ah Marauder is the most powerful ship in the game.
The Ur-Quan has an immensely powerful medium-long range
weapon that fires rapid fusion plas-ma blasts. It also has
the capability of launching pairs of autonomous, laser-
equipped fighters. Remember that each fighter represents
a depart-ing crew member. So if you are wounded to start
out with, don’t send off all but the last few of your crew
and risk defeat through a single lucky enemy shot. Also,
fighters expire if you don’t let them return to your ship.
Avoid high speed chases or your fighters will be left far
behind. Use fight-ers at short range and in conjunction
with your main weapon. For best results, chase an opponent
in one direction while you head off in the opposite
direction to meet him as he wraps around.
Kohr-Ah Marauder – The Kohr-Ah ship is one of the few ships
that is a good match for an Ur-Quan Dreadnought. The two
ships are comparable in speed, maneuverability, crew, and
energy regeneration. However, instead of firing plasma
blasts, the Kohr-Ah vessel fires missiles which continue
to move away from the ship until the Fire Button is
released. Once the Fire Button is released, these spinning,
metal blade-disks remain where they are placed. When an
enemy vessel draws near, it tracks on the vessel and closes
with it.
A Kohr-Ah commander will often first lay down a defensive
wall of blades around his ship, then litter an opponent’s
path with the spinning weapons. Only eight blades may be
present on the screen at any given time. When a ninth is
fired, the first one disappears.
The other capability of the Kohr-Ah ship is known by the
other alien races as “the Fiery Ring of Inevitable and
Eternal Destruction” or F.R.I.E.D. This is actually an
expanding ring of super-heated gases that can be used both
for defense and close range offense. When facing the
Ur-Quan, the Kohr-Ah is better off staying farther away,
and the Ur-Quan is better off closing.
Utwig Jugger – This slow, tubby craft is only a moderately
powerful ship. However, it is particularly well suited to
facing the Kohr-Ah and the Mycon. The Utwig, in addition
to its forward facing, wide area guns, has the special
capability of shielding itself. This shielding, however,
uses up energy which cannot be regenerated, so the trick
for Utwig commanders is to acquire more than they use.
Against ships that fire rapidly and continually, the
Utwig commander can find himself being tricked into
shielding unnecessarily and wasting his energy. The best
strategy for the Utwig is to close with the opponent’s
ship using a Gravity Whip when necessary, and time the
shielding to catch any incoming shots. DOGI’s from the
Chenjesu are an Utwig commander’s greatest fear, as they
quickly turn his ship into a sitting duck.
Thraddash Torch – The Torch is a difficult ship to master,
but can be quite potent when it is flown well. The normal
weapon of this ship is a simple long range weapon that does
a small amount of damage. The special capability of this
ship is to eject ultra high pressure bursts of plasma out
the rear of the craft. These propel the ship forward at
great speed and act as an effective turbo boost. Commanders
must learn to use this as their primary means of propulsion
rather than their engines, which actually slow the vessel
down. By using the rear ‘Torch’, commanders can stay far
away from shorter range ships, and hit enemies with its
long range weapon. When these Torch bursts are laid down
in a wall in the path of an oppo-nent that is moving a
lot, they can be a powerful offense.
These bursts can also be used defensively to block
incoming shots. This technique requires the Torch captain
to keep the rear of the ship facing the opponent whenever
it is not advantageous to be firing.
Supox Blade – The Supox Blade is another effective ship. In
combat situ-ations, any ship that can get another ship to
chase it is in an advanta-geous position. The Supox, with
its ability to reverse direction, is well suited to this
strategy. This is done by approaching a ship head-on.
As soon as that ship is in range, the Supox reverses the
direction of its thrust and flies backwards, shooting at
the ship that is all of a sudden following it. To travel
backwards, press the Thrust key and the Special key
simultaneously. Another capability of the Supox ship
is to move laterally. To perform this maneuver, press
the Special key and a Turn key simultaneously. This should
only be attempted by the most gifted of Supox commanders, as
it more often than not results in victory for your very happy
opponent.
Pkunk Fury – Though small and holding few crew, the deft Pkunk Fury
sports miraculous features. The Fury’s main (and only) weapon is a
rapid-fire, very short-range mini-gun that launches streams of dense,
superheat-ed metals forward and to the sides. This unusual weapon
configuration allows the Fury to engage in certain non-traditional
combat moves, such as running broadside. The popular Death Blossom
attack is performed by flying adjacent to an enemy ship, and then
simultaneously rotating and firing to create a beautiful spiral of
destructive force.
The vessel’s energy is generated directly from the Pkunk captain’s
fierce mental emanations. By holding down the Special key, the player
instructs the captain to radiate these psionic energies. Accompanying
the regeneration are various insults and jibes spewed forth by the Pkunk
captain toward his opponent.
When a Pkunk ship is destroyed in combat it will frequently reappear –
instantly, and with no visible signs of damage. The Pkunk claim that
this resurrection is due to a trace of the blood of the gods, which
flows through each Pkunk as the result of some divine indiscretion on
their home world several thousand years ago. Other alien races believe
that the “res-urrected” vessels are in fact a mere projection generated
by Pkunk vessels which are cloaked with some kind of invisibility field.
To date, no one has explained why a “projection’s” weapons are
genuinely destructive.
Melnorme Trader – The primary weapon aboard the Melnorme (pro-nounced
Mehl-nor-may) Trader is a long-range, variable power blaster, fired by
holding down the Fire key and then releasing it. The Melnorme’s pro-
jectile becomes larger and more destructive while the Fire key is held.
The weapon has 4 degrees of power, reflected in the color of the
pulsating missile. A green weapon is weakest, next comes blue, purple,
and finally red. Each color change represents a doubling in the
strength of the weapon. The Melnorme ship will not regenerate energy
while “holding” the weapon; however, at these times the weapon acts
as a front shield for the ship.
The special power of the Melnorme Trader is a long-range confusion ray
which scrambles the enemy vessel control systems, causing the enemy to
tumble out of control. The effect lasts only a few seconds, so the
Melnorme must follow-up the attack with a powerful blaster strike, or
an additional whack with another confusion ray. Note that in order to
penetrate an enemy ship’s hardened control system, the Melnorme
confusion weapon drains almost half of its maximum supply of energy.
Chmmr Avatar – The Chmmr Avatar may be the most powerful ship in space
with a laser so dangerous that when fired, it ionizes the solar wind.
The laser strikes an enemy vessel’s hull with twice the destructive
force of the feared VUX laser. Orbiting around the Avatar are three
ZapSats – sturdy satellites that automatically fire their own laser
weapons at incoming ships and missiles.
The Chmmr Avatar’s special power is a tractor beam which generates a
focused beam of artificial gravity, pulling in an enemy vessel like
a fish on a line. The effect of the tractor depends on the size and
speed of the opposing ship.
The biggest threat to the Avatar is the Kohr-Ah Marauder’s fiery gas
ring which will instantly destroy any satellites it touches.
Orz Nemesis – This menacing manta craft was built for combat! Atop
the swift Nemesis is a rotating howitzer, which can pump out shells
at a high rate of fire over medium range. Unlike vessels whose weapons
are fixed forward, the Nemesis captain can swivel his gun fore, aft,
port, star-board, or anywhere in-between. To swivel the gun, the
player must hold down the Special key and then press the Rotate keys.
This ship’s most exciting feature is its Space Marines! Encased in
vacuum-fitted exo-skeletons, these relentless soldiers use their jet
packs to chase down enemy ships, and then burn entry holes through
their hulls. When launched (by pressing the Special key and the Fire
key simultaneously), each departing Marine decreases the Nemesis’
crew by one. Once inside the enemy ship, the Space Marines employ
basic search-and-destroy tactics, wreaking havoc on the soft
targets within. When an enemy ship is destroyed, any Marines onboard
will jet out of the exploding hulk, and return to the Nemesis for
more fuel and ammunition. Opponents would be wise to remember that
Space Marines receive special training in using the Leyland Whip
maneuver, and are exceptionally adept using a planet’s gravity to
speed them toward their target.
Druuge Mauler – This ship is perfect for sharp-shooters since its
only weapon is a high-velocity, very long-range cannon. When fired,
the recoil of the massive discharge will send the Mauler sailing
backwards. Should the heavy projectile strike its target, the enemy
vessel gets a similar shove. The experienced Druuge commander can
use this recoil effect as a super-thruster. The Druuge Mauler has
pitifully slow energy regeneration and when unable to shoot the
ship is a sitting duck. To compensate for this weakness, the Druuge
has a matter-to-energy converter that transforms crew members into
instant bursts of power. Each time the special power is activated,
one crew will be “tossed into the furnace.”
Zoq-Fot-Pik Stinger – The Zoq-Fot-Pik Stinger is a flimsy ship whose
main weapon is a spray of minute anti-matter particles which
annihilate a tiny portion of the enemy ship’s hull, releasing
colossal amounts of heat and light.
The Zoq-Fot-Pik’s special power is a point-blank range attack.
Should the Stinger maneuver adjacent to an enemy vessel, it can
quickly extend a rigid, alloy tube from the front of the ship,
similar to an insect’s proboscis. If the tube strikes the enemy
ship’s exterior, it bores a tiny hole through the hull metal and
injects a high-pressure stream of hot plasma into the interior of
the vessel.
Slylandro Probe – The Slylandro Probe tumbles through space
devouring asteroids and zapping anything it can catch with massive
electrical dis-charges. Like a shark, the Probe must continually
move, constantly twisting its invisible magnetic scoops to
scavenge interstellar hydrogen for its internal fusion generator.
While the player cannot cause the Probe to stop, the rotational
controls will cause a change in its trajectory, and the thrust
control will make the Probe reverse direction instantly. Gravity
has no effect on this vessel; however, impacting the planet will
be severely damaging.
The Probe’s best combat strategy is to first energize its
lightning batteries by moving close to an asteroid and use its
special power to pulverize the rock and absorb it as energy.
Then the Probe must move toward its opponent, dodging all
incoming missiles. When it has gotten close enough for the
screen to zoom it to the most magnified view, the Probe should
unleash its auto-fire lightning until its batteries are
exhausted, all the while maneuvering to stay behind its opponent.
APPENDIX VI : FLAGSHIP MODULES
The Multi-Function Modules initially available at the Starbase
are:
Planetary Lander Maximum: 10
This Module is actually a separate vehicle which you can
launch from your flagship and send down to a planet surface.
Although a planet lander appears to have been built to carry a
crew of 2 Precursors, 12 human crew members can fit inside. You
may wish to carry more than one lander, since you may lose a
lander due to hostile conditions on alien planet surfaces.
Thruster Maximum: 11
Thrusters lock into place on your warp outrigger units,
increasing your acceleration and maximum velocity and making
travel through space less time-consuming. Fuel cost for
HyperSpace travel remains constant, regard-less of how many
thrusters you have on board your vessel.
Turning Jets Maximum: 8
Turning Jets also fit in your outrigger units, but their
function is to let your flag-ship turn more rapidly. Turning
Jets are most important for rapid maneuvering in combat.
Crew Pod Maximum: 16
These modules provide living quarters and life-support
for up to 50 addi-tional crew members. When you purchase
a Crew Pod, it will be empty. To fill it with new crew,
visit the SHIPYARDS in the Earth Starbase.
Cargo Bay Maximum: 16
Cargo Bays hold up to 500 units of minerals or other
cargo each. To see how much available cargo space your
flagship possesses, use the CARGO command in the
MANIFEST command menu. To remove a Cargo Bay, it must
first be emptied, typically by visiting the Starbase
Commander.
Fuel Tank Maximum: 16
Each Fuel Tank Module holds 50 units of fuel which is
enough to take your flagship halfway across known
space. Of course, if you are making a lot of planet
landings, or are employing a powerful device, you
may wish to increase your fuel capacity with more
Tanks. Fuel Tanks are purchased empty, but can be
filled from the Earth Starbase OUTFIT menu. You can-
not remove a fuel tank module unless it is empty.
Dynamo Maximum: 16
Dynamos are finely engineered pieces of equipment
whose function is to supply raw energy to your
weapons systems by augmenting your normal combat
batteries. A classic mistake in ship configuration
is to load down a vessel with multiple weapons, but
not include an appropriate number of Dynamos. The
result is a ship whose firing rate is atrocious.
Ion-Gun Racks Maximum: 3 each
Ion-Gun Racks are poly-channel combat units which
concentrate the raw energy of your ship’s batteries
and Dynamos into a focused destructive projectile.
Depending on the exact placement of an Ion-Gun Rack
or other weapon module, the ship will fire in one or
more directions simultaneously. The most weapons you
can have on your ship is four. The module slots in
which you can put a weapon are marked in blue.
WEAPON POSITION FIRING EFFECT
First (right most) slot Fires Forward
Second slot Fires a spread
Third slot Fires to both sides
Last (left most) slot Fires backwards
It is recommended that you balance the number of Ion-Gun Racks
on your vessel with 1/3 to 1/2 as many Dynamo Modules to
provide your ship with an adequate rate of fire in combat.
Other Modules Maximum: Unknown New types of Modules will
become available at the Earth Starbase as the game progresses.
The function and cost of such Modules will be explained as
they are made available.
Game Credits
Programming Fred Ford
Game Design and Fiction Paul Reiche III
Additional Design Greg Johnson, Fred Ford,
Robert Leyland and Greg Hammond
Art George Barr, Paul Reiche III,
Erol Otus, Kyle Balda,
Greg Johnson, and Armand Cabrera
Sound Effects Paul Reiche III, Erol Otus,
Fred Ford
Music Riku Nuottajarvi, Dan Nicholson,
Marc Brown, Aaron Grier,
Eric Berge, Kevin Palivec, Erol
Otus and Tommy Dunbar
Producer Pam Levins
Assistant Producer Robert Daly
Testing Tomi Quintana and Joel Dinolt
Manual Paula Polley, Paul Reiche III and
Dick Moran
Manual Illustrations Jeff Rianda and George Barr
Online Manual Adaptation W.D. Robinson & Alisa Schaefbauer
Manual Updates Harvey Bush, David Foster, Daniel
Grove, Josh Huynh, Ray Massa,
W.D. Robinson, Bobby Tait
90-DAY WARRANTY
Accolade warrants for a period of 90 days from the date of purchase
by the orignal purchaser of the Software that the recording medium
on which it is recorded will be free from defects in materials and
workmanship. Defective media which has not been subjected to
misuse, excessive wear or damage due to carelessness
may be returned during the 90 days period without charge.
After the 90-day period, defective media may be replaced in the
United States for $10 (U.S. dollars; plus 7.75% sales tax if the
purchaser resides in California). Make checks payable to Strategic
Simulations, Inc. and return to Accolade, Inc. 5300 Stevens Creek
Blvd, Suite 500, San Jose, CA 94086.
LICENSE AGREEMENT
This computer software product (the Software) and user manual are
provided to the Customer under license from Accolade, Inc. and are
subject to the following terms and conditions, to which the Customer
agrees by opening the package of the Software, or using the Software:
Granting of this license does not transfer any right, title or
interest in the Software, or user manual to the Customer except as
expressly set forth in this License Agreement. The Software and user
manual may not be duplicated or copied for any reason. The Customer
may not transfer or resell the Software or user manual.
Star Control II is a trademark of Accolace, Inc. Portions (c)1992
PaulReiche III & Fred Ford. Game (c)1992 by Accolade, Inc. All
rights are reserved. Neither the Software nor the user manual may
be duplicated or copied for any reason. The customer may not
transfer or resell the Software or user manual.
The remedies provided above are the Customer's sole and exclusive
remedies. In no event shall Accolade, Inc. be liable for any direct,
indirect, special, incidental or consequential damages with respect
to the Software or the user manual. Except as provided above,
Accolade, Inc. makes no warranties, either expressed or implied,
with respect to the Software or user manual, and expressly disclaims
all implied warranties, including, without limitation, the warranty
of marchantability and of fitness for a particular purpose.
All other trademarks and registered trademarks are the properties
of their respective owners.
TABLE OF CONTENTS
Introduction
Technical Support Information
Star System Details
The 20 Overall Richest Star Systems
The 20 Most Mineral Rich Star Systems
The 20 Most Life Rich Star Systems
A Complete List of all Star Systems and their Contents
Rainbow World Locations
Alien Homeworld Locations
New Alien Races Biographies
Burvixese
Chmmr
Dnyarri
Drall
Druuge
Faz
Gg
Kohr-Ah
Kzer-Za
Mael-Num
Melnorme
Orz
Pkunk
Slylandro
Supox
Taalo
Thraddash
Utwig
Yuli
Yuptar
Zoq-Fot-Pik
Alien Lifeform Details
Puzzles and Mysteries Explained
Ariloulaleelay: The Location of their Secret Homeworld
Aqua Helix: From Whom and Where to Steal It
Burvixese 'Caster: Where to Find It
'Casters: What to Do with Them
Chmmr: Speeding the Process
Clear Spindle: Where to Get It
Deep Child Egg Case Fragments: Where to Find Them
Druuge: How to Trade in Good Conscience
Fwiffo: Making Friends with the Spathi Captain on Pluto
Kohr-Ah: Slowing their Death March
Ilwrath: How to Get Rid of the Pesky Monsters
Orz: Hosting an *Alliance Party*
Pkunk: Becoming Friends
Pkunk: Stopping their Migration to Yehat Space
Portal Spawner: A Map of QuasiSpace-HyperSpace Shortcuts
Rosy Sphere: Where to Buy It
Sa-Matra: How to Destroy It
Shofixti: Resurrecting the Species
Slylandro Probes: How to Stop Them
Spathi: Forming an Alliance
Starbase Commander: Convincing Him to Help You
Sun Device: How to Acquire It
Syreen: Forming an Alliance
Syreen: Locating the Ship Vault
Talking Pet: Enlisting its Assistance
Taalo Shield: How to Acquire It
Thraddash: Forming an Alliance
Ultron (Broken): How to Effect Repairs
Umgah: Forming an Alliance
Utwig Bomb: Amplifying its Destructive Power
VUX: Apologies, Apologies
Winning the Game: In a Nutshell
Words: Getting the Ur-Quan and Kohr-Ah to Reveal their Past
Yehat: Triggering the Revolution
ZEX: Dealing with the Eccentric Admiral
Zoq-Fot-Pik: Forming an Alliance
Giveaway Clues
INTRODUCTION
This document ontains everything you need to know to win Star Control
II -The Ur-Quan Masters, plus a whole lot more. Secret histories will
be revealed and dark motives hauled into the light of day. We'll also
pro-vide you with more details about the stars, planets, ships, and
alien races than you can absorb in a light year (all right, maybe a
light week).
There is only one rule about this book; it's not meant to be read.
That's right, it's strictly to build your confidence. Having it handy
assures that you can always find the answer to a perplexing problem.
But to actually read it, well now, that's quite another matter. After
all, you don't want to spoil the fun, do you? I mean, if you know all
the secrets, the game won't be any challenge! Star Control II was
hard to make, so it should be hard to play. Right? What's that? We
may be crazier than a loboto-mized mooncalf, but you're not! You have
a point. Here, read all you want! The answer to every mystery is in
your hands at a mere flip of a page. Now, if you'll excuse us, we're
due for some serious couch time.
Enjoy! Enjoy!
Paul Reiche III and Fred Ford
(developers of Star Control II)
STAR SYSTEM DETAILS
The 20 Overall Richest Star Systems
Mineral Totals Biological Totals
Star System and Best Worlds and Best Worlds
----------- --------------- -----------------
Delta Aurigae 11005 (7,2a,1b) 256 (2,1b,1a)
Beta Carinae 7982 (2,9d,9b) 304 (4,3b,7a)
Beta Scorpii 12680 (5,7,3) 178 (8b,6,3)
Beta Circini 6897 (7,8,3) 248 (3a,1,2a)
Delta Sextantis 5901 (9,3,6) 322 (5a,1,2b)
Beta Tauri 5747 (5a,7,5b) 277 (1,5b,5a)
Alpha Olber 6940 (3,6b,1) 241 (3,7,6a)
Epsilon Draconis 7298 (1,9,2a) 230 (8a,2a,7)
Zeta Scorpii 4134 (9,9a,5) 309 (9a,8,3)
Gamma Tauri 7307 (1c,5b,4d) 219 (2b,1a,3b)
Gamma Geminorum 2388 (4a,4c,4b) 341 (3,1,4c)
Epsilon Scuti 8365 (5b,4,3a) 175 (5b,3b,5d)
Lambda Hyades 1949 (6,4,3) 329 (7,1,4a)
Beta Vulpeculae 6208 (5d,5a,3) 214 (2d,6,2a)
Gamma Circini 4903 (6,3,1) 247 (6,2,5)
Delta Chandrasekhar 4299 (4,1,8) 259 (3,6,7d)
Aldebaran 6488 (5c,2,4) 201(2a,2,5a)
Kappa Hyades 4736 (6,1,2) 186 (2,9a)
Fomalhaut 4158 (1,5a,2) 191 (5a,5b,4)
Alpha Chandrasekhar 4799 (1,9b,7c) 175 (2,5a,9b)
The 20 Most Mineral Rich Star Systems
Mineral Totals
Star System and Best Worlds
------------ ---------------
Beta Scorpii 12680 (5,7,3)
Delta Tauri 12080 (2,1,7)
Alpha Ceti 11739 (2,6b,5a)
Alpha Centauri 11476 (3,8,1)
Delta Aurigae 11005 (7,2a,1b)
Beta Cephei 10447 (6,9b,4)
Zeeman 10421 (5a,4a,6b)
Zeta Vulpeculae 9404 (3a,7,1)
Beta Normae 9153 (3,7,2)
Delta Brahe 9100 (1,3,9a)
Alpha Antliae 8734 (8c,5,3)
Alpha Columbae 8370 (5,4a,4b)
Epsilon Scuti 8365 (5b,4,3a)
Alpha Ptolemae 8055 (7a,7d,6c)
Beta Persei 8037 (6,3c,5a)
Beta Carinae 7982 (2,9d,9b)
Zeta Volantis 7912 (7,6,3)
Epsilon Normae 7718 (4,6,3b)
Alpha Crucis 7702 (2a,5,4a)
Iota Hyades 7379 (2,1,7a)
The 20 Most Life Rich Star Systems
Biological Totals
Star System and Best Worlds
----------- -----------------
Gamma Geminorum 341 (3,1,4c)
Lambda Hyades 329 (7,1,4a)
Delta Sextantis 322 (5a,1,2b)
Zeta Scorpii 309 (9a,8,3)
Beta Carinae 304 (4,3b,7a)
Beta Tauri 277 (1,5b,5a)
Gamma Sextantis 271 (3b,3a,1)
Delta Chandrasekhar 259 (3,6,7d)
Alpha Sextantis 257 (3,1b,1a)
Zeta Orionis 257 (5,4)
Delta Aurigae 256 (2,1b,1a)
Beta Corvi 255 (1,6,3)
Epsilon Sextantis 253 (2,3,6a)
Alpha Trianguli 252 (1,5,8b)
Beta Circini 248 (3a,1,2a)
Gamma Circini 247 (6,2,5)
Alpha Olber 241 (3,7,6a)
Gamma Mensae 234 (4,4a,7b)
Alpha Giclas 231 (4,7c,7a)
Epsilon Draconis 230 (8a,2a,7)
A Complete List of all Star Systems and their Contents
Mineral Totals Biological Totals
Star System and Best Worlds and Best Worlds
----------- --------------- -----------------
Achernar 389(2,1) 0
Alcor 2906(6a,1,2a) 42 (2c)
Aldebaran 6488 (5c,2,4) 201 (2a,2,5a)
Algol 330 (5,6,4) 0
Almagest 1959 (2,3,1) 62 (2)
Altair 5107 (3,5,4) 146 (2,3a)
Andromedae Alpha 4317 (3,1,4) 46 (5a,6)
Andromedae Beta 180 (1) 0
Antares 1942 (6b,5,6c) 5 (6a)
Antliae Alpha 8734 (8c,5,3) 38 (3)
Antliae Beta 356 (1,2) 0
Antliae Gamma 2764 (2,1) 0
Antliae Delta 2049 (4,1,3c) 43 (1,2)
Antliae Epsilon 4270 (2,6,8a) 75 (4a,3,2)
Antliae Zeta 3409 (4,3b,1a) 104 (1b)
Apodis Alpha 3444 (1,2,3a) 0
Apodis Beta 5292 (2,6b,3) 75 (9b,9a,6b)
Apodis Gamma 3061 (6a,8b,6c) 81 (9b,1)
Apodis Delta 544 (1) 0
Aquarii Alpha 56 (1) 107 (1)
Aquarii Beta 6089 (5c,6d,8) 90 (1a,1,2)
Aquarii Gamma 3022 (1,3,7) 68 (5)
Aquarii Delta 1175 (2,1,3) 0
Aquarii Epsilon 944 (4b,5,1) 0
Aquarii Zeta 1075 (2,1) 0
Aquarii Eta 3526 (3,5,7) 151 (4,3)
Aquilae Alpha 1351 (3,2) 0
Aquilae Beta 826 (1) 0
Aquilae Gamma 2326 (8,4d,5a) 207 (1,8,2)
Aquilae Delta 3993 (3,1,2a) 76 (1,5)
Aquilae Epsilon 388 (3a,6,5) 9 (1)
Arae Alpha 2895 (1,1a) 12 (1a)
Arae Beta 2422 (3,2,4) 0
Arae Gamma 184 (1) 0
Arae Delta 1311 (2,6,7) 96 (6)
Arae Epsilon 364 (1,2) 0
Arcturus 1420 (1,4,5) 176 (1a,1)
Arianni Alpha 193 (1) 0
Arianni Beta 1493 (2,1a,1b) 0
Arianni Gamma 1127 (4a,1,2c) 138 (4a,1,2b)
Arietis Alpha 135 (1) 0
Arietis Beta 1086 (1) 58 (1)
Arietis Gamma 1401 (1,2b,2) 0
Arietis Delta 270 (2,1) 49 (2)
Arietis Epsilon 567 (2,3,1) 0
Aurigae Alpha 5230 (6b,2,6a) 104 (3,5a,2a)
Aurigae Beta 952 (1,4a,2) 0
Aurigae Gamma 7343 (7,3b,2a) 141 (2a,3d,2c)
Aurigae Delta 11005 (7,2a,1b) 256 (2,1b,1a)
Bellatrix 2231 (1,2,3) 0
Betelgeuse 2816 (3a,3b,3) 184 (1,3)
Bootis Alpha 2868 (5,2,1) 228 (4a,2,4c)
Bootis Beta 835 (1,3,2) 0
Bootis Gamma 1842 (5,2,3) 0
Bootis Delta 435 (2a,2,1) 0
Bootis Epsilon 676 (1a,2,5a) 0
Bootis Zeta 228 (2,1a) 0
Bootis Eta 3125 (4,3a,7) 0
Brahe Alpha 831 (3,1,5) 126 (2,6)
Brahe Beta 4752 (1,3a,3b) 0
Brahe Gamma 3619 (1,2) 0
Brahe Delta 9100 (1,3,9a) 91 (8b,4)
Brahe Epsilon 270 (4a,1,3) 60 (1)
Brahe Zeta 772 (1,2b,2a) 0
Caeli Alpha 612 (1b,1a,1d) 0
Caeli Beta 909 (1,4,3) 22 (2)
Caeli Gamma 2180 (2a,1c,2) 66 (2a)
Caeli Delta 595 (1a,2b,1b) 0
Caeli Epsilon 2347 (1b,1c,1a) 0
Camelopardalis Alpha 1631 (1,3,4b) 38 (4a)
Camelopardalis Beta 3033 (1b,3,1c) 65 (7,1a)
Camelopardalis Gamma 3824 (5b,2,1) 92 (4)
Camelopardalis Delta 1743 (1,4,7) 0
Camelopardalis Epsilon 862 (1a,1,2) 0
Camelopardalis Zeta 897 (2,1c,1a) 23 (2)
Camelopardalis Eta 607 (4,3,2a) 126 (3,1)
Camelopardalis Theta 1315 (5b,3,4b) 0
Camelopardalis Iota 1131 (3,2,1a) 0
Cancri Alpha 2082 (3,1,2) 79 (3,1)
Cancri Beta 970 (1a,1,1b) 104 (1b)
Cancri Gamma 854 (3,1,2) 0
Cancri Delta 681 (1a,1c,1d) 0
Canopus 260 (1) 0
Capella 1248 (1,2) 0
Capricorni Alpha 114 (1) 24 (1)
Capricorni Beta 2042 (2b,2a,2c) 89 (2a)
Capricorni Gamma 120 (1) 0
Carinae Alpha 2080 (1) 0
Carinae Beta 7982 (2,9d,9b) 304 (4,3b,7a)
Carinae Gamma 176 (1a,1b) 0
Cassiopeiae Alpha 645 (1a,1d,1b) 0
Cassiopeiae Beta 1401 (5,4,5a) 45 (3)
Cassiopeiae Gamma 2993 (4b,3,2b) 102 (1,3)
Cassiopeiae Delta 1503 (1,4,3a) 0
Cassiopeiae Epsilon 3323 (1,2) 0
Centauri Alpha 11476 (3,8,1) 0
Centauri Beta 3377 (3c,1c,1b) 92 (3b,5)
Centauri Gamma 1461 (1,2,1a) 0
Centauri Delta 3921 (2a,6,4) 186 (2a)
Centauri Epsilon 572 (1) 0
Centauri Zeta 2193 (1c,4,2a) 56 (1a)
Cephei Alpha 4687 (3,1,7) 0
Cephei Beta 10447 (6,9b,4) 75 (1a,2a,4)
Cerenkov Alpha 5720 (5,2b,7b) 155 (1,9)
Cerenkov Beta 1123 (6a,7a,6) 10 (7a)
Ceti Alpha 11739 (2,6b,5a) 0
Ceti Beta 4334 (3,2b,6) 105 (2a)
Ceti Gamma 1900 (5,3a,2) 47 (2,1)
Ceti Delta 4872 (9a,5a,5c) 55 (5d,4)
Ceti Epsilon 2508 (2a,1,4) 0
Ceti Zeta 2199 (6,5,3) 86 (3)
Ceti Eta 1466 (3,5,8a) 0
Chamaeleonis Alpha 6653 (4,5b,6) 148 (5b,5d,3)
Chamaeleonis Beta 1298 (1,5,2) 216 (5,8,7)
Chamaeleonis Gamma 2472 (1b,2,3) 85 (1b)
Chamaeleonis Delta 136 (1) 0
Chamaeleonis Epsilon 2011 (7a,4,5) 101 (7a,7b)
Chamaeleonis Zeta 808 (1a) 0
Chamaeleonis Eta 4752 (5b,1,2a) 103 (5b,5d)
Chamaeleonis Theta 534 (1) 0
Chamaeleonis Iota 5668 (4,1,7b) 84 (1)
Chamaeleonis Kappa 4356 (1a,1c,1b) 47 (1c,1a)
Chandrasekhar Alpha 4799 (1,9b,7c) 175 (2,5a,9b)
Chandrasekhar Beta 4350 (2,1) 0
Chandrasekhar Gamma 1613 (4a,6,5) 12 (3a,5)
Chandrasekhar Delta 4299 (4,1,8) 259 (3,6,7d)
Chandrasekhar Epsilon 144 (1) 0
Circini Alpha 6053 (4d,1c,6c) 122 (2b,5)
Circini Beta 6897 (7,8,3) 248 (3a,1,2a)
Circini Gamma 4903 (6,3,1) 247 (6,2,5)
Circini Delta 2283 (2,6d,4) 28 (4,2,7a)
Circini Epsilon 1543 (2,7,1) 35 (1)
Circini Zeta 3129 (4,7a,3a) 86 (1,7a,3a)
Columbae Alpha 8370 (5,4a,4b) 0
Columbae Beta 64 (1) 0
Columbae Gamma 1116 (1) 11 (1)
Copernicus Alpha 54 (1) 0
Copernicus Beta 5770 (1,3,2a) 0
Copernicus Gamma 1610 (8c,4,7) 0
Corvi Alpha (Victim of interdimensional fatigue)
Corvi Beta 1766 (7,6,2) 255 (1,6,3)
Corvi Gamma 1566 (2,4,1) 0
Corvi Delta 129 (1) 0
Corvi Epsilon 898 (1a,5,1b) 219 (1a,1c,7)
Corvi Zeta 1520 (5d,5a,6b) 195 (4a,4b)
Corvi Eta 709 (5b,4b,4a) 100 (5b,4b)
Crateris Alpha 2533 (5a,4,5b) 0
Crateris Beta 1773 (3,7,5) 18 (1)
Crateris Gamma 4309 (5a,1a,2) 30 (2)
Crateris Delta 3726 (4a,9a,6b) 172 (9,4a,1)
Crateris Epsilon 1245 (2,4,4a) 109 (1,4)
Crateris Zeta 403 (2b,2a,1a) 0
Crateris Eta 598 (1,2a,2c) 6 (2b)
Crateris Theta 1769 (3,1,4c) 0
Crucis Alpha 7702 (2a,5,4a) 7 (1a,3)
Crucis Beta 2492 (2a,2,3) 164 (2,1)
Crucis Gamma 999 (4a,3b,1a) 0
Crucis Delta 1007 (1a,1c,1d) 106 (1d,1a)
Cygnus Alpha 3492 (2,5,6) 28 (4)
Cygnus Beta 4019 (5a,2a,4) 114 (4,3)
Cygnus Gamma 103 (1) 0
Cygnus Delta 1561 (2,1,3a) 182 (1,3b)
Cygnus Epsilon 181 (3,2,1) 0
Delphini Alpha 942 (1,3,5c) 0
Delphini Beta 350 (1) 0
Deneb 352 (3,2,1) 0
Doradus Alpha 189 (1) 0
Doradus Beta 2109 (4,5,1) 208 (3b,4,2b)
Draconis Alpha 554 (2b,1,2a) 0
Draconis Beta 3008 (6a,3b,7b) 60 (6a,7c,5c)
Draconis Gamma 5590 (3c,7,3a) 155 (3b,3a,3c)
Draconis Delta 2720 (4,8,2b) 122 (2a,1,3)
Draconis Epsilon 7298 (1,9,2a) 230 (8a,2a,7)
Draconis Zeta 1695 (1,7b,8a) 30 (4)
Draconis Eta 683 (1c,1d,1b) 50 (1a)
Draconis Theta 3131 (1,3,4) 0
Draconis Iota 2581 (1,5,2) 123 (1)
Draconis Kappa 3783 (2,4,5) 16 (5)
Draconis Lambda 2525 (3,2,2a) 49 (2,6)
Draconis Mu 801 (4,2b,2a) 0
Draconis Nu 616 (2a,1,2c) 55 (2a)
Draconis Xi 493 (2a,2b,1) 0
Equulei Alpha 4832 (1,3b,3a) 0
Equulei Beta 532 (4,2,1) 92 (1)
Eridani Alpha 2022 (1b,1a,1c) 0
Eridani Beta 3938 (4,1a,3c) 41 (3d,3c)
Eridani Gamma 5541 (1,2b,2a) 0
Fomalhaut 4158 (1,5a,2) 191 (5a,5b,4)
Fornacis Alpha 4221 (5,2,1) 4 (1)
Fornacis Beta 2445 (5b,3,6a) 114 (3,6a)
Fornacis Gamma 1651 (1,2c,2a) 47 (2c,1)
Fornacis Delta 1317 (3,4,5) 0
Fornacis Epsilon 1438 (4,2a,1) 0
Fornacis Zeta 1751 (5,2,3c) 49 (3b,3c,3a)
Fornacis Eta 513 (1,3,2a) 0
Geminorum Alpha 4257 (4b,2,5) 0
Geminorum Beta 4245 (1a,1c,3b) 105 (1b,4,1a)
Geminorum Gamma 2388 (4a,4c,4b) 341 (3,1,4c)
Geminorum Delta 257 (1) 3 (1)
Giclas Alpha 3663 (7b,7a,4) 231 (4,7c,7a)
Giclas Beta 1850 (4a,3,2) 0
Giclas Gamma 323 (2,3) 0
Giclas Delta 3346 (8,2,1) 16 (8)
Giclas Epsilon 904 (1) 0
Giclas Zeta 2225 (1a,3b,3c) 0
Giclas Eta 4236 (4,2,3a) 37 (5)
Giclas Theta 1548 (6,7,2a) 80 (4,2c)
Gorno Alpha 4051 (2,8,3) 203 (1,6a)
Gorno Beta 664 (2,3b,3a) 172 (2,3a)
Gorno Gamma 1748 (3,5,4) 0
Gorno Delta 3479 (4,6,5) 75 (4,5)
Gorno Epsilon 311 (1) 0
Groombridge 1056 (1) 0
Gruis Alpha 112 (1) 0
Gruis Beta 1949 (2,1) 103 (1)
Gruis Gamma 3006 (1,3a,3b) 10 (3b)
Gruis Delta 1060 (3a,1a,4d) 104 (1a)
Gruis Epsilon 281 (1a,1) 32 (1)
Gruis Zeta 1768 (1b,1a) 105 (1a)
Gruis Eta 1623 (3c,1,3a) 0
Herculis Alpha 6846 (2,3,2a) 99 (3,2,1a)
Herculis Beta 213 (2,1) 0
Horologii Alpha 1584 (6,1a,5) 154 (2,5)
Horologii Beta 2438 (1,6d,5) 150 (6a,2)
Horologii Gamma 575 (2,3,1) 23 (3)
Horologii Delta 159 (2,1) 0
Horologii Epsilon 1032 (2,1) 0
Horologii Zeta 1796 (3,4,7) 0
Horologii Eta 1284 (4,2a,1a) 0
Horologii Theta 201 (1) 0
Horologii Iota 1854 (7,4,6) 0
Horologii Kappa 5371 (4,6d,7) 79 (6d,5b,6a)
Horologii Lambda 1638 (1,2,3) 0
Hyades Alpha 6015 (1,3b,7) 11 (8)
Hyades Beta 2710 (5,2,1) 192 (4,2)
Hyades Gamma 1386 (3,1,4) 124 (3,2c)
Hyades Delta 2436 (3,6,9a) 0
Hyades Epsilon 1133 (2c,6,7) 77 (4,3,2a)
Hyades Zeta 3756 (9,1,2) 86 (3,8,5)
Hyades Eta 2840 (2,3b,5a) 80 (3a,5a)
Hyades Theta 2493 (1,2c,2a) 0
Hyades Iota 7379 (2,1,7a) 72 (2,7b)
Hyades Kappa 4736 (6,1,2) 186 (2,9a)
Hyades Lambda 1949 (6,4,3) 329 (7,1,4a)
Hydrae Alpha 3869 (3a,5,6) 201 (2,1,5)
Hydrae Beta 239 (1a,1b) 0
Hydrae Gamma 575 (4c,3,4d) 10 (4c)
Hyginus Alpha 705 (2,4a,1) 0
Hyginus Beta 1515 (4,1,5) 0
Hyperion 826 (2a,2b,3) 0
Illuminati Alpha 4694 (1,4,5) 64 (6)
Illuminati Beta 715 (1,2a,2b) 0
Illuminati Gamma 4401 (9a,6,4a) 101 (6,2)
Illuminati Delta 2064 (5a,2d,2a) 6 (5a)
Illuminati Epsilon 612 (4,1) 0
Illuminati Zeta 1270 (6,3,9) 50 (3)
Illuminati Eta 3786 (2c,6b,8) 43 (1a,6b)
Illuminati Theta 1668 (1c,4,2) 0
Indi Alpha 639 (1,1a,2a) 0
Indi Beta 208 (1,2) 0
Kepler Alpha 5881 (5b,5d,3) 96 (6a,1,8d)
Kepler Beta 1274 (2a,2b,3) 0
Kepler Gamma 1011 (1) 144 (1)
Klystron Alpha 392 (3,2,4) 0
Klystron Beta 1193 (5c,1,4) 0
Krueger Alpha 1638 (3,2a,2) 0
Krueger Beta 538 (3,2,1) 0
Krueger Gamma 2152 (3,1a,2) 30 (2)
Krueger Delta 1150 (1c,1b,1a) 42 (4)
Krueger Epsilon 935 (4a,4b,3) 6 (4b)
Krueger Zeta 2850 (2,3,1) 19 (3)
Lacaille Alpha 2640 (7d,2,1) 42 (8,4a)
Lacaille Beta 45 (1) 30 (1)
Lacaille Gamma 5594 (3b,6,5b) 91 (3b,3a,5a)
Lacertae Alpha 2019 (1,2a,2) 6 (2)
Lacertae Beta 1169 (2,3a,4) 86 (3a,3c)
Lalande Alpha 1000 (1,2) 0
Lalande Beta 1604 (2,1) 72 (2)
Lalande Gamma 225 (1) 0
Lalande Delta 1071 (4,3,1a) 100 (4)
Lentilis Alpha 982 (1,2) 57 (2,1)
Lentilis Beta 4881 (3a,5,3b) 114 (2,1)
Lentilis Gamma 887 (6b,3,4b) 26 (4b,6a)
Lentilis Delta 1028 (3,1c,1a) 55 (2)
Leonis Alpha 4363 (5,4,1) 123 (1,2b)
Leonis Beta 2746 (2,3,4b) 0
Leonis Gamma 7138 (2,4,6) 71 (8,2,2a)
Leporis Alpha 1674 (2b,5,3) 0
Leporis Beta 3084 (1,5,8) 155 (8,7a,1)
Leporis Gamma 3023 (1,2,4) 0
Librae Alpha 4737 (1b,1d,1c) 55 (2,5)
Librae Beta 986 (1b,1,1a) 48 (1b,1)
Librae Gamma 138 (1b,1a) 31 (1a)
Librae Delta 53 (2a) 20 (2a)
Librae Epsilon 635 (1) 0
Librae Zeta 1133 (1) 65 (1)
Librae Eta 2027 (2,1,2b) 6 (2b)
Lipi Alpha 3290 (2a,6b,2b) 56 (8,3c)
Lipi Beta 3033 (5,4c,1) 60 (1)
Lipi Gamma 954 (2a,2b,1) 0
Lipi Delta 525 (1,2a,2b) 0
Lipi Epsilon 2385 (1,2a,2c) 0
Luyten Alpha 223 (2,1) 0
Luyten Beta 2062 (4,2,7) 189 (8b,9a,8d)
Luyten Gamma 6059 (2,3,4) 124 (6b,8b,5a)
Lyncis Alpha 1150 (3,4,2) 30 (3)
Lyncis Beta 1773 (7,4,6) 8 (5)
Lyncis Gamma 671 (3a,1,2) 0
Lyncis Delta 153 (1) 55 (1)
Lyncis Epsilon 2908 (6,3c,1) 198 (3a,1,2)
Lyncis Zeta 801 (2,4a,5) 0
Lyncis Eta 563 (1,3,2) 0
Lyncis Theta 3789 (1,5a,4) 62 (3)
Lyrae Alpha 507 (1,2) 0
Lyrae Beta 2431 (5,3c,3a) 0
Maksutov Alpha 6240 (4,2a,1) 104 (5,2a,7a)
Maksutov Beta 360 (1,1a) 44 (1a)
Menkar 1412 (2,7,5) 72 (1,2)
Mensae Alpha 485 (1c,1d,1b) 0
Mensae Beta 2329 (5c,4a,6) 20 (3d)
Mensae Gamma 1255 (4,7c,4a) 234 (4,4a,7b)
Mersenne Alpha 1327 (1,2) 0
Mersenne Beta 1328 (4,8,2) 115 (3,1,7)
Metis 2131 (5,1a,6) 0
Microscopii 192 (1a,1b) 27 (1a)
Mira Alpha 360 (1,2) 82 (1)
Mira Beta 2341 (1c,1b,1d) 90 (1d)
Mira Gamma 309 (2,1) 0
Mira Delta 1395 (1d,2a,1a) 190 (1a,3,1d)
Mizar 147 (1) 0
Monocerotis Alpha 205 (1,2) 0
Monocerotis Beta 1777 (3,4,1) 0
Muscae Alpha 2910 (2,1) 0
Muscae Beta 1253 (1,5b,6) 0
Muscae Gamma 219 (3,2,1) 0
Muscae Delta 606 (3b,3a,1) 0
Muscae Epsilon 162 (1) 0
Muscae Zeta 1258 (2,4,6a) 7 (4)
Normae Alpha 5835 (2c,1c,2a) 140 (2a,2d,1c)
Normae Beta 9153 (3,7,2) 0
Normae Gamma 987 (6c,3,5a) 18 (5a)
Normae Delta 792 (3,4,2) 123 (1,2)
Normae Epsilon 7718 (4,6,3b) 121 (3a,4)
Normae Zeta 180 (1) 0
Octantis Alpha 3798 (4a,2,4b) 0
Octantis Beta 5147 (1,2b,5c) 168 (2d,1,3)
Olber Alpha 6940 (3,6b,1) 241 (3,7,6a)
Olber Beta 152 (1) 0
Olber Gamma 1095 (1,3,2) 0
Ophiuchi Alpha 495 (2,3a,2a) 50 (2a)
Ophiuchi Beta 4310 (2,1,6) 0
Ophiuchi Gamma 1271 (2,1,1a) 33 (1a,1)
Organon 1766 (2,4,5) 39 (1a)
Orionis Alpha 14 (1) 0
Orionis Beta 5081 (1,2b,3a) 28 (4b)
Orionis Gamma 2371 (5a,6,3) 0
Orionis Delta 2765 (6,1,2a) 71 (2,1,5)
Orionis Epsilon 163 (1) 0
Orionis Zeta 1508 (2b,4,6) 257 (5,4)
Orionis Eta 2417 (2,3,5a) 24 (1a)
Orionis Theta 2048 (6,1,3b) 167 (9)
Orionis Iota 1430 (1b,2,1a) 110 (1b,2)
Orionis Kappa 2890 (1,2d,2c) 98 (3a,4,5)
Orionis Lambda 99 (1) 0
Orionis Mu 2615 (2,3a,1) 0
Pavonis Alpha 2983 (4,7,5) 96 (7)
Pavonis Beta 1395 (5b,3,5a) 197 (5a,3)
Pegasi Alpha 4981 (5,9b,2) 100 (1,6)
Pegasi Beta 3711 (3,1,2) 0
Persei Alpha 455 (1,2) 64 (1)
Persei Beta 8037 (6,3c,5a) 0
Persei Gamma 1462 (2,5,1) 0
Persei Delta 2755 (1,3d,3c) 28 (3b)
Persei Epsilon 1096 (7b,7a,2) 20 (7b)
Persei Zeta 747 (3,5b,1) 120 (4,1)
Persei Eta 1513 (6,3,1) 65 (6)
Persei Theta 1013 (2,1,4) 6 (2)
Persei Iota 1155 (5,3,3a) 0
Phoenicis Alpha 1740 (1,5,2) 66 (2)
Phoenicis Beta 1484 (5b,4,7) 24 (5a,5b)
Phoenicis Gamma 2687 (2,3,1) 115 (2)
Pictoris Alpha 2312 (4,2,1) 40 (3c)
Pictoris Beta 620 (1b) 0
Pictoris Gamma 1166 (5,3,4) 0
Pictoris Delta 4099 (5,1,4) 210 (1,7)
Piscium Alpha 1118 (1,3,2) 87 (2)
Piscium Beta 640 (1) 0
Piscium Gamma 2932 (2a,1,5) 0
Piscium Delta 148 (1) 0
Pollux 144 (1,2) 0
Procyon 4048 (2,1,3a) 212 (3a,3b)
Ptolemae Alpha 8055 (7a,7d,6c) 71 (4,6c,2)
Ptolemae Beta 1952 (5c,1,3c) 114 (3b,1,3a)
Ptolemae Gamma 422 (3,4,5) 0
Ptolemae Delta 1190 (6a,2,1) 33 (6d)
Ptolemae Epsilon 63 (1) 0
Ptolemae Zeta 405 (3,1,2a) 152 (1)
Ptolemae Eta 4059 (1a,5,7) 103 (5,4)
Puppis Alpha 2291 (2,6,5) 135 (3b,2)
Puppis Beta 81 (1) 0
Puppis Gamma 36 (1) 0
Pyxidis Alpha 4765 (1a,2c,2d) 0
Pyxidis Beta 215 (1,2) 0
Pyxidis Gamma 3006 (9,2,6c) 0
Raynet Alpha 265 (1) 0
Raynet Beta 101 (1) 0
Raynet Gamma 270 (1,2) 0
Regulus 984 (3,6,1) 9 (1)
Reticuli Alpha 970 (2,3b,3a) 42 (3b)
Reticuli Beta 3435 (4,1,5) 32 (3)
Reticuli Gamma 2569 (1,2,4) 0
Reticuli Delta 1052 (2,1,2a) 0
Rigel 400 (1,2d,2c) 0
Sagittae Alpha 0 0
Sagittae Beta 295 (1) 0
Sagittae Gamma 2899 (6c,6b,1) 94 (6c,6a)
Sagittarii Alpha 3417 (5,4,3) 104 (2,5)
Sagittarii Beta 1366 (1,3,4) 132 (3,1)
Sagittarii Gamma 2851 (4a,3,4) 7 (3)
Sagittarii Delta 2194 (2,1,3) 87 (2)
Saurus Alpha 548 (3,1,2) 111 (3,2)
Saurus Beta 133 (1) 0
Saurus Gamma 100 (1) 0
Scorpii Alpha 1260 (1,2) 16 (1)
Scorpii Beta 12680 (5,7,3) 178 (8b,6,3)
Scorpii Gamma 3084 (1,1a,2) 0
Scorpii Delta 1677 (2a,2,1) 117 (1,2)
Scorpii Epsilon 2055 (1,1a,2) 0
Scorpii Zeta 4134 (9,9a,5) 309 (9a,8,3)
Sculptoris Alpha 6860 (2,2a,6a) 20 (5)
Sculptoris Beta (Suffered mysterious solar implosion.)
Sculptoris Gamma 150 (1) 0
Sculptoris Delta 984 (6,3,6a) 0
Sculptoris Epsilon 1930 (8,2,5) 9 (1)
Scuti Alpha 327 (1,1b) 0
Scuti Beta 1998 (8b,5,6) 4 (2)
Scuti Gamma 2479 (3,4,1) 19 (5)
Scuti Delta 401 (2,1,1a) 70 (1)
Scuti Epsilon 8365 (5b,4,3a) 175 (5b,3b,5d)
Scuti Zeta 6814 (2,3,5a) 6 (4)
Serpentis Alpha 3050 (1a,2b,1b) 0
Serpentis Beta 847 (1) 0
Serpentis Gamma 2099 (7,6,3) 102 (7,1,1a)
Serpentis Delta 2435 (5,7d,2) 148 (1,7c,7a)
Serpentis Epsilon 1370 (6a,6c,4) 20 (5b)
Serpentis Zeta 2371 (3a,4b,4a) 0
Serpentis Eta 159 (1) 0
Serpentis Theta 1589 (1,3,2) 0
Serpentis Iota 5566 (1,2a,2b) 0
Sextantis Alpha 1820 (2,3,5) 257 (3,1b,1a)
Sextantis Beta 255 (1) 0
Sextantis Gamma 1531 (3b,3a,4) 271 (3b,3a,1)
Sextantis Delta 5901 (9,3,6) 322 (5a,1,2b)
Sextantis Epsilon 4229 (7,1,3) 253 (2,3,6a)
Sextantis Zeta 2637 (1,7,4) 0
Sirius 1265 (1) 0
Sol 4008 (5a,1,5b) 0
Squidi Alpha 1502 (1,2) 18 (1)
Squidi Beta 1556 (3a,1,2) 0
Squidi Gamma 409 (2,2a,1) 32 (2)
Tauri Alpha 5155 (3a,2,4b) 152 (1,3d)
Tauri Beta 5747 (5a,7,5b) 277 (1,5b,5a)
Tauri Gamma 7307 (1c,5b,4d) 219 (2b,1a,3b)
Tauri Delta 12080 (2,1,7) 167 (3)
Tauri Epsilon 2278 (8b,7a,8a) 153 (7a,3)
Tauri Zeta 2106 (3,4,2a) 37 (1)
Telescopii Alpha 6863 (5a,5d,2) 139 (2)
Telescopii Beta 68 (1) 0
Telescopii Gamma 668 (3,1) 58 (2,1)
Trianguli Alpha 3401 (8c,7,4) 252 (1,5,8b)
Trianguli Beta 0 21 (1)
Trianguli Gamma 2502 (4,4a,3) 140 (1a,3,4a)
Tucanae Alpha 3457 (1a,3,2) 115 (2)
Tucanae Beta 2241 (5,2c,3) 150 (2a,3)
Tucanae Gamma 285 (1,2) 59 (2,1)
Vega 762 (2,5,4) 51 (4)
Vela 982 (3,5,2) 39 (1)
Velorum Alpha 5547 (3,1a,2) 0
Velorum Beta 481 (3,1,2) 0
Virginis Alpha 3684 (6b,8,6a) 85 (6a)
Virginis Beta 0 0
Virginis Gamma 937 (2a,6,1) 71 (1,6)
Virginis Delta 1458 (2,4,1) 37 (2)
Vitalis Alpha 1158 (2a,3,1) 54 (2a,1)
Vitalis Beta 1237 (2,4,1) 42 (1,3)
Vitalis Gamma 2391 (5,1,6) 88 (6,4)
Vitalis Delta 3501 (5,7b,7c) 71 (6b,6c)
Volantis Alpha 571 (3,2,1) 124 (1,2)
Volantis Beta 2039 (1c,1b,1d) 198 (1b,1a)
Volantis Gamma 5277 (1,5,3a) 0
Volantis Delta 2378 (4,3a,2) 0
Volantis Epsilon 7963 (4,3c,7) 146 (1,9a,3a)
Volantis Zeta 7912 (7,6,3) 0
Volantis Eta 2305 (1,5,2) 35 (2b)
Vulpeculae Alpha 977 (1a,1) 0
Vulpeculae Beta 6208 (5d,5a,3) 214 (2d,6,2a)
Vulpeculae Gamma 3456 (4,3,2) 102 (1)
Vulpeculae Delta 3774 (2c,8,1) 180 (8,1)
Vulpeculae Epsilon 290 (1,2) 0
Vulpeculae Zeta 9404 (3a,7,1) 47 (5a,5b)
Vulpeculae Eta 2175 (5,2a,7) 163 (1,2)
Wolf Alpha 870 (3,1a,4c) 106 (4a,4d)
Wolf Beta 100 (1) 0
Zeeman 10421 (5a,4a,6b) 0
Rainbow World Locations
Rainbow worlds, whose locations are highly valuable to the Melnorme,
can be found at the following star systems. In all cases, they are
in the first orbital position, closest to their sun.
Beta Pegasi
Epsilon Lipi
Groombridge
Beta Leporis
Epsilon Draconis
Gamma Aquarii
Gamma Reticuli
Zeta Sextantis
Gamma Kepler
Alpha Andromedae
It may be of interest to note that the locations of the Rainbow
worlds form a particular pattern when diagrammed on the map of
HyperSpace. The exact configuration of this pattern, as well as its
significance, is left to the player to divine.
Alien Homeworld Locations
-------------------------
Human (Earth) Sol 3
Androsynth Eta Vulteculae 2
Arilou QuasiSpace Coordinates (613.4, 590.0)
Chenjesu Procyon 2
Druuge Zeta Persei 1
Ilwrath Alpha Tauri 1
Mycon Epsilon Scorpii 1
Orz Gamma Vulpeculae 1
Pkunk Gamma Krueger 1
Shofixti Delta Gorno1 (thoroughly toasted)
Slylandro Beta Corvi 4
Spathi Epsilon Gruis 1a
Supox Beta Librae 1
Syreen (New) Betelgeuse 1
Syreen (Old) Beta Copernicus 1
Umgah Beta Orionis 1
Utwig Beta Aquarii 1
VUX Beta Luyten 1
Yehat Gamma Serpentis 1
Zoq-Fot-Pik Alpha Tucanae1
Unzervalt Vela 1 (the lost colony... your home)
Melnorme All supergiant star systems
NEW ALIEN RACES BIOGRAPHIES
Burvixese
The Burvixese race evolved on the planet Arcturus 1, progressing
from turtle-like swamp dwellers to a benevolent, highly tech-
nological society in just over fifteen million Earth years.
Although the Burvixese had the wherewithal to build crude inter-
planetary vessels, they preferred to remain on the comfortable
damp surface of their world and explore the galaxy through
HyperWave communication. Using this method, the Burvixese made
contact with several neighboring alien cultures, includ-ing the
Utwig, the Gg, and unfortunately, the Druuge, whom the Burvixese
would have been much better off never finding. For many decades,
the Burvixese exchanged information with these races, trading
technological, historical and philosophical facts and theories,
until the fateful year 2142. It was then that the Gg announced
that they had come under attack by a unknown alien race, who
appeared to want nothing less than their complete annihilation.
The Gg surmised that the hostile race, the Kohr-Ah, had located
them using the Gg's HyperWave transmissions. Knowing that they
had little chance of survival, the Gg warned the Burvixese that,
unless they restricted their own transmissions, they too might
face a gruesome fate.
Being a charitable race, before the Burvixese turned off their
HyperWave transmitters, they shared the Gg's warning with the
Druuge. But it was too late. The Druuge's powerful advertising
beacons had already attract-ed the attention of the murderous
Kohr-Ah, who, having finished with the Gg, began moving in the
general direction of the Persei constellation, home of the
Druuge. Realizing their peril, the Druuge took immediate
action. They ceased all transmissions and sent a task force
of their fastest ships to the moon of the Burvixese world.
Once there, the task force assembled a huge HyperWave
broadcaster on the moon's surface. When it was complete, the
Druuge activated the unit which began emitting powerful
HyperWave signals, focused directly toward the oncoming Kohr-Ah
fleet. The Druuge hoped that the hostile aliens would change
course toward the Burvixese planet and fail to find their own
worlds. Unfortunately, this ruse was all too effective: the
Kohr-Ah changed course, attacked the poor Burvixese and, sadly,
destroyed them all in three days of orbital bombardment.
Chmmr
Half living crystal, half machine, the Chmmr are a new hybrid
of two Old Alliance races, the Chenjesu and the Mmrnmhrm. This
synthesis, when complete, will produce the most powerful race
in the known region of the galaxy. The two races' reasons for
engaging in this hybridization are largely unknown, but some
researchers surmise that for the Chenjesu, it was a matter of
evolution. Having long since established a stable technology
and philosophy, the crys-talline Chenjesu may have felt a
need for "new blood" to promote radical change and growth.
The Mmrnmhrm's reasons were probably much more pragmatic.
Their creator, a huge alien factory-vessel known as the
Mother Ark, was failing and, without a new system for repro-
duction, the robotic Mmrnmhrm faced gradual but inevitable
extinction.
The Chenjesu and Mmrnmhrm made the final decision to begin
the hybrid synthesis, called The Process, after the two races
were defeated by the Ur-Quan Hierarchy in 2134. They both
chose to be imprisoned under a slave shield on the Chenjesu's
homeworld, Procyon 2. Not knowing what the two races planned,
the Ur-Quan agreed to this situation, and for the past
twenty years, The Process has continued. Estimates for The
Process' completion date range from 90-110 Earth years,
depending on the precise solar energy output of the slightly
variable star Procyon. If an additional source of solar
energy could be found, the Process would be completed much
sooner.
Dnyarri
This evil alien race consists of small, grayish creatures
resembling a cross between a toad and an unhealthy mushroom.
The Dnyarri's unassuming aspect belies its true nature as
one of the most hostile and dan-gerous species in the galaxy,
because each Dnyarri possesses psychic compulsion mental
powers. With these powers, a single Dnyarri can hold an
entire planet enthralled. A Dnyarri mental command is so
strong that only one race, the extinct Taalo, had been able
to resist its power.
The non-technological Dnyarri were discov-ered over 20,000
years ago by the Ur-Quan, then a peaceful member of the
Sentient Milieu. The Ur-Quan brain was particularly
susceptible to the Dnyarri's psychic compulsion, and the
Dnyarri used this weakness to force the Ur-Quan to transport
them off their planet and distribute them throughout Milieu
space. The ensuing slave war lasted only a few months as
race after race was quickly enslaved by the Dnyarri's'
powers. Only the Taalo could resist, and they were
destroyed by the other, now-enslaved races.
The reign of the Dnyarri lasted several thousand years.
During this time, they ruled the ex-milieu races with uniquely
perverse cruelty, even caus-ing two of the species to be
utterly destroyed. This period of time was a living nightmare
for the races who survived.
Like all slave masters, the Dnyarri were eventually defeated.
The hatred of their freed slaves was so extreme that the
Dnyarri were not eliminat-ed. Instead, their genetic struc-
tures were modified so that their offspring were born non-
sentient - dumb animals, who the Ur-Quan took as pets. The
immense telepathic powers remained in the Dnyarri, but
without intelligence they could use these abilities only
for interspecies translation at the command of their masters.
Over the following millennia the Dnyarri became known as the
"Talking Pets".
Drall
The Drall were one of the four founding members of the
cooperative union of races known as the Sentient Milieu,
which dominated the local region of space some 20,000 years
ago. Historical fragments show the Drall to be tall, skeletal
humanoids often reaching 3 meters in height. It is suggested
that the Drall evolved from a mud-skipper analog, because the
few images that remain show clear evidence of both mouth-lung
and gill systems.
In terms of their culture, philosophy, and history, we know
almost nothing. When the Dnyarri assumed control over the
Milieu, they found the Drall to be inferior to their other slave
races, and compelled the Ur-Quan and the Mael Num to destroy
them.
Druuge
The Druuge are a callous, amoral and perhaps even genuinely evil
race who care for nothing but profit and personal gain, usually
through devious mercantile exchange.
Physiologically, the Druuge are humanoid, but they possess
certain characteristics which make them less than attractive
to people from Earth. Chief among these traits are body odor,
constant oozing from the mouth, nose and ears, and breath best
described as putrid.
Druuge history bears strong similarity to that of Earth, however.
Having evolved from solitary hunter-gatherers, rather than
tribes, the individualization of the Druuge is much greater
than that of most humans. Sentiment, and more specifically the
concepts of Love, Honor and Charity, are totally foreign. Druuge
"families" are profit-making undertakings. Mutually acceptable
males and females meet at "Repro Mixers", negotiate terms, sign
the necessary forms, and engage in the requisite carnality. Any
offspring are instantly made part of this business arrangement,
and typically accept terms which give their parents a 12-18%
lifetime royalty on their income. Since the parents' take is
directly proportional to their offsprings' occupation, families
usually spend considerable funds in education and specific
training to further the return on their investment.
At present, all living Druuge are employed by a single entity,
the Crimson Corporation. In the past there were other
businesses, but with the relaxation of anti-monopoly laws, the
formation of a single, mono-lithic company was inevitable.
Using leverage buyout tactics, the Crimson Corporation has
purchased all land on all Druuge planets, and the atmosphere
as well. Breathing, as such, is considered a perq of working
for the Corporation, and consequently there is limited job
turnover. Retirement benefits most often include continued
breath provisions, though at reduced levels.
Not more than fifty years ago, the Druuge were informed by the
now-extinct Burvixese race (whose sad death can be blamed
directly on the Druuge) of a powerful alien nation called the
Utwig. The Utwig possessed some kind of gigantic bomb. The
Druuge recognized the description of the bomb as a Precursor
planeteering tool, and they set out to make it their own.
Traveling from Zeta Persei (the location of their central
trade world), the Druuge met the Utwig at Beta Aquarii. Their
plan was to entice them with useless but genuine Precursor
artifacts and take the bomb in exchange. The Utwig fell for
the Druuge's foul ruse, and snapped up the artifacts. But
instead of giving the Druuge their desired price, the Utwig
traded a collection of `historical oddments and genuine
artifacts', which to this day the Druuge are trying to
unload on unwary buyers. Specifically, these include Wimbli's
Trident and the Glowing Rod which are worthless, as well as
the Rosy Sphere which is useful.
Faz
The Faz joined the Sentient Milieu several centuries before
the Ur-Quan, about 2,000 years ago. Like the Ur-Quan and the
other Milieu races, the Faz fell under the psychic compulsion
of the Dnyarri and for over 2,000 years served their masters
every perverted wish. The Faz survived their time as slaves
and helped the Ur-Quan defeat the Dnyarri. But when their
evil masters were finally overthrown, the Faz became the first
victims of the "Path of Now and Forever", a new Ur-Quan
doctrine designed to ensure that race's perpetual freedom. The
Faz were offered the choice of fighting for the Ur-Quan as
battle thralls, or being forever contained on the surface of
their world, cut off from the rest of the galaxy. The Faz chose
the latter option, and thus became the first world - there
would eventually be thousands - to be enclosed in an Ur-Quan
slave shield.
The location of the Faz homeworld, and their eventual fate is
unknown.
Gg
The Gg were known only by the now-extinct Burvixese race
who communicated with the Gg via long range HyperWave broadcast.
It was the Gg who warned the Burvixese of the approach of the
hostile Kohr-Ah, as well as the accurate conjecture that the
Kohr-Ah used HyperWave trans-missions to locate their prey. Since
the Gg were loath to engage in visual transmissions, their
appearance must remain an eternal mystery for their world was
incinerated by the Kohr-Ah in 2142.
Kohr-Ah
The Kohr-Ah are a variant strain of the Ur-Quan race,
synthetically split off from the main species to become the
"muscle" of the Dnyarri slave empire - the physical laborers and
soldiers. In appearance, the Kohr-Ah resemble the Ur-Quan, except
that they have a black body sheath, while the Ur-Quans have a
brilliant green exterior.
When the Dnyarri were defeated over 20,000 years ago, both the
Ur-Quan and the Kohr-Ah agreed that they had to do something to
ensure that they would never again be made slaves. The green
Ur-Quan devised the "Path of Now and Forever", a doctrine which
dictated that all other races must be either permanent slaves to
the Ur-Quan, or be forever trapped on their own world under an
impenetrable force shield. This plan was not sufficient for the
black Ur-Quan. Nothing less than the complete destruction of all
non-Ur-Quan sentient life was acceptable, and this was defined
to be the "Eternal Doctrine" by a new leader named Kohr-Ah.
The conflict between the Kohr-Ah and the Ur-Quan led to a bloody
war. The Kohr-Ah lost, and were exiled by the Ur-Quan. The Kohr-Ah
slowly rebuilt their strength and now pursue their "Eternal
Doctrine" of genocide.
Kzer-Za
Kzer-Za is the name of the Ur-Quan hero who discovered that it
could temporarily stun the Dnyarri by inflicting severe pain upon
itself. Although Kzer-Za died in the process, this technique was
soon perfected, and a device known as the Excruciator was built
which provided the Ur-Quan and the Kohr-Ah with the constant flow
of agony necessary to defeat the Dnyarri. In honor of its courage,
Ur-Quan Kzer-Za was adopted as the name of the green Ur-Quan.
Mael-Num
The Mael-Num were one of the founding members of the Sentient
Milieu who survived the millennia of Dnyarri enslavement along
with the Ur-Quan, the Kohr-Ah, the Yuptar, and the Faz. When the
Dnyarri were finally overthrown, the Ur-Quan and the Kohr-Ah
adopted different strategies for protecting their species from
future enslavement. The green Ur-Quan chose to become slave
masters themselves, while the Kohr-Ah chose to destroy all other
intelligent life. When these two rival factions met at the
Mael-Num's home planet, this doctrinal conflict led to a bloody
war. During the battles between the Ur-Quan and the Kohr-Ah, the
Mael-Num fled their planet in a huge fleet of interstellar
vessels, and vanished.
Melnorme
The Melnorme are interstellar traders who deal primarily in
information. Since they enjoy somewhat of a monopoly on Hyper-
Space trading, the Melnorme never haggle over a price. Their first
offer is their one and only offer. The Melnorme are especially
interested in data on alien life forms, as well as the locations
of "Rainbow Worlds", rare planets whose strange radia-tions
confuse starship scanning systems.
The history of the Melnorme is poorly understood, not because
they are unwilling to reveal details, but because they will only
do so for vast sums of credits. Even the location of their
homeworlds is unknown.
Regardless of the details, the depth and breadth of this species'
knowl-edge makes it obvious that the Melnorme are an old and
widely traveled race.
Since the Melnorme have only one eye, they have no depth
perception, but their singular ocular organ is rich in complex-
cone cells, affording them sensitivity to light far outside the
range of human perception. Perhaps as a consequence, the
Melnorme take great care and concern with color.
Orz
The Orz are newcomers to the nearby region of space, having
somehow displaced the Androsynth in the Vulpeculae constella-
tion during only the last few years. The fate of the
Androsynth is unknown. Physiologically, the Orz seem
straightforward gill breathers, gathering dissolved gases
from a strong ethanol solution. However, in terms of mental
processes, the Orz are well...different. No known current
technological device can accurately translate their language.
The little that has been divined from contact with this race
leads to a disturbing conclusion: they are not from this
dimension. The Orz have somehow pushed through from... else-
where. Although the natives of the Orz remain a mystery, there
is a suggestion that the Ariloulaleelay may have some knowledge
on the nature of this species.
Pkunk
The Pkunk are a mystical off-shoot of the Yehat species who left
their violent brethren long ago to found a peaceful enclave in
the Krueger and Giclas constella-tions. The Pkunk claim to be in
contact with a "higher consciousness", a "more pure truth", a
"realer reality". Indeed, quite often Pkunk will offer profound
statements regarding the peculiar relevance of obscure events in
the distant past, or ominous por-tents of the near future. The
relevance of the Pkunks' "wisdom" is highly variable and somewhat
up to interpretation. Nonetheless, the Pkunk are a kind and help-
ful race whose friendship should not be spurned.
Although the Pkunk are inherently peaceful, they currently find
themselves at war with the Ilwrath who have attacked them on the
basis of commands from the dark Ilwrath deities, Dogar and Kazon.
Slylandro
The Slylandro are an ancient race of gasbag people who live in
the upper reaches of a gas giant's atmosphere. Their insubstantial
physiology has made it difficult for the Slylandro to construct
starships or other physical paraphernalia, and indeed they are
incapable of surviving the rigors of space travel. However, the
Slylandro are interested in exploration and new knowledge, and
were frustrated in this regard until the Melnorme happened by a
few decades ago. The Melnorme, who are always interested in
barter for new knowledge, offered to sell the Slylandro robotic
probe ships with which they could explore the galaxy in a remote
fashion.
Unfortunately, the Slylandro made a slight error in programming
the probes resulting in unanticipated behavior; instead of making
friendly contact with alien life forms, the probes attack
anything that moves.
Supox
The Supox are a race of kind, sentient plant creatures who evolved
from a species of semi-mobile symbionts. The Supox are quite aware
of how unlikely their evolutionary path appears, and they use this
fact as proof of their favored status with the "Higher Powers."
The Supox's biological foundation as a sym-biont is reflected in
their present relationship with the Utwig. The Supox look to the
Utwig for guidance, and use the Utwig culture as a model for their
own. In exchange, the Supox provide the Utwig with emotional
support and sage advice, both of which the Utwig sorely need.
Taalo
The Taalo were the only member of the Sentient Milieu who were able
to resist the mental compulsion powers of the Dnyarri and maintain
their freedom. This was a mixed blessing though, since the Dnyarri
response was to have all the other enslaved Milieu races attack
the Taalo planet at Delta Vulpeculae 2c, annihilating the Taalo.
Some historians have suggested that just before they were wiped
out, the Taalo were near completion of a device which would have
conferred their psychic immunity on the other Milieu races.
Thraddash
The Thraddash are an arrogant, stubborn, and thick-skinned species
who reside in the Draconis and Apodis star systems. They have
little or no respect for anything but force, which they admire
greatly. There is an old Melnorme proverb about the Thraddash which
goes something like this: "To make a Thraddash your friend, kill
him - but then of course, he's dead, so what's the point?"
Thraddash history includes the rise and fall of nineteen planet-
wide cultures. Tradition dictates that for a new culture to emerge
and assume dominance, it must defeat the previous culture in
battle. As a consequence, the Thraddash are constantly blasting
themselves back into savagery - all in the name of progress.
When the Ur-Quan entered the local region of space, the first
race they conquered was the Thraddash, who eagerly chose the role
of battle thrall. However, due to the Thraddash's arrogance and
relatively weak starships (a model previous to the one now in
service), the Ur-Quan left them behind in the Draconis star
system to "guard the rear".
Utwig
The Utwig are a race of sophisticated humanoids who inhabit the
Aquarii constel-lation. Their culture is ancient and elabo-rate,
as evidenced by their complex "Mask Etiquette" which dictates
which of the eigh-teen hundred standard "facial appliances" should
be worn under what circumstances. The Utwig empire was a vibrant,
exciting place to be during recent years because of the acquisition
of a supreme mystic device, the "Ultron", which was sold to the
Utwig by the Druuge. Regardless of the true pow-ers (if any) of
the Ultron, the Utwig felt that its presence guaranteed their
fulfillment.
Unfortunately, during a recent ritual, the Ultron was dropped and
broken, resulting in a planetwide suicidal depression. The Utwig
handed the broken Ultron over to their good friends and allies,
the Supox, and now all the Utwig can manage to do is brood, spin
regrets, and consider using their "super weapon" to end their
misery.
Yuli
The Yuli were members of the Sentient Milieu who were enslaved by
the Dnyarri, found inferior and ordered destroyed. Additional
details regard-ing this race are not available at this time.
Yuptar
Like the Yuli, the Yuptar were of the Sentient Milieu and fell
victim to the psychic coercive abilities of the evil Dnyarri.
Unlike the Yuli, the Yuptar survived the millennia of slavery
only to become the first victim of the Kohr-Ah's "Eternal
Doctrine" which required the "cleansing" of all non-Ur-Quan
races.
Zoq-Fot-Pik
The Zoq-Fot-Pik are a cooperative union of three separate,
intelligent alien races, who all evolved simultaneously on the
same world. There was a fourth intelligent species, the
Zebranky, who preyed cruelly on the other three races, but
in their equiva-lent of the Stone Age, the Zoq, Fot, and Pik
banded together and annihilated the Zebranky. The three races
found that they were much stronger and happier together than
apart, and as a result have maintained their union ever since.
At the present time, the Zoq-Fot-Pik have found themselves in
the unpleasant position of being in the middle of the doctrinal
conflict between the Ur-Quan and the Kohr-Ah, whose ferocious
battles have wreaked havoc on the Zoq-Fot-Pik worlds. As a
result, the Zoq-Fot-Pik are in great danger (and could use an
ally, quickly) but are also in a good situation to provide
intelligence on the progress of the war.
ALIEN LIFEFORM DETAILS
Hits to
Lifeform Type Value Stun Speed Danger
-------------------------------------------------------------
Roto-Dendron Sessile 1 1 0 Harmless
Macrocillia Sessile 6 1 0 Harmless
Splort Wort Sessile 3 1 0 Low
Whackin' Bush Sessile 5 3 0 Harmless
Slot Machine Tree Sessile 2 10 0 Harmless
Neon Worm Wanderer 1 2 Slow Harmless
Stiletto Urchin Coward 8 5 Slow Harmless
Deluxe Blob Hunter 2 2 Slow Low
Glowing Medusa Wanderer 3 8 Slow Moderate
Carousel Beast Hunter 10 15 Slow EXTREME
Mysterious Bees Hunter 3 3 Med Low
Hopping Blobby Coward 2 1 Med Harmless
Blood Monkey Wanderer 2 2 Med Low
Yompin Yiminy Hunter 4 6 Med Moderate
Amorphous Wanderer 9 12 Med EXTREME
Trandicula
Crazy Weasel Hunter 3 1 Fast Low
Merry Whumpet Coward 1 1 Fast Harmless
Fungal Squid Hunter 7 8 Fast Moderate
Penguin Cyclops Coward 15 2 Fast Low
Chicken Coward 1 1 Fast Low
Bubble Vine Wanderer 6 2 Slow Low
Bug-Eyed Bait Coward 4 2 Slow Low
Goo Burger Sessile 8 5 0 Low
Evil One Sessile 1 1 0 EXTREME
Brainbox Wanderer 0 1 Slow Harmless
Bulldozers
Zex's Beauty Hunter 15 15 Fast EXTREME
Lifeform Trivia
Hottest world with life: Alpha Circini 5 at1281 degrees
Single most life-rich planet: Delta Centauri 2a with 186 BioUnits
Number of planets with life: 562
Total number of lifeforms: 6451
Total number of BioUnits: 28,352
PUZZLES AND MYSTERIES EXPLAINED
Ariloulaleelay: The Location of their Secret Homeworld
The Ariloulaleelay are a secretive race whose homeworld is very well
hidden. The main reason you may want to seek this race out is that
they will give you an extremely valuable device, called a Portal
Spawner. This device will speed your travel through space quite
considerably.
Finding the Arilou is not only a matter of where but also of when.
They live in a - for lack of a better word - "place", which is
accessible only during the 17-20th day of each month. To find the
doorway to their "place", carefully examine the starmap during the
four specified days and look for a new green star. When you high-
light the star, instead of printing its name, it will simply say,
"Unknown". The Spathi in space know of this doorway, as do the
Melnorme. But if you want the exact location right this second,
see Giveaway Clue #19.
Aqua Helix: From Whom and Where to Steal It
The Aqua Helix can be found in Thraddash space, where it the most
highly revered object of that race. The Helix has been the
property of the Thraddash for millennia, and they aren't about to
give it to you under any circumstances. Therefore, you are forced
into the unpleasant role of thief.
Once you have located the right planet, you will note that the
Helix is protected by an absurd number of Thraddash ships. You
cannot beat them all - you will have to get sneaky. There are two
tricks you can pull on the Thraddash to get the Helix: one is to
convince them to go impress the Ur-Quan by attacking the Ur-Quan's
enemy, the Kohr-Ah. While the Thraddash are gone, you can sneak
down to the surface and snag the Helix. Alternately, you can ally
with the Thraddash, and then rely upon their naive trust to let
you go down to the surface to "just kind of look at" the Helix.
Either way, once you have taken the Helix, don't expect the
Thraddash to be your friends ever again.
To find the Aqua Helix planet, search Thraddash space for a planet
guarded by a bazillion ships (it's not their homeworld), or see
Giveaway Clue #18.
Burvixese 'Caster: Where to Find It
The Burvixese 'Caster was actually once the property of the Druuge
who placed it on the Burvixese' moon to lure the Kohr-Ah into
attacking the Burvixese instead of themselves. The Druuge's plan
worked, and alas, the Burvixese are no more. Nonetheless, the
Druuge want the 'Caster back, and are willing to buy it from you.
To learn the exact location of the Burvixese homeworld, talk with
the Melnorme or see Giveaway Clue #4.
'Casters: What to Do with Them
There are two HyperWave Broadcasting Units ('Casters) in the game
which can be used for a variety of different tasks, specifically:
To summon a Melnorme Trading ship just use a 'Caster anywhere in
HyperSpace. The ship will appear a few moments later.
Use a 'Caster at the Chenjesu homeworld to speak with them through
their slave shield. Note that this doesn't work on any other
shielded planet.
To impersonate certain divine personages, go to the homestar
system of the race whose god(s) you wish to emulate, and use the
'Caster.
Chmmr: Speeding the Process
If you talk enough with the Chenjesu/Mmrnmhrm hybrid race known as
the Chmmr, you will learn that they will not leave their world
until the melding process is complete, and this will take many
decades. The reason for this delay is because the "Process" is
fueled exclusively by the energy of the sun, Procyon. To speed the
process, you will have to find some way to increase the amount of
light energy falling on the Chmmr planet. To discover what you
need to do this, try talking to the Shofixti Tanaka in the Delta
Gorno star system. He once saw someone using a device that just
might do the trick. To discover who has the device and where it
can be found, see Giveaway Clue #11.
Clear Spindle: Where to Get It
The Clear Spindle is in the hands of the Pkunk at their homeworld.
To learn the location of this planet, talk with any Pkunk in
space, or see Giveaway Clue #16. Upon your arrival at this
planet, the Pkunk will give you the Clear Spindle for free and
with no obligations whatsoever.
Deep Child Egg Case Fragments: Where to Find Them
One set each of Egg Case Fragments can be found at all three of
the "Shattered" worlds in Mycon space. To find the fragments,
search the Mycon star systems for orange innermost planets with
black surfaces cracked to reveal rivers of magma. For the
precise locations of the Deep Child Egg Case Fragments, see
Giveaway Clue #3.
Druuge: How to Trade in Good Conscience
At best, the Druuge are cruelly amoral merchants with no
conscience or concern for the rights of others. At worst,
they are evil, conniving slave-traders, seemingly born from
the darkest pit of Hell. It is all a matter of perspective
- your perspective. More than anything, the Druuge want
members of your crew. They will trade all their wares for a
supply of your people to tend their atomic furnaces and/or
serve as fuel for the same. The question is, do you want to
sell your crew into slavery, and possibly hideous death,
in exchange for a shiny bauble or a few units of fuel? If
you are not bothered by this, by all means proceed, but be
prepared for the consequences. Should word of your black
deeds get back to the Earth Starbase, you may have trouble
recruiting more people for your subsequent trips into space.
Also, remember that the Commander is very protective of his
personnel, and if he finds out you have been selling them
to the Druuge, watch out!
If you cannot stomach becoming a trader in human flesh,
congratulations! But now you find yourself facing a
substantial problem: there is something which you absolutely
need from the Druuge. How can you acquire this item? The
Druuge will reveal this to you when you refuse their
suggestion to trade them your crew. In addition to buying
people, the Druuge will also make the following trades:
The Druuge desire Deep Child Egg Case Fragments from which
they extract incredibly tough, fungal fibers to build
inescapable harnesses for their slaves. For each set of
fragments, the Druuge will give you one of their Mauler
starships. There are three sets of fragments in the game,
but the Druuge will buy only two.
The Druuge will fill ALL of your ship's fuel tanks if you
give them the Burvixese HyperWave 'Caster. The Druuge will
not be interested in any other Caster you may offer them.
Should you be sufficiently foolish or desperate, you can
sell the Portal Spawner to the Druuge for three Mauler
starships PLUS a full load of fuel.
If you have no qualms about trading non-human slaves,
the Druuge will gladly purchase the Cryogenic hibernation
tanks containing the nubile Shofixti females in suspended
animation. The Druuge desire the maid-ens to serve as
surrogate mothers to a race of mindless hybrid offspring
who will provide the Druuge with a limitless supply of
living cannon fodder. This grim trade will earn you six
Mauler combat ships, and most probably a ticket to hell
in the afterlife.
When you trade one of the above items to the Druuge, they
may offer you the Rosy Sphere instead. Although the Druuge
do sell some worthless artifacts, this is not the case with
this particular artifact.
Fwiffo: Making Friendswith the Spathi Captain on Pluto
Although the Hierarchy base on Earth's moon has been
abandoned and the starships based there are long gone, a
small part of this force remains on the surface of Pluto.
A single Spathi captain named Fwiffo is the last remaining
member of the Earthguard, a fleet of Spathi and Ilwrath
combat ships left behind twenty years ago by the Ur-Quan to
monitor Earth. Over the years, nearly all the ships have
abandoned their post, leaving only Fwiffo.
Although Fwiffo possesses some interesting information, his
greatest value is as a member of your battle fleet. To get
Fwiffo to leave Pluto and join your fleet, you will have to
convince the Spathi captain that he would be safer joining
you than remaining on the surface of Pluto. Just keep talking
with Fwiffo until you get the opportunity to remind him about
the "monsters" in space who are all out to get him. After you
have scared Fwiffo in this manner, he will accept your offer
to join your fleet. Remember, even though you now have a
Spathi ship, you cannot build more back at the Starbase until
you have a supply of trained Spathi officers. The only way to
secure these officers is to ally with the Spathi at their
homeworld, Spathiwa which Fwiffo will tell you is Epsilon
Gruis I. Fwiffo will also tell you the Secret Spathi Cypher,
without which you will be unable to contact the Spathi Ruling
Council. The only other way to learn the Cypher is by buying
information on alien races from the Melnorme.
Kohr-Ah: Slowing their Death March
Once the Kohr-Ah have defeated the Ur-Quan in their Doctrinal
Conflict (usually in February of 2159), they will begin moving
through space, destroying each alien race in turn. When they
have eliminated all other races, the Kohr-Ah will move to Earth
and vaporize the starbase and its inhabitants, ending the game.
Up until this point, you can still win the game, regardless of
how many races have been vanquished.
Although you cannot stop the Kohr-Ah from winning their war
against the Ur-Quan, you can delay their victory for a year
(until February of 2160) by having the Utwig and Supox attack
them. To do so, get the Utwig's broken Ultron from the Supox,
repair the device, and then return the fully operational
Ultron to the Utwig.
Ilwrath: How to Get Rid of the Pesky Monsters
The Ilwrath are a nuisance you could best do without,
especially when you are traveling in the vicinity of Procyon.
Still, the question remains, how are you going to get rid of
them? The answer lies in subverting the Ilwrath's absurd
devotion to Dogar and Kazon, their dark gods of death, deceit
and destruction. Indeed, if you have talked with the Pkunk,
you may have surmised that someone else has done exactly the
same thing with the mysterious broadcasts on HyperWave
Channel 44.
To remove the Ilwrath menace permanently, consider impersonating
Dogar and Kazon, and giving the Ilwrath orders which will get
them out of your hair. However, you will need a special device
to aid you in your deception. To discover the nature of this
device, talk with the Spathi about the "Grand Master Planet
Eaters", or see Giveaway Clue #20.
Orz: Hosting an *Alliance Party*
The easiest alliance to build is with the unusual race called the
Orz. They can be found almost anywhere in the green Vulpeculae
constella-tion, and their homeworld is at Gamma Vulpeculae I.
Forging an alliance with the Orz is particularly simple: just ask!
The "*Alliance Party*" will permit you to build the powerful Orz
Nemesis vessel, complete with Orz Space Marines, or "*Go-Gos*",
as the Orz call them.
The only difficulty with the Orz is deciding whether or not you
really want an alliance with them at all. The Orz are newcomers
to this part of the galaxy, and have apparently annihilated the
humanoid Androsynth who previously occupied the Vulpeculae stars.
Are there risks to cooper-ating with the Orz? Is it dangerous to
allow their captains to roam your Starbase freely in their super
strong combat armor? Well, some things you will have to learn for
yourself. Just remember - once you have made the *Alliance Party*
with the Orz, never ask them about the Androsynth. Never!
Pkunk: Becoming Friends
You cannot ever formally ally with the Pkunk but you can get their
help from time to time in the form of a gift of a few Fury class
starships. To become friends with the Pkunk, just visit their
homeworld and act, well... friendly! Once you get your first batch
of ships, you should be able to return every year or so for an
additional supply.
Pkunk: Stopping their Migration to Yehat Space
It is inevitable that a few months after your first meeting with
the Pkunk, they will make a fateful decision to reunite with
their Yehat brethren. Unfortunately, as you may know, their Yehat
"brethren" would like noth-ing better than to eradicate their
peaceful Pkunk relatives, preferably one feather at a time. So,
how do you stop the Pkunk from making this foolish trip? You
can't - you can only delay their eventual encounter with the
Yehat. A cruel fate, you say? Perhaps...perhaps not.
Portal Spawner: A Map of QuasiSpace-HyperSpace Shortcuts
What follows is a complete listing of all the portals from
QuasiSpace to HyperSpace and their respective coordinates
in the two universes.
QuasiSpace Portal at Leads to HyperSpace
QuasiSpace Coordinates: Coordinates:
-------------------------------------------------------------------
A* (500, 500) (043.8, 637.3)
B (520, 514) (011.1, 940.9)
C (520, 540) (584.9, 621.3)
D (530, 528) (775.2, 890.6)
E (544, 532) (036.8, 633.2)
F (502, 460) (318.3, 490.6)
G (506, 474) (190.9, 092.6)
H (516, 466) (567.3, 120.7)
I (476, 458) (409.0, 774.8)
J (468, 464) (921.0, 610.4)
K (476, 496) (611.6, 413.1)
L (466, 514) (230.1, 398.8)
M (448, 504) (565.7, 971.2)
N (458, 492) (860.7, 015.1)
O (492, 492) (005.0, 164.7)
P (488, 538) (973.5, 315.3)
* Remember, this portal is only open from the 17th through the
20th of each month.
Rosy Sphere: Where to Buy It
You can find the Sphere at the Druuge's central trade world,
where they will sell it to you for a hundred of your crew
members, or one of a few specific artifacts which they crave.
To find the central trade world, talk with any Druuge ship in
space, or see Giveaway Clue #15.
Sa-Matra: How to Destroy It
To destroy the Ur-Quan ultimate battle platform, you require
three things: the location of the Sa-Matra, something to
create a big enough distraction to let you slip past the Sa-
Matra's guardian fleet, and a destructive device of sufficient
strength to blast through the battle plat-form's defensive
screens.
The location of the Sa-Matra is alluded to by the Zoq-Fot-Pik,
the Supox, the Utwig, and the Melnorme. However, the Pkunk
make the most spe-cific reference when they describe their
shared dream of dark and omi-nous portents:
...Yes, a dream. We have seen that in the center of this region
of space, near stars that form the shape of a cup, and are in a
constellation that begins with the letter C and ends with the
letter S, and whose letters rearranged spell, "Asteric"...
If you want the exact location, see Giveaway Clue #6.
The distraction you need can be found at the Umgah homeworld of
Beta Orionis 1. Yet the very factor which makes the distraction
so effective can also be hazardous to your health, so be
careful.
The bomb can be found in Utwig space (location is Giveaway Clue
#9), but you will be unable to acquire the weapon until you
deliver a fully repaired device called the "Ultron" to the
Utwig. Once you have attained the bomb, you will learn that
in its present condition, it will be unable to destroy the
Sa-Matra. It must be improved.
Shofixti: Resurrecting the Species
When the Ur-Quan forces entered the Shofixti home star system of
Delta Gorno, the Shofixti detonated a huge bomb in the photo-
sphere of their sun. The explosion ripped away a portion of the
sun's outer layer, allow-ing the super-heated interior to stream
out in a storm of gigantic solar flares. All life in the star
system was destroyed, Ur-Quan and Shofixti alike. As a
consequence, most people assume that the Shofixti are extinct.
This is not quite correct.
There are over a dozen Shofixti still alive in the galaxy. Due
to the potent reproductive capabilities of the species, the
Shofixti could repopulate their culture in less than a century,
and provide you with a huge supply of crew in a fraction of
that time. The problem though is bringing the male and female
Shofixti together for the... er... reproductive thing.
Locating the male Shofixti is fairly straight for-ward: go to
Delta Gorno and look for a single Shofixti ship patrolling the
system. The Captain (and sole crew member aboard his scout
ship) is a feisty old Shofixti named Tanaka. Since Tanaka's
sensors are damaged (it's worthwhile finding out how they
got that way), he will think your flagship is an Ur-Quan
dreadnought and attack you. To avoid killing Tanaka, run
away from battle by pressing the escape key. Then try talking
with Tanaka again, but this time, insult him back. Ur-Quan don't
insult their enemies, and eventually even Tanaka will realize
this and relent. If you kill Tanaka inadvertently, don't
despair. His brother Katana will appear in the Delta Gorno
star system later on, after you have acquired Shofixti
females.
The only Shofixti females alive are actually in suspended
animation somewhere in VUX space, under the control of Admiral
ZEX, the brilliant but perverse VUX military genius. ZEX's
hobby is finding new and exotic additions for his "menagerie"
of creatures. The Shofixti maidens are there at ZEX's private
planet. To find the location of this world, ask any VUX or
see Giveaway Clue #3.
Slylandro Probes: How to Stop Them
If you've spent much time in HyperSpace, you have probably run
into one or two of these annoying entities and either been
forced to destroy them or been destroyed by them. The tumbling
red probes profess to be on a mission of peace, but you know
better! So what's their problem?
The truth of the matter is that the probes WERE sent out on a
peaceful mission. Unfortunately, the beings who sent out the
probes weren't very competent with technology and they messed-
up the mechanism's programming. Now, instead of exploring the
galaxy and making peace-ful contact with other alien races,
the probes are relentless hunters. They will chase anything
that moves and try to break it down into its component atoms,
blowing the target to bits in order to gather raw materials
to build replicates of themselves. This unhappy habit is the
result of a Slylandro having changed the probe's sub-mission
priority settings for Replication behavior from low to absolute
maximum.
So how do you stop these probes? Simply find the Slylandro
(the crea-tures who sent them out into space), and explain to
them that they have made a dreadful mistake by changing the
probe's Replication priority setting. Once you have done this,
they will give you a destruct code which automatically
destroys any probe you meet, without your even having to
enter into combat.
There are several ways to locate the Slylandro homeworld: ask
the Melnorme for information about Current Events (it's the
6th piece of information), OR ask the Thraddash about their
brutal history three times, OR, each time you meet a probe,
engage it in conversation. When it is your turn to say
something, pick the third option. The fourth and subsequent
times you pick this option, the probe will print a coordinate
pair. Pause the game and write these coordinates down. These
are NOT the coordinates of the Slylandro homeworld; rather
they are the coordinates of the probe relative to the
Slylandro homeworld, its point of origin. You should be able
to use your present position, and the probe's coordinates,
to locate the homeworld. To make things even trickier, the
first number in the coordinate pair is the Y- component
(up/down) and the second number is the X-component
(left/right).
There is one last trick to finding the Slylandro Homeworld.
Unlike all other lifeforms in known space, the Slylandro are
NOT native to solid, rocky worlds. You will have to look
elsewhere.
For the exact location of the Slylandro homeworld, see
Giveaway Clue #1.
Spathi: Forming an Alliance
For all their cowardly whining, the Spathi are one of the
strongest allies you can have in the game. Getting the Spathi
to join you is simple, once you know where their homeworld is
located, at Epsilon Gruis I. To speak with the Spathi leaders,
you will also have to learn a password, the Secret Spathi
Cypher ("Huffi-Muffi-Guffi"), from either Fwiffo on the surface
of Pluto, or the Melnorme.
When you arrive at the planet, you will discover something
strange: the Spathi are living on their moon, not Spathiwa.
Perhaps it has something to do with the many quasi-ursine
creatures covering the surface of Spathiwa? The Spathi High
Ruling Council will explain that these crea-tures are the
"Evil Ones" who ran the Spathi off their own world many years
ago. In order to ally with the Spathi, first try asking the
High Ruling Council to join you. When they refuse, explain how
strong you are, and how the Spathi are better off with you as an
ally than with the Ur-Quan. Eventually, the Spathi rulers will
offer you a challenge: to prove yourself, you must eliminate the
Evil Ones from the surface of Spathiwa.
Fortunately, the "Evil Ones" do not appear to find human flesh
particularly tasty and will not attack your lander when you make
planetfall on Spathiwa. However, if you touch an Evil One, be
prepared for a vicious attack! The best strategy is to remain
at a distance from the creatures, stun them into submission, and
then carefully pick them up, one at a time. When you think you
are done and have returned to orbit, you may want to make one
last Biological Scan, just to insure that you haven't left any
Evil Ones on the surface. You wouldn't want the Spathi to return
to Spathiwa only to be cruelly devoured, would you?
Next, return to the moon and inform the Ruling Council of your
success. They will then dismiss you and send Spathi to the
surface to confirm your claim. Return immediately and demand
they make good on their offer of alliance. Do not permit the
Spathi to delay their obligations. Eventually, after a threat
or two, the Spathi Ruling Council will agree to fulfill their
commitment, and will begin sending Spathi technology and
captains to the Earth Starbase, allowing you to build as many
Spathi Eluder starships as you can afford.
A final note: you will soon learn from the Starbase Commander
that Spathi scientists have arrived at Earth to study the
slave shield encircling the planet. Although they claim that
they are trying to find a means of lifting the force field,
the truth is just the opposite. You have a limited number of
months before the Spathi learn what they need to know, return
to Spathiwa, and use their new knowledge to erect an
impenetrable shield around their own planet, cutting them
off from the affairs of the galaxy. Since this will also stop
the supply of additional Spathi captains, you may want to
purchase several Eluder vessels before the Spathi successfully
raise their planetary shield.
Starbase Commander: Convincing Him to Help You
This first challenge is accomplished by performing three,
relatively simple tasks in sequence. Once you have done so,
the Starbase Commander will be so impressed with you and your
Precursor starship, that he will devote the full capabilities
of the Starbase to helping you on your quest to defeat the Ur-
Quan.
The first part of the challenge is to supply the Starbase
with radioactive minerals. The Commander tells you that there
are some on Mercury (the planet closest to the sun), but warns
you to be careful since Mercury's proximity to Sol makes the
surface VERY hot and dangerous. The Commander is correct on
both counts. You can go to Mercury to acquire radioactives,
but it is much safer to go to Io, the first moon of Jupiter.
Once you have out yourself into orbit at either world, SCAN the
surface for MINERAL deposits. Radioactive deposits will be
colored orange, and the larger the dot on the screen, the more
units of an ele-ment you will find in a deposit. Next, select
DISPATCH and place the crosshair right on top of a radioactive
deposit, then press ENTER. Due to the alien nature of your
landing vehicles (remember, they were built by and for the
Precursors), you will not land exactly where you intended.
Now use your navigation controls to move your lander over the
deposit to pick it up. Any amount of radioactive minerals,
however small, is sufficient for the Starbase Commander's needs,
but you may want to pick up additional minerals (they will be
valuable a bit later on). If you are exploring the surface of
Mercury, be sure to avoid the crawling fire trails - they will
destroy your lander in a second if they touch you. Once you
have gathered some radioactive minerals, return to the Starbase
and give them to the Commander.
After supplying the Earth Starbase with radioactives, your next
task is to prove to the Commander that you are capable of
dealing with the Ur-Quan. The Commander suggests that you should
do so by 'dealing with' the Hierarchy base on the moon. This
is easy. Simply enter orbit at the moon and scan for energy
sources, and then land near the one energy node you discover
(the lunar base). Move onto the base to receive a report from
your landing team. After reporting what they have found at the
base, your landing team will return to your ship, automatically
bringing with them valuable scavenged materials. Now return to
the Starbase and report what you have found. The Commander will
be suitably impressed. However, before he agrees to join with
you, you will face the third and final part of this initial
challenge: a surprise attack by a lone Ilwrath Avenger!
You have no alternative to facing the Ilwrath in combat. Still,
you would be well advised to use your short conversation with
the Ilwrath starship captain to gather whatever information you
can, such as the fact that the Ilwrath ship is returning home
from a battle with the Pkunk in the Giclas constellation. Since
these 'Pkunk' are the enemy of the Ilwrath (your enemy), perhaps
they will become allies with you. (Then again, maybe the Pkunk
will just try to bite your head off - aliens can go both ways.)
In any event, you must fight the Ilwrath. Fortunately, the alien
ship is partially crippled, possessing half its normal crew
complement and being unable to cloak (turn invisible). The most
effective way to deal with the ship is to attack with the
Earthling Cruiser, keeping your distance from the enemy ship and
launching a continuous stream of MX missiles. Once the Ilwrath
has been destroyed, the Starbase Commander will be ready to
listen to your plans for overthrowing the evil Ur-Quan.
Sun Device: How to Acquire It
You will need this artifact to speed the Chmmr hybridization
process - to free them so that they can help you against the Ur-
Quan. Finding the Sun Device is the easiest part of the problem.
Both the Shofixti in the Delta Gorno system and the Yehat will
give you clues to its location (see Giveaway Clue #11 for its
precise location). Then, once you have found it, you will have
to find some way past the huge number of ships guard-ing the
Sun Device. You will have to lure all or at least most of the
ships away from the planet using some kind of ruse. And you will
need help. The Syreen are the key to unlocking this puzzle,
though allying with them may not be the simplest task. To find
the location of the Syreen's homeworld, ask the Ariloulaleelay
or the Melnorme, or see Giveaway Clue #12.
Syreen: Forming an Alliance
When you find the Syreen homeworld (see Giveaway Clue #12, or
talk with the Ariloulaleelay or Melnorme), you will soon learn
that the female warriors are content on their new planet and
have no desire to join with you in your struggle against the
Ur-Quan Hierarchy. Your only hope of getting them on your side
is uncovering a secret which, when revealed to the Syreen, so
angers them that they will leave their world to seek revenge.
So, what's the secret? Well, it has something to do with the
tragic destruction of the Syreen's original planet, Syra. The
Syreen believe the cataclysm was caused by a freak meteor
impact, but the truth is far different. A Mycon "Deep Child"
destroyed Syra.
To convince the Syreen to ally with you, you must first be told
about the function of the "Deep Children" by either the Mycon,
the Druuge, the Ariloulaleelay or the Melnorme. Then you must
gather physical evidence - a Deep Child egg case from the
surface of one or more Mycon "shat-tered" worlds. You can find
the "shattered" worlds by exploring Mycon space, or by looking
under Giveaway Clue #13.
Syreen: Locating the Ship Vault
After you have confronted Talana, the Syreen starbase commander,
with your proof about Syra, the Syreen will offer their
assistance, provided you help them exact their revenge. First
you must find their fleet of Penetrator starships which the
Ur-Quan hid in an underground vault at a nearby star system. To
find the vault containing the ships, talk with the Zoq-Fot-Pik
or see Giveaway Clue #14.
Once you have opened the ship vault, return to Betelgeuse and
follow Talana's instructions.
Talking Pet: Enlisting its Assistance
The mental powers of the Talking Pet will serve a single
important purpose: they will distract the Ur-Quan and Kohr-Ah
long enough so that you can get close to the Sa-Matra.
To get the Talking Pet working for you, you will have to remove
it from its present location at Beta Orionis 1. Since it is
likely that the Talking Pet will not go willingly, you will
have to find some way to neutralize the creature's mental
powers. The secret to this defense can be found at the ancient
Taalo homeworld, which is located in Orz space. For the nature
of the device, see Giveaway Clue #7, and for its location, see
Giveaway Clue #8.
Taalo Shield: How to Acquire It
The Taalo mind shield can be found at an ancient Taalo planet
located in Orz space. For the exact location of the shield,
search this area carefully, or see Giveaway Clue #8. There is
one complication, however. The Orz find the Taalo planet a very
interesting and pleasant place. Unless they are allied with
you, you will have to destroy at least ten of their ships to
reach the planet's surface and attain the Taalo Shield.
Thraddash: Forming an Alliance
The Thraddash are thick-headed bullies who understand little
else but violent conflict. Therefore, it should not come as
surprise that the only way to ally with them is to impress them
with your own might, say by defeating a certain number of their
vessels. The only restriction to this method is that you must
defeat ALL of the ships in a battle group to have their number
credited to your score. As a consequence, it is point-less to
attack the Thraddash homeworld or the Aqua Helix planet, since
they both possess an unlimited number of ships.
To learn the exact number of ships you need to defeat in order
to impress the Thraddash enough to ally with you, see Giveaway
Clue #21.
Ultron (Broken): How to Effect Repairs
The Ultron is an ancient and mysterious device whose mystic
powers, if any, were quenched when the Utwig High Proctor
dropped it during a particularly frenetic ritual. After
breaking the Ultron, the Utwig became so despondent that they
gave the ruined device to the Supox, and are now on the brink
of cultural suicide. In order to fix the device, you will have
to find and "use" three replacement parts; the Rosy Sphere,
the Clear Spindle and the Aqua Helix. These devices are
scattered across space, and it is your job to bring them
together with the Ultron as quickly as possible.
Umgah: Forming an Alliance
Can you ally with the Umgah? Simply put, no, but it is quite
possible to become a great hero in the eyes of the Umgah,
their ultimate savior. How? The answer lies in freeing them
from the bondage of a creature who, at some point in the game,
will enslave the Umgah with its evil psychic coercive powers.
Free the Umgah from their heinous bondage and you will earn a
reward...although perhaps not something you expect. Remember,
the Umgah have a very strange sense of humor.
To rescue the Umgah, remove the psychic creature from Beta
Orionis 1, the Umgah homeworld.
Utwig Bomb: Amplifying its Destructive Power
Once you have gotten the Utwig bomb, you will soon learn that
it is not yet powerful enough to fulfill its destiny: to
destroy the Ur-Quan battle platform known as the Sa-Matra.
There is only one race in space who has the technological
sophistication to perform this improve-ment, and they are
under a slave shield. You must find them and somehow cause
the shield to fall. For the name and location of this race,
see Giveaway Clue #10.
VUX: Apologies, Apologies
It is common knowledge that during the war with the
Hierarchy, Humanity encountered an unknown race which called
itself the VUX. Although hideous in appearance, the VUX had a
considerable star fleet, and would have made a significant
ally against the Ur-Quan, were it not for a certain blundering
starship captain named Rand. Captain Rand's cruiser was the
first Alliance starship to encounter the VUX. When he saw the
VUX starship captain, he blurted out an insult regarding the
aliens appearance and parentage, not knowing that the
sophisticated VUX language translation technology had relayed
his every word to the VUX captain. Combat immediately ensued.
Before diplomatic efforts could resolve the situation, the
Ur-Quan also discovered the VUX, and compelled them to join
the Hierarchy.
So, perhaps you have come to the conclusion that the time is
right for humanity to apologize for Captain Rand's foolish
insult. The VUX are intelligent creatures, compassionate in
their own way. Surely after all these years they will respond
to your genuine desire to forge a bond between your two races.
WRONG! The VUX will never become your allies! They despise
Earthlings with such great loathing that nothing you can do
will sway them from their hatred. Why? Well, the old insult
is only a small part of the problem. The real difficulty is
that the very sight of humans makes the VUX immediately throw
up (and if you've never seen a green, multi-tentaculated beast
vomit, take my word for it, it's horrible). In reality, VUX are
far worse bigots that humans. For years they have hidden behind
Rand's insult, using it as their excuse for incessant hostility,
when the truth of the matter is the VUX simply think humans are
too ugly to let live.
So how do you deal with the average VUX? MX missiles or space
marines. Still, there is one VUX with whom you can make friends,
though he is hardly average. You must seek out Admiral ZEX, the
eccentric military genius who led the entire VUX starfleet during
the war. Alone among the VUX, the admiral has a soft spot in his
circulatory organ for human beings. You will find ZEX tending the
menagerie of lifeforms he has assembled on his own personal
world. To locate this planet, ask any VUX or see Giveaway Clue
#3.
Winning the Game: In a Nutshell
Okay, you want to cut to the action, right? Here's what you do:
find the Ur-Quan's ultra-powerful battle platform, the Sa-Matra,
and destroy it It's that simple.
Words: Getting the Ur-Quan and Kohr-Ah to Reveal their Past
For the most part, neither the Ur-Quan or the Kohr-Ah are par-
ticularly fine conversationalists. However, if you know the right
words, you can get them to "open up" to you - at least a bit. To
learn the words, you can talk to the Pkunk (ask them for advice
on how to deal with the Ur-Quan), the Melnorme, or with Spathi
ships in space. Once you have heard the "words" you can repeat
them to the Ur-Quan and/or Kohr-Ah at your next encounter.
Yehat: Triggering the Revolution
Twenty years ago, the Yehat Veep-Neep Queen joined forces with
the Ur-Quan Hierarchy, against the wishes of many honorable
Yehat, includ-ing nearly all of her starship captains. Although
the Yehat are initially hostile to you and your plans for war
against the Ur-Quan, you can start a civil war between the
Royalist factions (who are loyal to the Queen), and the starship
clans who hold true to the ancient Yehat qualities of honor and
integrity.
To trigger the revolution, you must add a Shofixti ship to your
fleet and then approach a Yehat ship in space. When confronted
by a living Shofixti (the Yehat's adopted child race whom they
believed extinct), many of the Yehat will turn against the Queen
and a huge battle will begin. From this point on, half of the
Yehat ships you meet will be rebel friends, who hold true to
the old Alliance of Free Stars, while the rest will remain your
enemies. Never look for friends at the Yehat homeworld on Gamma
Serpentis I.
Although the Yehat rebel forces are unable to spare starship
captains to send to your Starbase (which would allow you to
build as many of their ships as you wanted), from time to time
the rebels will give you a hand-ful of their powerful Terminator
vessels. In addition, they will provide substantial assistance
at the climactic, battle with the Ur-Quan, should you need it.
ZEX: Dealing with the Eccentric Admiral
Admiral ZEX is the only VUX who actually likes to have human
beings around. Since all other VUX regard humans the same way
they view putrid flesh, you'll understand why the VUX consider
the admiral to be, to say the least, eccentric. However, due
to ZEX's military genius, he is allowed to do whatever he
pleases, as long as he remains at his person-al menagerie
world, Alpha Cerenkov I.
Beyond his dubious friendship, ZEX has only one thing to offer
you to aid your struggles against the Ur-Quan. On the surface
of his menagerie planet, ZEX has cryogenic hibernation tanks
containing a dozen Shofixti Maidens. These Shofixti females
are absolutely necessary to restoring the Shofixti race. ZEX
will agree to give you the maidens on one condition: you must
deliver to him a beast he desires. To ZEX, the beast is a
"beautiful creature" who resides on a planet orbiting a yellow
star on the far side of space. The beast's world is in a
constellation of eight stars which looks like a snake that
has devoured an elephant. For the exact location of the
"beautiful creature", see Giveaway Clue #5. Once you have
located the beast, beware! The creature is the single most
deadly lifeform in this part of the galaxy, and it will be
tough to incapacitate. However, once you have the creature
stowed aboard your vessel, you will be safe. Once you have
acquired the beast, return to Alpha Cerenkov 1, and deliver
it to ZEX. You shall receive your just reward, as shall ZEX.
Zoq-Fot-Pik: Forming an Alliance
It will be beneficial for you to forge an alliance with the
Zoq-Fot-Pik early on. They are eager to join forces with
humanity, and later will give you unique information about
the activities of the Ur-Quan.
To establish an alliance with the Zoq-Fot-Pik, you will
have to travel to their homeworld. To find the location of
this planet, either talk with the Zoq-Fot-Pik scout ship at
Rigel, or see Giveaway Clue #17.
Remember, an alliance only works if both sides help each
other. If you ever receive a distress call from the Zoq-Fot-
Pik, answer it with all haste.
GIVEAWAY CLUES
This section contains the explicit clue fragments, which are
referred to in the Puzzles and Mysteries section of this
book.
#1. Beta Corvi 4 (yes, the gas giant!).
#2. Alpha Cerenkov 1.
#3. Beta Copernicus 1, Gamma Brahe 1, and Gamma Scorpii 1.
#4. Arcturus 1.
#5. Delta Lyncis 1.
#6. Delta Crateris 5.
#7. A shield against psychic attack.
#8. Delta Vulpeculae 2c.
#9. Zeta Hyades 6b.
#10. The Chmmr at Procyon 2.
#11. The Mycons at Beta Brahe 1.
#12. Betelgeuse 1.
#13. Gamma Scorpii 1, Beta Copernicus 1, and Gamma Brahe 1.
#14. Epsilon Camelopardlis 1a.
#15. Zeta Persei 1.
#16. Gamma Kreuger 1.
#17. Alpha Tucanae 1.
#18. Zeta Draconis 1.
#19. (043.8, 637.2)
#20. A HyperWave 'Caster
#21. 25 ships

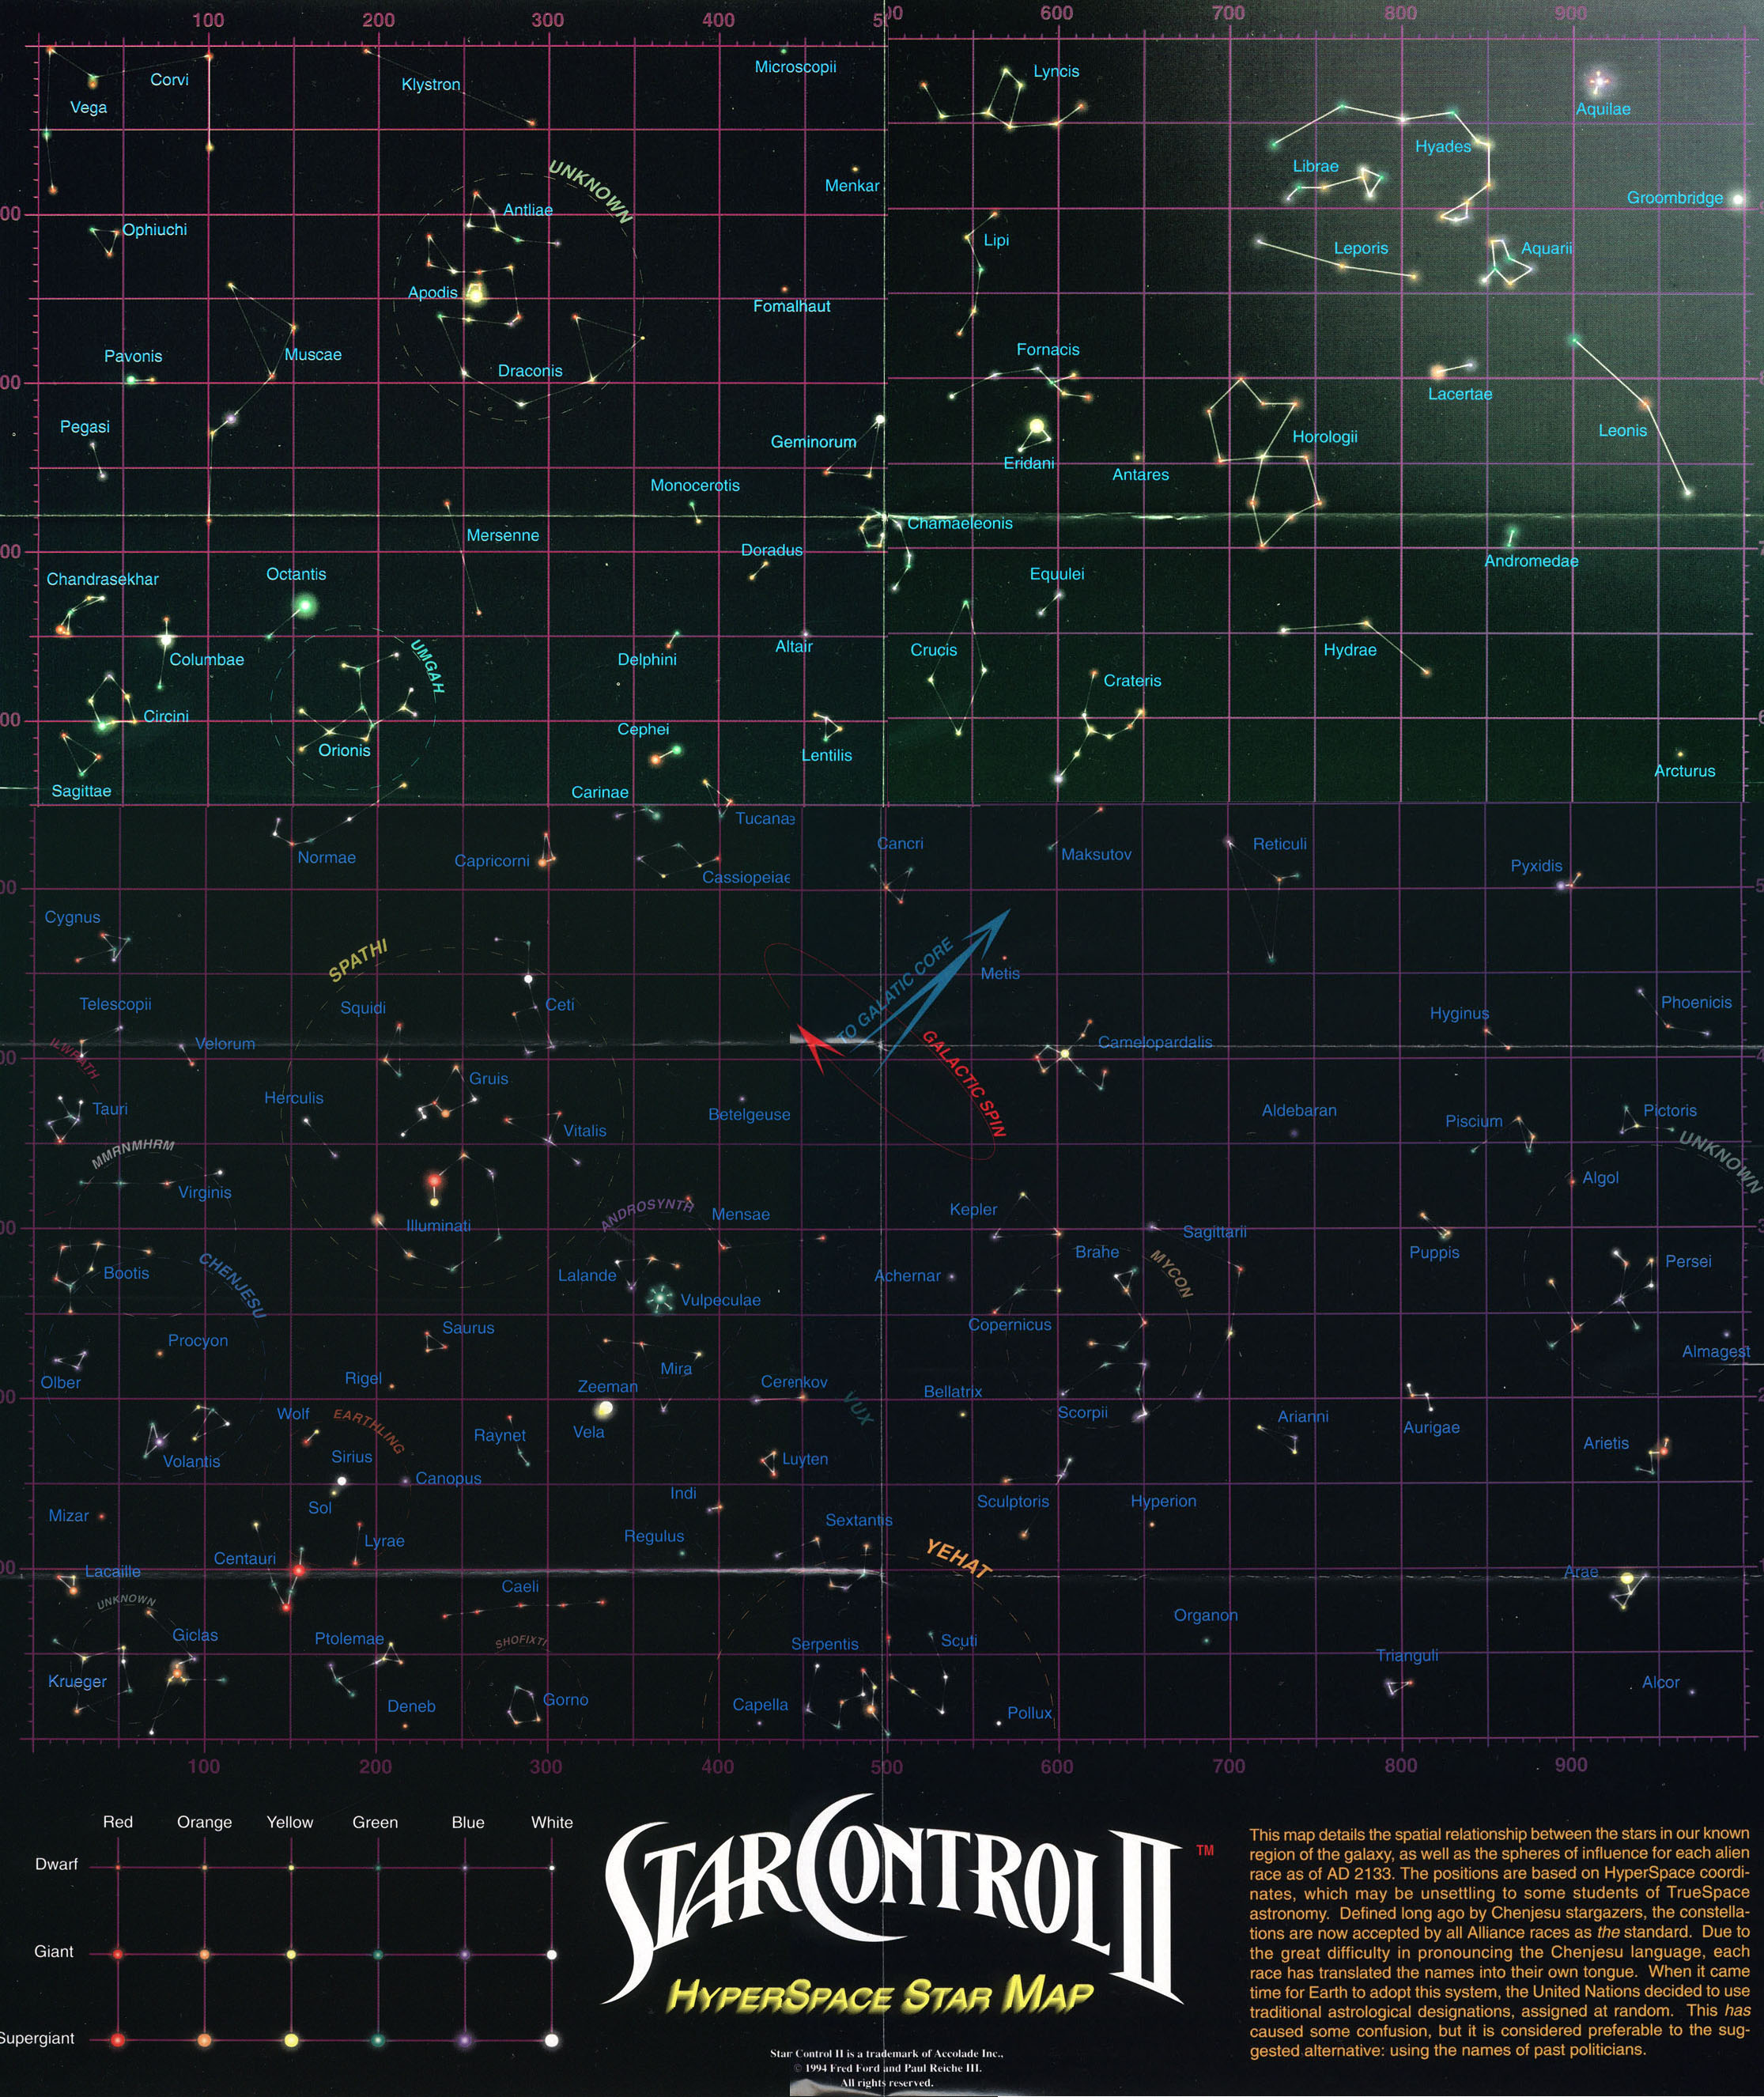