PLAYER'S
GUIDE
1992 ORIGIN Systems, Inc.
Electronic Form Document
Created
and Produced by Boba Fet.
STARTING THE GAME
1. First, install ULTIMA Underworld on your hard disk.
If you haven't already done this, refer to the Install Guide included in this package for instructions.
2. Select the drive on which the game is installed. (For example, if you installed the game on your C-drive, type "C:" and [ENTER].
3. Select the ULTIMA Underworld directory. (If you selected our default direc-
tory, type "CD \UW" and [Enter]). 4. Start the game (by typing "UW" followed by ENTER].
The "ORIGIN Presents" screen appears, followed by another reading "A Blue Sky Productions Game." As the game finishes loading, this screen is replaced by a title screen ("ULTIMA Underworld: The Stygian Abyss"). If you have not played the game before (or have never "saved" your previous adventures), the game proceeds to the Introduction. This provides background information you need to complete your subterranean adventure.
If you are in a hurry, or you have already seen the Introduction, press [ENTER] to cancel anypreliminary screen and bring on the following screen. If you have "savedgames" on your hard disk, the game automatically skips the Introduction and goes directly to the main menu. (If you do not know what "saved games" are, see "Save Game," )
Afterward, you are presented with several choices:
Introduction. Repeats the introductory sequence you just saw.
Create Character. Allows you to set up a brand-new player-character.
Acknowledgments. Lists the names of the people who created the game.
Journey Onward. When you have a character, select this option to begin playing. You will not see this option unless you have a saved game.
Select an option by clicking on the option you want or by using the cursor keys to change the highlighted selection and pressing [ENTER]. If this is your first game, you must select "Create Character" before you can begin play.
CREATING YOUR CHARACTER
Through the choices which you make at this time, you fashion the type of hero you wish to guide through this adventure. Each option is represented by button. To make a choice, use the mouse to move the cursor onto the option button you want to select and click either mouse-button. (You may also use the cursor keys to highlight the option you want -- a highlighted option appears raised -- and then press [ENTER] to select the option.)
In order, the choices you must make are:
Choose Player Sex.
Male or female. Controls whether your Avatar is a man or a woman, and which portraits you may select later. Gender has no effect on your character's strength or abilities.
Select Handedness.
Right or left. Determines which hand you use to hold your primary weapon, and which is your shield-hand.
Class
Fighter. A warrior, trained in the military arts since youth.
Mage. One born with the ability to cast spells.
Bard. A traveling entertainer, perhaps a storyteller or a musician.
Tinker. A skilled craftsman, particularly with weapons and armor.
Druid. A guardian of the woodlands, able in both combat and magic.
Paladin. A warrior who also has some grasp of the art of spellcasting.
Ranger. A woodsman, skilled at tracking, hunting and fighting.
Shepherd. A resourceful sheep-tender, often a jack-of-all-trades.
Pick Skills.
Your character description includes several skills -- abilities you have honed and tasks you have practiced. Many of these skills come automatically, as a result of the character class you choose. (For instance, all Mages can use magic so they all begin with casting and mana skills.)
In addition to innate skills, you are asked to select some skills unique to your character. For instance, you may give your Fighter sword skill, or you might choose axe, mace, missile weapon or the unarmed combat skill. When the skill selection list appears on the right-hand side of the screen, simply click on the skill you want for your character.
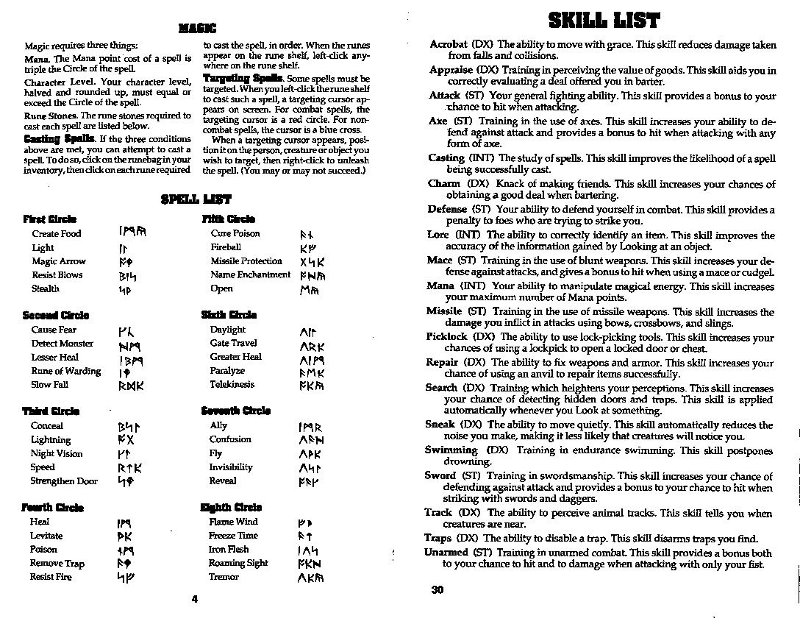
For now, pick skills that sound useful and interesting. Later, you can consult the skill list on page 30 and create carefully honed characters.
Portrait.
Select the appearance of your character by clicking on one of the five pictures that appear on the right-hand side of the screen.
Choose Difficulty.
Standard or Easy. In easy mode, monsters and hostile characters are less dangerous and are easier to defeat than in standard mode. (Note that you can't change this after you begin playing -- to change the difficulty level, you must begin a new game.)
Name.
The last step in creating your character is to give him or her a name. Type in the name of your choice, then press the [Enter} key when done.
Keep This Character.
Finally, the game asks you whether or not you want to play the game with the character you have just designed. If this character is acceptable, answer "yes." Otherwise, select "no" and you can design another character.
IN THE UNDERWORLD
(NOTE: This tutorial walks you through the beginning of your adventure in the Abyss. It assumes you have a mouse. To play without a mouse, consult your Reference Card for keyboard equivalents of the commands described.)
Once you finish designing your character, you automatically begin the game.
The Main Game Screen.
This is the screen you will see most of the time. In the center is the View Window -- the Stygian Abyss as your character sees it. To the right of this is a Character Panel which usually displays a picture of your character and any items he or she is carrying. At the bottom of the screen is a Message Scroll where text is displayed. On the left side of the screen are six Command Icons which allow you to look at and interact with creatures and objects you encounter in the underworld. Other elements of the game screen -the Compass, the Rune Shelf, the Power Gem, the Vitality Flask and the Mana Hask -- will be explained later.
Try moving your mouse around the screen -- but don't press any of the buttons yet. As you move the mouse in the view window, an arrow-shaped cursor mimics your mouse movements. Outside the view window, the cursor takes the form of a yellow cross.
SAVING YOUR CHARACTER
Before you do anything else, save the game. If you die before saving, you will have to go through the character creation process again.
1. First, click on the "O" icon (for "Options") on the left side of the screen.
2. When the option list appears, click on "Save Game."
3. Click on the roman numeral "I" icon.
4. When the words "<not used yet>" appear in the message scroll, type in a name for your saved game (something like "Start") and press [ENTER] or either mouse-button.
5. You return to the game automatically and can now begin exploring.
LOOKING AROUND
First, examine your surroundings. Move the cursor into the view window, and notice how the shape of the arrow changes depending on where it is. Near the middle of the screen, the arrow changes into cross-hairs. Moving to the right makes the arrow point to the right; moving to the left makes the arrow point left.
In the view window, the shape of the arrow controls which direction your character moves. To move, press and hold the left mouse-button. Your character moves as long as you hold the button down.
For instance, move the arrow to the right side of the screen, then move it up or down until the arrow bends and nearly forms a circle -- this allows you to turn in place, without moving forward or backward. With your cursor in this position, press the left mouse-button and hold it down.
The view in the window shows what you see as you turn around. If you're just starting a game, you see a dark corridor ahead of you and a bag to your right. Behind you are the closed (and locked) doors through which you entered the Abyss. To your left is a skull and, on the wall, a carved message.
As you spin around, note that the compass below the view window spins too. The compass shows which direction you are facing -- the red-tipped point of the compass indicates north.
Occasionally, looking at or using objects calls up a scene that temporarily replaces the view window. When you 'refinished looking at one of these scenes, click either mousebutton or [ENTER] to return to the view window.
MANEUVERING
Now you're ready to try moving around. Two rules govern movement:
Rule 1. While vour cursor is inside the view window, its shape determines the direction i'n which you move if you press and hold down the left mousebutton. If it points right, you'll move to the right; if it points upward, you'll move forward, and so forth.
Rule 2. The speed at which you move depends on how far your cursor is from the center of the view window. When the cursor is exactly centered, it changes into a cross and you don't move at all. As you move the cursor closer to any edge of the view window, you move faster.
To practice setting speeds, turn until you are again facing down the long corridor leading deeper into the Abyss (the corridor opposite the huge double doors at the entrance). Remember, you turn by using the nearly-circular cursor arrows, as you did before -- this pivots you in place, without moving you forward. Then release the mouse-button to stop your turning motion. Now, move the mouse until the cursor turns into an upward-pointing arrow, and then press and hold the left mouse-button. This moves you forward. Shift the mouse so that the cursor moves toward the top of the screen and you will move faster and faster until you release the mouse-button. When the arrow points downward (toward the bottom of the view window), you will move backward.
Try clicking the right mouse-button while you're moving forward -- this causes you to jump. The faster you're moving, the farther you jump.
Don't worry if you slam into a wall -- you can't hurt yourself by walking into walls. Flying (or jumping) into a wall will cause injury.
When you feel comfortable walking, running, turning and jumping, turn around and walk back to the double doors.
Easy Move Mode. If you have difficulty maneuvering in 3-D space, try using the arrow keys on the base of the compass below the view window. The curving left and right arrows turn you 45 degrees in the direction of the arrow you click. The up arrow in the center of the compass moves you forward four feet. Press [X] to move back (two feet with each keypress). There is no mouse equivalent for the [X] command. Though less realistic than "normal" movement through the dungeon, using the arrows might make it easier to maneuver through the dungeons.
INTERACTING WITH THE WORLD
The first thing to do when beginning the game is to find some equipment a weapon, armor, food and so forth. Fortunately the bag close at hand holds several useful items. To find out what's in the bag, use the command icons on the left side of the screen. In order from the top of the screen, these icons are:
Options
Talk
Get
Look
Fight
Use
Selecting these various icons (only one of which can be active at a time) allows your right mouse-button to perform different tasks. We'll address each of these as the need arises. (For an explanation of the "Options" icon, see page 16.)
Advanced tip: The icons are easy to use and give you a good understanding of the way ULTIMA Underworld works, but if you are an experienced game-player and mouse-user, you can access many commands without using the icons! If none of the icons are highlighted, you enter a very useful shortcut mode called "Default Mode."
If you're just learning to play ULTIMA Underworld, we recommend using the icons for a while (and this tutorial assumes you will do so). Eventually, however, perhaps even before you complete this tutorial, you will want to try the icon-less default interface. For an explanation of Default Mode, see page 16.
LOOKING AT THINGS
Click on the Look icon with either button, then move the cursor over the bag, and click the right mouse-button. (Don't press the left mouse-button -- that will cause your character to move.) Pressing the right button in Look Mode causes your character to Look at an object -- what you see is printed on the message scroll. Turn until you are facing the bag and Look at it. The words on your message scroll read, "You see a bag."
Looking Up and Down. You might have trouble seeing the bag on the floor, unless you tilt your character's head and look down. To do this, press [1] at the top of your keyboard -- each time you press this key, your character's head tilts a little further downward, until it finally reaches its maximum. To look up again, you can either press [3] (which lets you look up a little more, every time it is pressed) or [2] (which returns your head to its normal viewing angle).
Note that [1], [2] and [3] on the numeric keypad control cursor movement and can't be used to look up or down.
GETTING THINGS
Now, pick up the bag and examine its contents. First, make sure that the inventory side of your character panel is displayed. This is the side with your character's picture on it. (If this picture isn't visible, click either button on the chain below the right-hand panel.)
The circles at the bottom of the character panel are for inventory -- objects your character is carrying but which aren't necessarily ready for immediate use. The circles surrounding the picture of your character are for objects your character is wearing or holding -- armor, weapons, rings, lit torches and so on.
To pick up the bag, change to Get Mode by clicking on the Get icon (the third one from the top) and move your cursor until it is on the bag. (Look down, using if you have trouble seeing the bag.) Now, press and hold the right mousebutton and move the mouse. You now have the bag "in-hand." The cursor assumes the shape of the bag and, as long as you keep the right mouse-button pressed, moves around the screen as you move the mouse.
Move the bag over to one of the empty circles at the bottom of your character panel. Release the right mouse-button and the bag settles into place in your inventory.
Manipulating Your Inventory. To open the bag, click on it with the left mouse-button. The contents are now displayed on the inventory panel. If you don't recognize any of the items, you can find out what they are by Looking at them. For instance, click on the Look icon, then move the cursor over the object that looks like a stick and press the right mouse-button -- the message scroll now reads, "You see a somewhat used torch."
Looking at a n object may tell you the nature and condition of the item you are looking at. Right-clicking the sword-like object, for instance, reveals that it is a dagger, and that it is in "badly worn" condition. However, it is the only weapon you have, so place it in your weapon hand. If your character is right-handed, your weapon hand is your right hand - otherwise, it is your left hand. (Note that your character's "right" hand is not the hand to the right on the screen, but thefigure's right hand.) To move the dagger from the bag in your inventory to your weapon hand, place the cursor on the dagger, press and hold down either mouse-button, and drag the dagger to the inventory circle nearest your weapon hand. When you release the button, the object will settle into place.
The torch will make the Abyss a much brighter place. You already know how to move items within your inventory, so move the torch to the circle above your character's right shoulder. Now you want to light it. Click on the Use icon and then on the torch. Notice the difference this makes in the view window. (If you Use a lit torch, you snuff it out.)
The food in this bag -- an apple, a fish and a loaf of bread -- can be ignored for now, but your character will eventually become hungry. Always make sure you have food available.
Perhaps the most important item in the bag is the square parchment, which a Look will tell you is a map. The game automatically updates this map as you move about the Abyss. Place the cursor on the parchment and click the left mouse-button -- a full-screen map appears.
The Auto-Map. There isn't much on your map at this point, since you haven't gone anywhere yet -- the wails of your current room and the bit of corridor you explored are sketched in brown ink, your position is noted by the yellow pushpin, and the cursor is a quill pen. If you want, you can write notes to yourself directly on the map.
For instance, mark your starting location for future reference: Move the quillpen cursor to your current location on the map and press either mouse-button. The quill pen shifts into writing position - whatever you type will now be added to the map. (Try typing, "START.") When you are done with the comment, click either mouse-button (or press either [Enter] or [ESC] to return the quill pen to its non-writing position.
To erase a remark, click on the eraser symbol in the lower right corner of the map. This turns your cursor into an eraser. Move the eraser to the comment and click either mouse-button. The comment goes away.
To call up maps of levels other than the first, click on the dog-eared corners on the right-hand side of the map. The upper corner allows you to examine higher levels while the lower corner allows you to examine deeper levels. Since you haven't explored any levels other than the first yet, you will have to wait to experiment with this feature.
To return from the map to the game, press [ESC] or move your cursor to the "Close" symbol at the lower right, and click either mouse-button.
You'll want to use the map often, so you shouldn't keep it inside a bag. Rightclick-and-hold on the map symbol on your character panel, drag it over the bag symbol above the lower inventory circles, and release the button. (This takes the map out of the bag, but keeps it on your person.) Now left-click the bag symbol to close the bag and return to the main inventory screen. The closed bag and the map should be side-by-side.
(Note that if you had all of your inventory slots full, dragging the map to the bag symbol would have had no effect -- to move the map out of the bag, you would have had to empty an inventory slot to make room for it.)
You can click on the map any time you want to get a fix on your location.
Dropping Objects. Now, you know how to pick things up and manipulate your inventory, but what if you want to get rid of something? At this point, you want to keep everything you've found, so we'll have to fudge a little -- there's a skull around here somewhere. It'll do.
Turn until you are facing the wall to the west -- the wall with the carved message on it. (When the red "North-point" on the compass below the view window points to the three o'clock position, you are facing west.) Now, move forward. You may accelerate right into the wall, but don't worry -- running into walls doesn't hurt you in ULTIMA Underworld. Back up a bit so you can see the message carved into the wall. (Read the message by clicking on the Look icon and right-clicking on the carving.)
The skull is just below the graffiti on the wall. Click on the Get icon, then use the right mouse-button to click and drag the object into your inventory. (If you are too far away to get the skull, move closer.)
You certainly don't need to carry this skull around, so drag it out of your inventory and put it back on the ground. (Remember, when you drag an item, the cursor assumes the shape of that item.) To rid yourself of the skull, you can either drop it or throw it.
To drop the skull on the ground, drag the skull-shaped cursor to anywhere in the bottom third of the view window, and then release the button.
To throw the skull, release the button while the skull is in the top two-thirds of the view window. (The skull is pretty tough, but some objects break or bounce upon impact.) If there is an obstacle in front of you, a thrown object falls to the ground in front of you.
If you're too close to an obstacle (the wall, for example), you may not be able to drop the skull at all. Any time you find you are unable to drop or throw an object because you are too close to a wall or door, try backing up a bit.
OPENING DOORS
Turn until you are facing north (i.e., until the red point on the compass is in the 12 o'clock position) and walk down the corridor again. This time, stop and look at all the objects you see. As you walk, you come across an axe (a Look will reveal that it is broken), ashes, bones and other rubbish. Mid-way down the corridor, in a recess in the right-hand wall, you'll find a door. Right-click to look at it and read the description on the screen's message scroll.
Click the Use icon and then the door to try to open it. You'll discover that it is locked, and you don't have a key. But there's another way to open this door-turn to face the door and back up a bit. There, on your right, is a pull-chain. Right click on the chain to Use the chain to pull it and open the door.
Walk through the doorway and bear a little to the left -- there's another bag! Using the bag spills the contents onto the ground so you can examine the items without adding them all to your inventory.
In this bag, you find a cudgel, a mushroom and a candle. First, pick up the now empty bag. Leave the candle, for the moment, and pick up the mushroom and the cudgel. (Click the Get icon, right-click and drag each object into your inventory and release the button over an inventory circle.)
SELECTING WEAPONS
Now you have a decision to make -- should you leave the dagger in your hand or move that out of the ready position and replace it with the cudgel? To make this decision, you need to know more about your skills. Click on the chain below the character panel and the panel flips around to your statistics panel.
This panel contains a great deal of information about your character, but right now we're concerned with the skill list at the bottom of the panel. To scroll through the list, click on the up- or down-arrows below the skill list.
If your character has the mace skill, you probably want to use the cudgel rather than the dagger. If your character's mace score is zero, check the sword skill. If you have that skill, stick with the dagger (and go looking for a better dagger or sword D. If you have neither skill, ready whichever weapon you prefer -- the dagger does less damage than the cudgel, but you will be able to attack more frequently with it.
Now click the chain below the stat panel to flip back to the character panel. Move whichever weapon you want into your character's weapon hand.
DEALING WITH GROUPED ITEMS
There is still a candle on the ground. Since your torch won't last forever, you should pick it up. (Candles don't provide as much light as torches, but they burn longer and some light is better than none at all...)
When you try to pick up the candle you find there's something different about it -- it's actually several candles! When you click the Get icon and then the candle, the message "Move how many? 1" appears in the message scroll. To take just one of the candles, click with the left button. The right button would take all of them if clicked, or you could type in a number from the keyboard, then press [ENTER]. Now you can move the candle(s) just as you would any other object.
Items of the same type can usually be stacked within a single circle on your inventory panel -- for instance, five torches are generally shown as one torch symbol, with the numeral "5" above it. The only time you can't stack identical objects is if their "quality" is different. For instance, you can't stack a "somewhat used" candle in the same circle with "halfway used" candles.
FURTHER EXPLORATION
Turning left and right, you see two doors in this room. Trying to open them (by clicking the Use icon and then right-clicking the door), you find that they're both locked -- and this time, there are no pull-chains. Without a key, there's nothing more you can do here short of "attacking" the door repeatedly to batter it down. This is possible, but it takes time and could damage or destroy your weapon. For now, go back out into the main corridor and head west.
Keep going until the east-west corridor ends, then turn to the right (north). Here, in an alcove, you find a torch, a bowl and an axe. Look at each of these items, note their condition, and get them. (If you have the axe skill, put the axe in your weapon hand.)
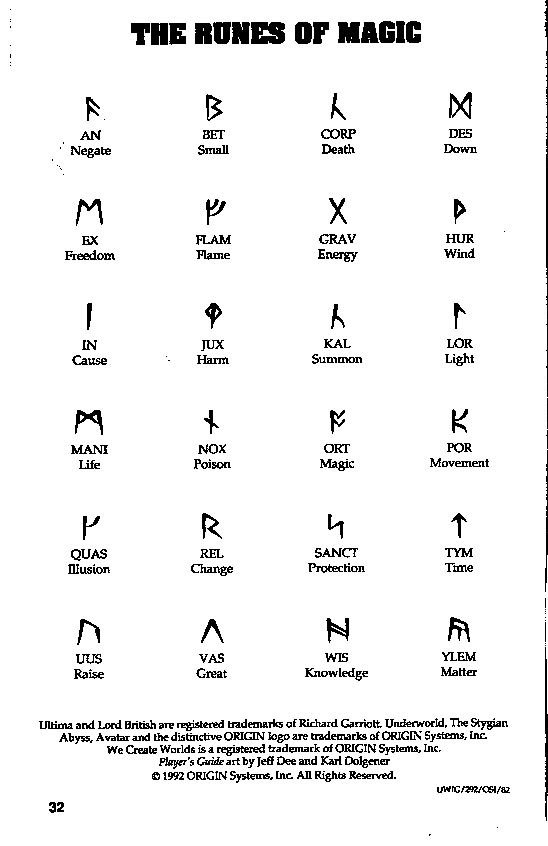
Now check the compass and head south. Beyond the east-west corridor that brought you here, you'll pass the remains of an adventurer and come upon some strange blue and gold objects. These are rune stones -- the stuff of magic. Pick these up and put them in your inventory. There isn't much you can do with them right now, but they'll come in handy later.
Continue on until the corridor tums to the right (west again) and you enter a room with a large stone block in the center. Go around the block -- it doesn't matter whether you go to the north or the south.
Past the block, you find a pack. Put it in your inventory and click on it to examine its contents. Inside, you find a scroll, a red key, a rune bag and some runes.
Read the scroll (by right-clicking it in Look mode) and then leave it behind or carry it, at your discretion (it doesn't weigh much). The red key should open some of the locked doors you've encountered. The magic items are very important. The rune bag allows you to cast magic, but only if you have the proper rune stones inside. Pick up each rune stone and drag it on top of the rune bag -- this actually puts the stone inside the bag. (You can use this method to place anything inside of any bag or pack.) Be sure to put in the stones you found earlier, too.
You want your rune bag to be accessible, especially if you're a mage, so drag the rune bag onto the pack symbol above the lower inventory circles, moving it to a more convenient inventory location.
MAGIC
With a rune bag and some rune stones, you may be able to cast spells -- even if you aren't a mage. The amount of Mana you have and your casting skill level determine how successful you can be with magic.
Preparing a Spell. Before you can cast a spell, you must prepare it. Try to anticipate your needs and have a spell (like Resist Blows) ready for use in an emergency or keep a common spell (perhaps Light) ready simply because you expect to use it repeatedly.
To prepare a spell, open your rune bag. Go to the inventory section of your character panel, and left-click the rune bag -- this causes the character panel to flip, revealing the Rune Panel. The rune stones are shown here in alphabetical order, with empty squares representing stones you haven't yet collected.
Now take note of the empty rectangle just to the right of your compass -- this is the Rune Shelf, where your readied spell is displayed. Left-clicking on any stone on the rune panel causes that stone to appear on the shelf. When all of the stones necessary to cast a spell are on the rune shelf, the spell is considered prepared.
Necessary Rune Stones. The rune stones you find in the pack are Bet, In, Lor and Sanct (B, I, L and S). The spell tables in this guide reveal that these stones can be used to cast three spells: Light (using I and L), Resist Blows (B, I and S), and Conceal (B, S and L). However, Conceal is a spell of the Third Circle, so it is beyond the ability of a beginning mage -- the other two spells, being of the First Circle, are possible.
In addition to the Bet, In, Lor and Sanct runes, you already had Ort and Jux (O and J). With these, you may also be able to cast the Magic Arrow spell (OJ) and, when you reach a higher level, the Rune of Warding spell (IJ) and the Strengthen Door spell (SJ).
Casting a Spell. All that is necessary to cast a prepared spell is to left-click on the runes on the rune shelf, regardless of whether your rune bag is open or closed. If you have the required Mana, and the correct runes on the shelf, the spell will eventually work -- but the number of attempts required will depend on your character's casting skill level. The higher your level, the better your chance of succeeding at a spell. Characters with lower casting ratings may have to try over and over in order to get a spell to work. Fortunately, there is no penalty for a casting failure unless the spell backfires -- a rare occurrence.
(If you make a mistake in laying out your runes, you can erase the rune shelf by clicking on the symbol at the bottom of the rune panel. This represents the rune stones being replaced in the rune bag.)
Once a spell is successfully cast, the blue Mana Flask drains to reflect the amount of Mana used up.
PLAYING IT SAFE
You're about to embark on a journey -- it may seem like you're going out of your way and retracing your steps, but it will pay off in the long run.
First, go to your auto-map and write yourself a note indicating your current location. Then, go back to the main corridor and the door you opened by pulling the chain. It's to the east -- refer to your automap, if you lose your way. Go through the door and find the locked door to the south in the room beyond.
Now use the red key you found in the pack. First, approach the locked door. Then open the pack in your inventory, click on the Use icon and then click on the key to put the key in-hand. You will be asked what you want to use the key on. Move the key-shaped cursor to the door and right-click. Since the key fits the lock, it unlocks the door. Use the door and it will swing open.
(Many usable objects -- keys, anvils, poles, lockpicks, rock hammers, even bones you wish to bury -- require specific targets. All are used in the manner described above.)
Proceed straight ahead through the door. On your right is a message carved in the wall. Look at the message to read it. Now, turn to face the plant at the far end of the room -- this is the Silver Sapling. Get the plant and it will wither, leaving you with a seed. Plant the seed somewhere in this room. To plant the seed, place it in your inventory, then click on the Use icon and then the seed. If there is floor space in front of you, the seed will take root. (If you have trouble planting the seed, back up or turn around until there is more room in front of you and try again. Make sure there is dirt ahead of you or the seed won't grow.)
Now, if you die in combat, you will be resurrected in the spot where you planted the seed. If you die without having done this, you return to the main menu and must create a character from scratch and start all over (or restore a saved game, if you have one).
Retrace your steps, using the auto-map if necessary, and go back to the room where you found the pack. You're about to pick a fight, and the Silver Sapling may prove your salvation.
(At some point you will want to Look around the Silver Sapling room carefully, examining walls, objects and everything else -- there is a secret door in the area, but you'll have to look carefully tofind it. This secret door can be seen on-screen if you keep your eyes open. Others are too well-hidden to be spotted by the naked eye. You're unlikely to find these unless a character tells you about them in conversation. Even then, you must click on the Look icon and look at the walls. Your search skill takes over at this point and, if you're observant, a secret door will be revealed.)
COMBAT
Once you're back in the room where you found the stone block and the pack, take a look around. There are two doors -- when you try to open them you will find that one is locked and the other is unlocked. You can try your red key in the locked door, but first open the unlocked door -- a Use click will do the job.
Enter and use the Look icon to examine everything in the room -- the first thing you'll probably notice is a giant rat. The rat is agitated, but it's not actively hostile (which means it won't leap to the attack). You'll also see some food and some armor.
If you want to, you can just try to take the items (probably starting with the armor). If the rat sees you take its food, it will get more angry, and since it is already upset, it will attack. If, however, you can grab the items while the rat is looking the other way, it won't notice, and you can saunter off with your newfound goods, none the worse for the experience.
However, in order to find out what combat is like in this game, you are about to attack the giant rat.
First, make sure you have your best weapon readied -- the one in the best condition and with which you have the highest level of skill -- then click on the Fight icon (the sword) on the left side of the screen. This readies your weapon. The tip of the weapon appears at the bottom of your view window.
(If your weapon does not come into view, and you see your fist instead, you may not have the weapon in your weapon hand. The large circles near your hands, on the inventory panel, are the only places from which you can use a weapon -- the circle to the left if your character is righ t-handed, and the right circle if your character is left-handed.)
Attacking. To attack, position the cursor over your target, then press and hold down the right mouse-button. This causes your weapon to disappear from the view window as you pull it back into the ready position. Releasing the button launches the blow. The location you're attacking is determined by where you start your attack -- where the cursor is when you first press the button -- not by where you release the mouse-button to unleash the attack.
Be sure to hold down the right mouse-button long enough for the power gem just left of the compass to begin glowing yellow or green -- otherwise, you haven't drawn your arm back yet, and the blow automatically fails.
You will quickly notice that you can make several different kinds of attack -positioning the cursor high in the view window causes a bash, starting the attack in the middle of the window causes a slash, a low cursor unleashes a thrust. Some attacks prove more effective against certain foes -- in this case, you're fighting a rat, and you want to swing middle and low (or look down and bash), as high swings go over the rat's head.
If the rat dodges, maneuver to keep it in view, using the left mouse-button as you would during normal movement. (You can move and attack simultaneously.) You might also want to look down (with
Doing Damage (and Taking It). If your attack is successful, you will see a splatter of blood -- the bigger the splatter, the more damage you did to your foe. (Not all enemies bleed, but giant rats do -- if your attack strikes home, you'll know it.) If you are lucky, or if your character is particularly skilled in attack or if you are skilled with the weapon you are using, you might even kill the rat with a single blow -- if so, you'll see a puddle of blood on the ground.
You will know if the rat injures you, because the view window rocks (as the attack knocks you back). If the attack seriously damages you, a sudden flash of red fills the entire window. To keep track of your health during combat, watch the red flask -- if its level falls too low, this may be a good time to run for it!
If you defeat the rat, check your character panel -- you will find that you've been given several experience points. When you have more, your character will grow in skills and attributes.
Collecting Booty. If you vanquish an enemy, his goods -- his weapon, armor and other treasures -- automatically fall to the ground, and you can claim them. Unfortunately, this rat has no treasure, but he does have his hoard: The cheese and the piece of meat are probably worth carrying until you need them. As for the leggings (armor for your legs), you should put them on.
To don the leggings (or any article of clothing or piece of armor), pick them up and release them over your character's legs on the inventory panel -- in addition to the inventory circles surrounding the picture of your character (which represent things your character holds), the picture itself includes inventory slots for items you wear on your head, torso, hands, legs and feet. Select the Get icon and then drag the leggings onto the picture's legs. When you release the mouse-button, the armor settles into place there -- your character is then wearing them.
And Should You Die .... If you die, you are resurrected where you planted the Silver Sapling seed. You can then try to defeat the rat again or continue exploring elsewhere.
CONVERSATION
Now that you've engaged in combat, try a little peaceful interaction. Use the red key on the west door and venture on. After you enter this room, turn to the left and collect the bedroll you see. This will help you sleep better. In addition to the bedroll, there's a person in the room. Look at him and you will find that he is friendly. Click on the Talk icon and then position the cursor over the man and press the right mouse-button to strike up a conversation.
The Conversation Screen. When you do this, a large conversation scroll appears in the middle of the screen. Below the large scroll is your message scroll. Above and to the left of the large scroll is a portrait of the man with whom you are speaking and, above that, the man's name -- Bragit. To the right of Bragit's portrait is his "barter area." To the right of that is your barter area and your character's portrait and name.
Selecting Responses. Bragit greets you with the words, "Hail, stranger! What be thy business? I have not seen thee in this place before." (His comments are printed in dark brown on the conversation scroll.) Below, on your message scroll, a menu of three possible responses appears:
1. I am merely exploring the Abyss.
2. I am attempting to rescue an innocent girl.
3. I was thrown in here as punishment for a crime I did not commit.
These are the things you can say to Bragit. The choice you make may determine how Bragit feels about you (friendly, angry, actively hostile, etc.) and what he says next, if anything. To select one of these responses, press the keyboard number of the option you want or move the yellow cross onto the option and click either button. Select the option you want now.
The response appears in light brown below Bragit's greeting, followed by his response to you. (The "[MORE]" at the end of his comment is a signal that he has more to say -- click either mouse-button or press any key to see the rest of his conversation. )
Notice that you now have new response options in the message scroll. Continue selecting response options and reading Bragit's text until he says, "Good luck in thy travels." This is the response he gives when he is ready to end the conversation and go about his business. (Other people and creatures will have different closing lines... )
To leave conversation and return to the main game screen, click either mouse-button or any key.
CONTINUING TO PLAY
These pages have provided enough tips to get you started in the underworld. At some point, you should read the Advanced Playing Tips for more information about the game.
Now you can venture forth on your own, using your native wits and sharp sword to cleave a route through the Abyss. Remember, there are plenty of locked doors to unlock and a secret door somewhere in the Silver Sapling room, and the man you talked with told you things you may want to investigate.
As you play, don't feel like you have to explore levels or solve puzzles and quests in any predetermined order. If a puzzle or quest has you stumped (or you just want to move on to a new level), go ahead -- ULTIMA Underworld is a nonlinear game. You can move freely from level to level, solve puzzles in any order you want and finish quests whenever you feel you're ready.
Now, if you want to stop playing, exit the game by selecting the Options icon, and then choosing the "Quit Game" option. Before doing this, however, save your game (see page 17) -- otherwise, your progress to this point will be lost.
ADVANCED PLAYING TIPS
DEFAULT MODE
In the tutorial above, you used the command icons to control the function of the right mouse-button and interact with the world. However, experienced players can perform almost all of the functions while in Default Mode -- that is, with no icons selected. Any time none of the icons is highlighted, you are in default mode. (To "un-select" a highlighted icon, click on it.) In default mode, you can:
Look. To Look at a creature or object (whether in the view window or in your inventory), right-click on the thing you want to examine. In default mode, you can tell what an object is, but no more. To search something carefully, you must click on the Look icon to enter Look mode.
Get. To Get an object you see in the view window, put the cursor on the object, press and hold the right mouse-button and drag the object wherever you want. The game detects whether an object is "get-able." If the object is one you can't get, right-dragging will generally try to Use it. If it is "get-able," it will be put in-hand, and you can throw it, drop it or move it into your inventory (simply release the right button). In default mode the cursor is always arrow-shaped, so if you need to Get a small item it may be more convenient to enter Get mode (which gives you a cross-shaped cursor).
Use To Use an object in your inventory, left-click it. To use an object in the view e.window, position the cursor on the object and right-drag it. If the object is "usable," you automatically Use it, as you would if you had clicked the Use icon. Note, however, that in default mode, the Get command takes a higher priority than the Use command, so you can only Use objects you can't Get (doors or levers, for instance). To Use a "get-able" object, click the Use icon and then the object.
Talk. To Talk to a person or creature, position the cursor on the person or creature and briefly right-drag the mouse. The game detects whether the person or creature is interested in conversation. If so, the conversation screen appears (as described in the tutorial above) and you proceed normally. If the person or creature isn't interested in conversation, you are informed of that fact and can proceed as you wish.
Fight. To toggle in or out of Fight mode, simply click on the weapon in your weapon-hand.
THE OPTIONS ICON
Default mode allows you to do almost everything you will ever need to do within the game. However, to access the save or restore game features, toggle sound and music on or off, increase or decrease the level of graphic detail, or quit the game, you must use the Options icon. (For a list of the keyboard equivalents of these options, consult your Reference Card).
When you click the Options icon, boxes appear on the left side of your screen, replacing the icons usually found there. Text in the boxes describes what each box does. To select an option, click on the appropriate box.
Save Game. Whenever you consider doing something you might regret later, it is a good idea to save your game. "Saving the game" is like placing a bookmark in something that you are reading, except that in this case it causes the game to store your current position and status. Once this has been saved, you can always go back and start again from the position you saved.
If for example, you're about to begin combat and there is a possibility your foe will kill you, save the game and you can always start over from the point at which you chose to fight. Then you can fight him again, hoping for a better outcome, or this time make the decision to leave him alone!
To save your game, click with either mouse-button on the Options icon (the uppermost icon). Click on the "Save Game" box, and new options will appear in boxes: I, II, III or IV. Each of these is a possible save-game, or bookmark, from which you can resume playing the game. The message scroll provides a description of each of the save-games. (The description for an unused saved game slot reads "<not used yet>."
It makes no difference which save-game you select. Click on any empty box (or a box representing a saved game you don't mind replacing). Now the game asks you to type a description of this save-game. You want to enter something that will remind you where this bookmark is, and you can write as much as there is room for in the message scroll. When you are done, click either mouse-button (or press [ENTER], and your game is saved.
Note that you can't save a game when you have an item "in-hand," or you're in the middle of some action (casting a spell, for example).
Restore Game. During the course of play, your character may die or you may do something you wish you hadn't. You may just want to pick up where you left off in an earlier play session. This can be accomplished by restoring the game to a point at which you saved it.
Do this by clicking the "Restore Game" box, then the roman numeral which matches the save-game you wish to restore. When the game is ready, a notice appears on the message scroll, and you can resume play.
You can also restore a game from the main menu by selecting "Journey Onward" and then clicking on the name of the saved game you wish to play.
Music. This toggles music on and off, but has no effect unless you installed the game with music and sound effects.
Sound. This toggles sound on and off, but also has no effect unless you installed the game with music and sound effects.
Detail. The level of graphic detail in ULTIMA Underworld has a direct effect on game speed. If your game seems to be running too slowly, click on the Options icon and then on the Detail box. The default detail level is "Very High." To speed up game play, decrease that to "High," "Medium" or "Low." The game won't look quite as good, but it will run more smoothly, and faster. Experiment with this option until you achieve a pleasing balance of speed and graphic appeal.
Return to Game. When you click on the Options icon, the game pauses (combat stops, creatures freeze, time stops). When you want to exit the Options menu and restart the game, click on this box.
Quit Game. This returns you to DOS. Be sure to save your game before you do this, or anything you accomplished after your last save will be lost.
YOUR CHARACTER
To the right of the view window is your Character Panel. Generally, this displays a picture of your character surrounded by small circles. Each circle is a place you can store or carry an object.
Encumbrance. At the right center of the panel, look for the gray circle with glowing yellow numbers -- this number represents how much more weight (in stones) your character can carry. This weight-limit number (in the gray circle) changes when you pick up an object, to reflect the fact that you now are carrying something.
The more you carry, the slower you move. Encumbrance also affects how far you can jump, and how long you can swim before you begin to drown.
If the weight-limit number ever reaches zero, then you are carrying your maximum load, and must drop something before picking up something new.
The Statistics Panel. Note the chain hanging from the bottom of the panel. Move the cursor to the chain, then click either mouse-button. This causes the character panel to flip over (or to flip back, when you click again). The side of the character panel which you are now viewing lists your character's stats: his or her name, class and level ("lst" for beginning characters, and higher numbers for more experienced adventurers), and other measurements which you previously saw when creating your character.
To become a more powerful character in the game -- and thus, more capable in combat or with magic, for instance -- you must accumulate EXP (experience points). These points are scored for exploring the Abyss, for slaying creatures which oppose you, and for accomplishing other noble tasks. When you start, your EXP score is very low, but this will change as you play.
Two other important measurements are your VIT (Vitality) and MANA. (Mana is like health, except that it is a measure of your magical energy. When you are out of Mana points, you can't cast spells.)
Both Vitality and Mana are represented by two numbers -- the first is your current score, and the second is your maximum score at the present time. These scores will be different for every character, but if your Vitality score is 34 / 34, this means that you have 34 points out of 34 possible (in other words, you are in perfect health).
Attributes. The three primary measurements on every character panel are ST (your strength), DX (your dexterity or quickness), and INT (how smart your character is). The maximum score for any attribute is 30, and the minimum (for player characters) is 12.
Each character class (fighter, mage, etc.) has its own level for each attribute. For example, the scores for a fighter are a high Strength, medium Dexterity and low Intelligence. In addition, each character class has its own advantages and disadvantages. Try creating characters of various classes to determine which combination of attributes and skills suits you.
Skills. Each class comes with its own required skills (which you receive automatically), and most also have optional skills (from which you may select a limited number).
YOUR CHARACTER'S CONDITION
As you explore the underworld, you will grow hungry and tired. To learn your character's condition, get a status report. To do this, move the cursor until it is over the compass below the view window, and then click the right mousebutton. Your character's status appears on the message scroll.
At the start of the game, the message reads something like this:
"You are currently well-fed and wide awake.
You are on the first level of the Abyss.
It is the first day of your imprisonment.
You guess that it is currently early evening."
Being "well fed" means that you are not hungry; therefore, you don't need to eat anything right away. The second sentence clues you in to your location -the Abyss is divided into levels in much the same way a building is divided into stories. The first level is the uppermost portion of the Abyss. The last sentences give you an idea of what time it is -- your first day, early evening.
Eating and Sleeping. If the message tells you your character is hungry or tired, you should consider sleeping or eating. When you sleep, you regain lost Vitality and Mana points. However, if you sleep on an empty stomach, your rest will be uneasy and you will recover fewer points. Therefore, it is wise to check your condition before sleeping -- and if you are hungry, eat something (Use a piece of food in your inventory, or simply drag it over to your character's mouth on the character panel and release the mouse-button). You will also sleep poorly if too close to the lairs of beasts, and they might surprise you in your sleep.
To sleep, press [F10] or better yet, Use a bedroll (your sleep will be more restful). Extinguish light sources when you go to sleep. Otherwise, they may burn out and be useless to you when you awaken. Remember that spells fade after a time and may have to be re-cast when you wake up.
The Vitality and Mana Flasks. To determine your current Vitality and Mana, check the score on your stat panel or click on the flasks on the right, below the character panel portion of the screen. One flask holds a red fluid -- the amount of fluid in the flask represents the fraction of Vitality which you possess. At the start of the game, the red flask is full; if you fight a battle and lose half your Vitality points, the red flask will then show half-full. The flask with blue liquid serves the same purpose, except that it is a measure of how much Mana you have. Clicking on either flask will cause the message scroll to display the exact number of points you have remaining.
The flasks are important for another reason -- if you are poisoned, the red Vitality flask changes from red to bright green. This might happen if you eat something bad for you, are struck by a poisoned weapon, drink a poison potion, receive a bite from a diseased animal, etc. Being poisoned gradually saps your vitality, so you want to take care of it quickly. One solution is to find an antidote potion, but the resourceful adventurer can find other solutions.
IMPROVING YOUR CHARACTER
You are not limited to the abilities with which you start the game -- they may improve as you advance further into the Abyss. All of this is controlled by Experience Points. You gain points for exploring the Abyss, slaying hostile creatures and performing heroic deeds. Points can be taken from you for lessthan-heroic actions.
Gaining Levels. The most obvious way in which your character progresses is through gaining levels. At the start of the game, you are a first-level character. As you gain experience, however, you will rise to second level, third level and beyond (to a maximum of 16th level).
As a higher-level character, you become harder to kill (your Vitality rises) and you qualify to cast more powerful spells. Increases in character level are automatic with sufficient increase in experience points. Notice of the level increase appears on the message scroll.
Improving Skills. Another way in which you progress is through raising your skill scores. Such increases only come as the result of study and deep reflection, and so you must visit an ankh shrine and recite the proper Mantra. Ankh shrines are located throughout the Abyss.
Reciting a Mantra is not enough to receive the skill bonus -- you must first qualify for it by having accumulated enough experience points. You always qualify for a skill bonus after you gain a new character level, but you can sometimes receive skill bonuses between level increases.
Whenever you come upon a shrine, Talk to it. The words "Chant the Mantra:" appear in the message scroll. Type in a Mantra followed by [ENTER]If you are not yet ready for a skill increase, the shrine will respond by saying "You are not ready to advance." If you are ready for an increase, the shrine tells you which of your skills improves.
The amount and nature of the skill increase is determined by the Mantra you choose to recite. Three Mantras are commonly known:
Summ Ra Improves some of your
attack skills.
Mu Ahm Improves some of your magic skills.
Om
Cah Improves some of your other skills.
Speak one of these Mantras and you increase in a few of the skills affected by that Mantra. However, as you explore the dungeon, you will learn Mantras that apply not to categories of skills, but to specific skills. Chant one of these Mantras and you will improve dramatically in the skill affected by the Mantra.
MOVEMENT
Jumping. You climb stairs and mount objects up to two feet tall by walking onto them. To climb onto an object higher than that, you must jump (or fly).
To jump, click the right mouse-button while the left mouse-button is down. If you press both mouse-buttons simultaneously, you will jump in place. To jump across a chasm or over an obstacle, make sure you get a running start. Press the left mouse-button and move the cursor to the upper edge of the view window. When you've built up speed (and you've reached the lip of the chasm), press the right button and you'll leap forward. How far you jump is determined by your forward momentum when you click the right mouse-button.
As a player convenience, the game will not let you walk off a precipice if you are moving slowly -- so if you really mean to jump off a cliff, move swiftly to the edge. Note that you can't jump while in Fight mode.
Swimming. When you walk (or fall) into water you begin to swim. In ULTIMA Underworld, swimming is just like walking. However, you can't jump or attack while swimming. To leave the water, you must find a bank that is no higher than two feet above the water level. When you reach such a bank, you can automatically begin walking (or running) normally.
All characters can swim, but only for a limited time (the actual amount of time is determined by your character's swimming skill and encumbrance level). As your character tires, the screen blinks blue as you sink and begin to drown. Your Vitality level will begin to drop; when it reaches zero, your character dies.
If you drop an item into the water or onto lava, it will probably sink out of sight and, since you can't swim underwater, you won't be able to retrieve it.
Flying. In addition to walking, running, jumping and swimming, you may learn to fly, either by casting the Fly spell or by using a magic item that gives you this ability. The direction of movement is determined by the position of the mouse in the view window (or the standard keyboard movement keys). Movement up and down requires the use of the keyboard. To move up, press until you reach the desired altitude. To move down or land, press
Lava and Movement. The Abyss is a volcano and sooner or later you will find lava flows. Generally, it is best to leap across molten lava if you want to cross it. You can walk on lava, but you take damage while doing so.
INVENTORY
Finger Slots. Notice the two small inventory circles near your character's hands. These are the finger inventory slots. One ring can be readied in each of these positions. In general, magical rings are only effective when worn (i.e., when they are readied in a finger slot).
The Four Upper Circles. Of the four upper circles, only the one near your primary hand can be used for your weapon. Only the one near your "off" hand can be used for a shield. The other two, your "shoulder" slots, are good places to put torches, your map or other items you want to carry around while keeping a weapon ready.
If one of the top four circles is empty and a torch is in one of the lower circles, clicking to Use the torch automatically lights it and moves it to an upper slot.
Combining Objects. In general, it is not possible to combine objects of different types. However, it is sometimes possible to make a new object by dragging an object in-hand on top of an object in your inventory. (For instance, you can drag a torch over an ear of corn to make popcorn.)
Bags and Packs. Keep the bags and packs you find, since you can use them to keep your goods organized. A typical adventurer might carry five or more bags -- a food bag, a bag of keys, a bag of items to barter with, a bag of torches and candles, and a rune bag. You can also place bags inside of other bags. To take an item out of your bag but keep it in your inventory, drag it to the symbol of the opened bag. (Note that you can't take rune stones out of your rune bag).
COMBAT
The Elements of An Attack. Every time you attack, you must make three choices: Where to aim, the type of attack and the strength of the attack.
To aim, place the cursor on the creature or object you wish to attack. It is not necessary to pin-point a specific part of your foe -- just pointing at the middle of his body is generally good enough for the purposes of this game. (But you wouldn't want to accidentally strike a door or a chest, instead of your enemy.)
Only one type of unarmed attack exists -- the jab. Similarly, there is only one form of attack for each missile weapon (bow, sling, etc.). Other weapons -swords, daggers, maces and so on -- can be used in a variety of ways. You determine the type of attack you make by where the cursor is located when you first press the right mouse-button.
If you start in the top third of the screen, your attack will be a bash from overhead. Pressing in the middle third of the screen will begin a sideways slash, and pressing while in the bottom third will cause a thrust. The three forms of attack inflict different amounts of damage, depending on the weapon used.
The power gem on the screen, just below the icons to the left of the view window, indicates the strength of your attack. When you press the right mousebutton to begin an attack, the gem gradually turns red, then yellow and finally green. The longer you prepare an attack, the more damage it does if it hits its target. If the gem is still red when you launch your attack, the attack is aborted. A yellow gem indicates a quick, low-strength attack. When the gem is green and sparkling, your attack is at maximum strength.
Your Foe's Condition. This is indicated by the gargoyle at the top of the view window. When you hit a creature in combat, glance at the gargoyle's eyes. If they glow green, your opponent is still in good shape. If they glow yellow, he is injured and if the eyes glow red, you've injured him badly.
Using Missile Weapons. Bows and similar weapons work differently than other weapons. Ready a missile weapon by placing it in your hand on the inventory panel, making sure you have the appropriate type of ammunition in your inventory. If you don't have the right type of projectile for the weapon, you can't attack. (Bows use arrows, crossbows use bolts, and slings use bullets.)
Press the right mouse-button to initiate an attack (screen location doesn't matter), then wait for the power gem to glow green. When it is green, your missile weapon is ready to shoot -- unlike other attacks, there is no bonus for delaying your shot further. A red, circular cursor appears. Move the cursor to your target, and release the mouse-button to unleash the attack. (Remember you have to lead a moving target... )
Some projectiles are destroyed on impact. You may be able to recover others after combat.
Attacking Inanimate Objects. In general, inanimate objects are not worth attacking -- you can't do much damage to stone walls. However, some objects can be affected by repeated attack -- you can bash open locked chests and batter down locked doors, for example. This is time consuming and may damage (or destroy) your weapon, but if you lack a crucial key or don't feel like taking the time to find one, it may be worth your while.
WEAPONS 8 ARMOR
To make the most of combat, you must understand the benefits and drawbacks of the various weapons and armor-types found in the Abyss. You should also pay attention to the condition of your equipment.
Weapon Types. There are four classes of weapons. Larger weapons usually do more damage, but take longer to ready between blows than smaller weapons.
Swords include daggers, shortswords, longswords and broadswords. Daggers can be readied swiftly, but inflict only light damage. Daggers are best used as thrusting weapons, while swords excel at slashing.
Axes include hand axes, pole axes and battle axes. Axes do more damage than swords, but take longer to ready. They are slashing weapons -- only the pole axe is effective when thrusting, and no axe can bash very well. The battle axe is the most damaging weapon in the game (excluding enchanted or special weapons).
Maces include cudgels, light maces and maces. All maces are best used as bashing weapons.
Missile Weapons include slings, bows and crossbows. Missile weapons allow you to attack most creatures before they can attack you. The problem is that each shot requires ammunition, and it can be hard to find arrows (for bows) or bolts (for crossbows). Slings fire projectiles which are slow, easy to dodge and which don't do much damage...but sling bullets are easy to find. (You can always make more by breaking a boulder.)
Armor. There are three types of armor: leather (the least protection), chain and plate. As you find various pieces of armor, your character might soon be wearing protection of many kinds (leather leggings, a chain shirt and a plate helm, perhaps).
Armor degrades in quality as it suffers damage through combat, and eventually is destroyed (unless a talented smith can be found or you repair it yourself, using an anvil). Also, note that armor provides less protection as it deteriorates. Keep armor in good repair whenever possible.
Armor is also heavy -- a complete set of plate armor may be too heavy for you to wear, especially if you want to carry anything else with you!
Shields. These are only effective when carried in the hand opposite your weapon hand -- if your character is right-handed, the shield must go in the inventory circle nearest his or her left hand. From least to most protective, the shields are: buckler, small shield, wooden shield and tower shield.
CONVERSATION
Many of the people and creatures you meet in the Abyss have tales to tell. Listening to them and helping them with their problems is an important part of the game.
Unless a person or creature seems obviously hostile, it is always in your best interest to try to engage him, her or it in conversation -- attacking everything in sight will lead to failure in your mission and, in many cases, quick death.
You can talk to most of the humanoid inhabitants and may hold conversations with certain creatures in the dungeon. In general, you cannot speak to someone who is fighting you, but there are exceptions.
Characters often remember and react to how you treat them in a conversation. Intimidation may work on some, but may anger others. An angry creature may attack you.
In some conversations, you will see the response "Other," "What about..." or something similar. If so, you can type in a name, word or phrase.
Bartering
Many inhabitants of the underworld have equipment and food they are willing to part with in exchange for things they need -- bartering is an important skill, one you will want to hone as you explore the depths.
Barter Areas. Sometimes in a conversation a character may ask to see items or you may want to show items. This is what the barter areas are for. The barter areas -- the tables upon which traders display their wares -- look just like normal inventory slots. If you want a potential trading partner to see an item you wish to trade, you must put it in one of the circles in your barter area.
Placing an item in the barter area automatically lights the dot next to the item. A lit dot indicates an item that is available for trade. Clicking on the item toggles the lit dot off, removing the item from consideration in a trade. No character can see what another has in his or her inventory. Put an item or items in your barter area and your trading partner will see it.
Procedure. Either you or the person you are talking to may initiate a barter sessi on. When this occurs a number of items that the character is offering to trade will appear in his barter area. You may move any items you wish to trade into your barter area. Then, click on the items in the character's barter area that interest you to light their dots, and do the same for the items you are offering to trade for them in your barter area. You can then offer this deal to the character by clicking on a menu line that says something like "I offer you this trade."
If the character accepts your deal, the items you offered will disappear into his inventory, along with any items of his you did not bargain for. You may move the items you traded for from his barter area into your inventory. If he declines, you may change the highlighted items in either barter area and try again.
Giving and Showing. The same procedure is used to give or show items. For example, you may want to offer someone a gift. To do this, you must have a highlighted item in your barter area. When you click on a menu line like "I wish to give you this gift," the character may take the item from your barter area. When a character decides to give you something, the cursor will become that item. You should place it into your inventory.
Appraisal. Some characters in the dungeon are patient with bartering. Others lose interest quickly and may tire of it after a few unsuccessful offers. Some may require more profit for themselves before accepting a deal. Characters also may have different ideas about the values of items than you do. To avoid making bad offers, or getting a really bad deal, you may wish to evaluate the relative values of the items being offered. To do this, click on a line that says something like "I must think about this deal." A line evaluating the deal will appear in the big scroll. For instance, you may see the words, "You think you are getting a good deal." The accuracy of the evaluation depends upon your appraise skill.
Demands. One final option in bartering is to simply demand items from the other character. Once the character has agreed to barter and you can see what he is carrying, you may demand that he give you certain items, by selecting the appropriate option in your message scroll. This is a very hostile act. Even if the character agrees to give you the items, his attitude towards you will worsen. If he thinks he is stronger than you, he will refuse, and he will attack you. You must be very careful of whom you demand things.
Repairing Items
Some characters in the Abyss may offer to repair items as part of their conversation. To have an item fixed, place the broken item in your barter area before you select the conversation option requesting the repair.
You can also try to repair damaged weapons or armor yourself, but you must first find an anvil. Success depends upon your repair skill level -- it is possible to ruin something by attempting to repair it! Repairs also take time, and the noise attracts attention. To repair an item, you use the anvil as you would any item. Your cursor tums into a small anvil, which you then must click on the item you wish to repair. A message appears in the message scroll telling you how difficult the repair will be and asking if you want to continue. Select the "Yes" option and you attempt to repair the item.
Ending Conversations
To end a conversation or bartering session, you must say "farewell" (or the equivalent) by selecting it from your conversation options. Any items left in your barter area or in the character barter area that belong to you at the end of a conversation appear on the floor in front of you.
MAGIC
Successful Spellcasting. In order to have any chance to cast a spell successfully, your character must be of high enough level and you must have sufficient Mana.
Required Mana. The cost of a spell, in Mana points, is equal to triple the level of the spell -- for example, a spell of the First Circle costs 3 Mana points to cast. Your character's current Mana level is the first of the two numbers which follows "Mana" on the character panel. lf you currently have at least 3 Mana points, you can cast a spell.
Your Level and Spellcasting. To cast a spell, your character level, halved and rounded up, must equal or exceed the Circle of the spell. If you successfully cast a spell, your level comes into play again -- before you can cast another spell, you may have to wait an amount of time determined by your level and the level of the spell cast.
Unsuccessful Spellcasting. Whenever you cast a spell, there is a chance you will fail. The higher your character's casting skill level, the less likely this is. In general, a failed attempt to cast a spell has no effect. You don't use up Mana points -you just waste some time. However, a failed spellcasting attempt may backfire (especially if your casting level is low). A backfire damages the caster.
SPELL TYPES
Spells come in three varieties. Some spells are instantaneous, taking effect as soon as they are cast. Many spells last for a period of time after they are cast -for instance, the duration of a Light spell is several minutes. Still other spells must be targeted -- directed at a specific point. These last two spell-types require a bit of explanation:
Duration Spells. When you cast a duration spell, its symbol appears to the left of the compass. It is impossible to maintain more than three duration spells at the same time. If you want to cast a fourth duration spell, you must dispel one of the existing spells (by left-clicking its duration symbol). Right-clicking on the symbol of a duration spell causes the message scroll to display the name of the spell, and whether the spell will continue much longer ("stable" means time remains, "unstable" means the spell will expire shortly).
If you expect to use magic in a battle, ready a useful spell prior to combat, not during it. Remember that you can leave a spell on the rune shelf, to be used at any time. Bear in mind that powerful spells (such as Flame Wind), may destroy valuable artifacts near the spell's target.
Targeted Spells. Several of the spells in the game must be targeted like missile weapons. When you cast a targeted spell by right-clicking on the rune shelf, your cursor changes to a targeting cursor. For combat spells (e.g., Fireball), the targeting cursor is a red circle. For non-combat spells (e.g., Strengthen Door), the cursor is a blue cross. Position the cursor on the target and press the right mouse-button to let the spell fly. These spells do not require Mana until they are released. And it may not be possible to release the spell if there is an object directly in front of you.
Area Spells. In addition to the spell-types described above, be aware that some spells affect individuals (your character or another creature) while others may affect entire areas.
Before casting an area effect spell, make sure there is some open space in front of your character -- obstacles close by can interfere with the casting.
Some area effect spells affect all creatures and/or objects in an area; some affect just one creature and/or object; still others will affect an unpredictable number of creatures and/or objects. Experiment with area effect spells to learn which ones have which effect.
Enchanted Items. As you explore the dungeon you will find powerful magic items. These give the user amazing magical abilities, unrestricted by level or amount of Mana.
Some enchanted items (crowns and rings, for example) are meant to be worn. These take effect as soon as you put them on. Other magic items take effect only when they are Used.
For example, when you put on a Ring of Invisibility the effect lasts as long you wear the ring. However, to cast a spell inscribed on a magical scroll, you must Use the scroll.
Note that enchanted items don't look any different than ordinary ones. If your lore skill is high enough, you may be able to determine an item's magical function when you Look at it. If you suspect an item is enchanted, but don't learn much the first time you Look at it, try again when your lore skill goes up.
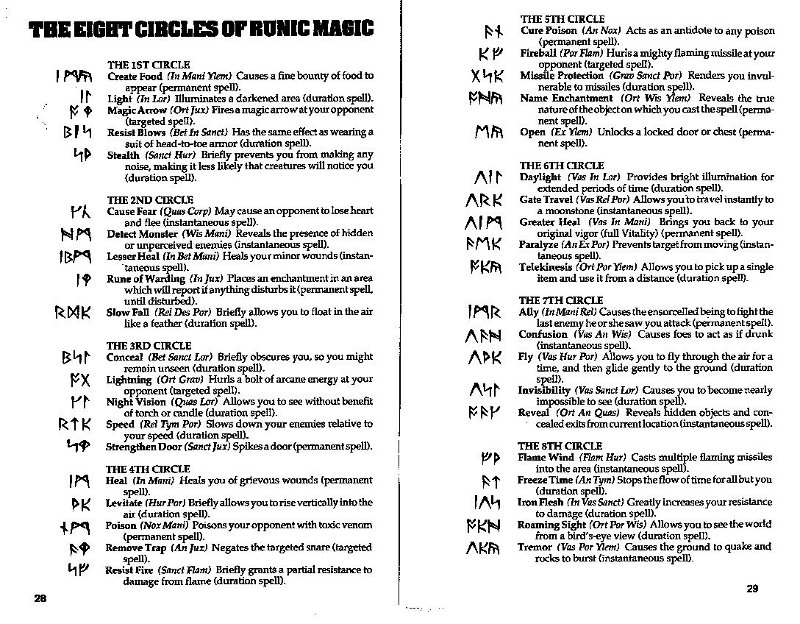
THE EIGHT CIRCLES OF RUNIC MAGIC
THE 1ST CIRCLE
Create Food (In Mani Yfern) Causes a fine bounty of food to
appear (permanent spell).
Light
(In
Lor) Illuminates a darkened area (duration spell).
Magic
Arrow (Ort
Ju;c) Fires a magic arrow at your opponent
(targeted spell).
Resist Blows (Bet In Sanct) Has the same effect as wearing a
suit of head-to-toe armor (duration spell).
Stealth (Sanct Hur) Briefly prevents you from making any noise, making it less likely that creatures will notice you (duration spell).
THE 2ND CIRCLE
Cause Fear (Quas Corp) May cause an opponent to lose heart
and flee (instantaneous spell).
Detect Monster (Wis Mani) Reveals the presence of hidden
or unperceived enemies (instantaneous spell).
Lesser Heal (In Bet Mani) Heals your minor wounds (instan-
taneous spell).
Rune of Warding (In Jux) Places an enchantment in an area which will report if anything disturbs it (permanent spell, until disturbed).
Slow Fall (Rel Des Por) Briefly allows you to float in the air
like a feather (duration spell).
THE 3RD CIRCLE
Conceal (Bet Sanct Lor) Briefly obscures you, so you might
remain unseen (duration spell).
Lightning (Ort Grav) Hurls a bolt of arcane energy at your
opponent (targeted spell).
Night Vision (Quas Lor) Allows you to see without benefit
of torch or candle (duration spell).
Speed (Rel Tym Por) Slows down your enemies relative to
your speed (duration spell).
Strengthen Door (Sanct Jux) Spikes a door (permanent spell).
THE 4TH CIRCLE
Heal (In Mani) Heals you of grievous wounds (permanent
spell).
Levirate (Hu r Por) Briefly allows you to rise vertically into the
air (duration spell).
Poison (Nox Mani) Poisons your opponent with toxic venom
(permanent spell).
Remove Trap (An Jux) Negates the targeted snare (targeted
spell).
Resist Fire (Sanct Flam) Briefly grants a partial resistance to
damage from flame (duration spell).
THE 5TH CIRCLE
Cure Poison (An Nox) Acts as an antidote to any poison
(permanent spell).
Fireball (Por Flam) Hurls a mighty flaming missile at your
opponent (targeted spell).
Missile Protection (Grav Sanct Por) Renders you invul-
nerable to missiles (duration spell).
Name Enchantment (Ort Wis Ylem) Reveals the true nature of the object on which you cast the spell (perma-
nent spell).
Open (Ex Ylem) Unlocks a locked door or chest (permanent spell).
THE 6TH CIRCLE
Daylight (Vas In Lor) Provides bright illumination for
extended periods of time (duration spell).
Gate Travel (Vas Rel Por) Allows you to travel instantly to a moonstone (instantaneous spell).
Greater Heal (Vas In Mani) Brings you back to your
original vigor (full Vitality) (permanent spell).
Paralyze (An Ex Por) Prevents target from moving (instan-
taneous spell).
Telekinesis (Ort Por Ylem) Allows you to pick up a single
item and use it from a distance (duration spell).
THE 7TH CIRCLE
Ally (In Mani Rel) Causes the ensorcelled being to fight the
last enemy he or she saw you attack (permanent spell).
Confusion (Vas An Wis) Causes foes to act as if drunk
(instantaneous spell).
Fly (Vas Hur Por) Allows you to fly through the air for a time, and then glide gently to the ground (duration spell).
Invisibility (Vas Sanct Lor) Causes you to become nearly
impossible to see (duration spell).
Reveal (Ort An Quas) Reveals hidden objects and concealed exits from current location (instantaneous spell).
THE 8TH CIRCLE
Flame Wind (Flam Hur) Casts multiple flaming missiles
into the area (instantaneous spell).
Freeze Time (An Tym) Stops the flow of time for all but you
(duration spell).
Iron Flesh (In Vas Sanct) Greatly increases your resistance
to damage (duration spell).
Roaming Sight (Ort Por Wis) Allows you to see the world
from a bird's-eye view (duration spell).
Tremor (Vas Por Ylem) Causes the ground to quake and
rocks to burst (instantaneous spell).
SKILL LIST
Acrobat (DX) The ability to move with grace. This skill reduces damage taken from falls and collisions.
Appraise (DX) Training in perceiving the value of goods. This skill aids you in correctly evaluating a deal offered you in barter. Attack (ST) Your general fighting ability. This skill provides a bonus to your chance to hit when attacking.
Axe (ST) Training in the use of axes. This skill increases your ability to defend against attack and provides a bonus to hit when attacking with any form of axe.
Casting (INT) The study of spells. This skill improves the likelihood of a spell being successfully cast.
Charm (DX) Knack of making friends. This skill increases your chances of obtaining a good deal when bartering.
Defense (ST) Your ability to defend yourself in combat. This skill provides a penalty to foes who are trying to strike you.
Lore (INT) The ability to correctly identify an item. This skill improves the accuracy of the information gained by Looking at an object.
Mace (ST) Training in the use of blunt weapons. This skill increases your defense against attacks, and gives a bonus to hit when using a mace or cudgel.
Mana (INT) Your ability to manipulate magical energy. This skill increases your maximum number of Mana points.
Missile (ST) Training in the use of missile weapons. This skill increases the
damage you inflict in attacks using bows, crossbows, and slings.
Picklock (DX) The ability to use lock-picking tools. This skill increases your chances of using a lockpick to open a locked door or chest.
Repair (DX) The ability to fix weapons and armor. This skill increases your chance of using an anvil to repair items successfully.
Search (DX) Training which heightens your perceptions. This skill increases your chance of detecting hidden doors and traps. This skill is applied automatically whenever you Look at something.
Sneak (DX) The ability to move quietly. This skill automatically reduces the noise you make, making it less likely that creatures will notice you.
Swimming (DX) Training in endurance swimming. This skill postpones drowning.
Sword (ST) Training in swordsmanship. This skill increases your chance of defending against attack and provides a bonus to your chance to hit when striking with swords and daggers.
Track (DX) The ability to perceive animal tracks. This skill tells you when creatures are near.
Traps (DX) The ability to disable a trap. This skill disarms traps you find.
Unarmed (ST) Training in unarmed combat. This skill provides a bonus both to your chance to hit and to damage when attacking with only your fist.
Ultima and Lord British are registered trademarks of Richard Garriott. Underworld, The Stygian
Abyss, Avatar and the distinctive ORIGIN logo are trademarks of ORIGIN Systems, Inc.
We Create Worlds is a registered trademark of ORIGIN Systems, Inc.
Player's Guide by Boba Fet
1992 ORIGIN Systems, Inc. All Rights Reserved.